Navigating the Workflow Interface
The Workflow interface in HuLoop is divided into four main tabs, each designed to help you manage different aspects of your workflows efficiently.
- Task: When you click Workflow from the HuLoop homepage, you are taken directly to the Task tab by default. This tab shows all the workflows assigned to you. You can view tasks that require your action, track deadlines, and update statuses.

- Instances: The Instances page helps users and admins to view, track, and manage workflow instances.

For Regular Users:
- Displays only workflows they have created, own, or execute or are authorized to manage through the Start Group.
- Start Group members can view and manage all workflow instances associated with workflows assigned to their group, regardless of who initiated the instance.
- Authorized users with workflow execution access can start, pause, resume, and stop workflow instances directly from the Instances tab.
- Defaults to showing only Running instances.
- Can be filtered by:
- All
- Running
- Paused
- Completed
- Stopped
- Failed
For Admins:
- Displays all running instances across the system.
- Includes the same filtering options.
- Allows centralized monitoring of workflow status across users and teams.
This page improves visibility and streamlines instance tracking and management, especially in large organizations.
Viewing Instances from the Templates Tab: Users can also view, track, and manage workflow instances from the Workflows tab by clicking a specific template name (e.g., Loan Approval Workflow). This opens the Template Overview and Instances page.

Key Features of This Page:
- Template Details Panel: Shows metadata like name, creator, last update date, status, and permissions.
- Instances List: Shows running and completed instances of the selected workflow.
- Filtering Options:
- All
- Running
- Completed
- Stopped
- Search Bar: Appears if more than 8 items are listed.
- Start Instance Button: Executes latest published instance. Visible only to users with permission to execute the workflow.
- Edit and Disable Buttons: Visible to owners, creators, or admins when permitted.
- Pagination: Shown if more than one page of results is available.
You can view past executions and use this overview to assess workflow performance or troubleshoot failures.
Viewing Workflow Instance Details:
Clicking the name of any workflow instance on the Instances tab opens a detailed view of that instance.
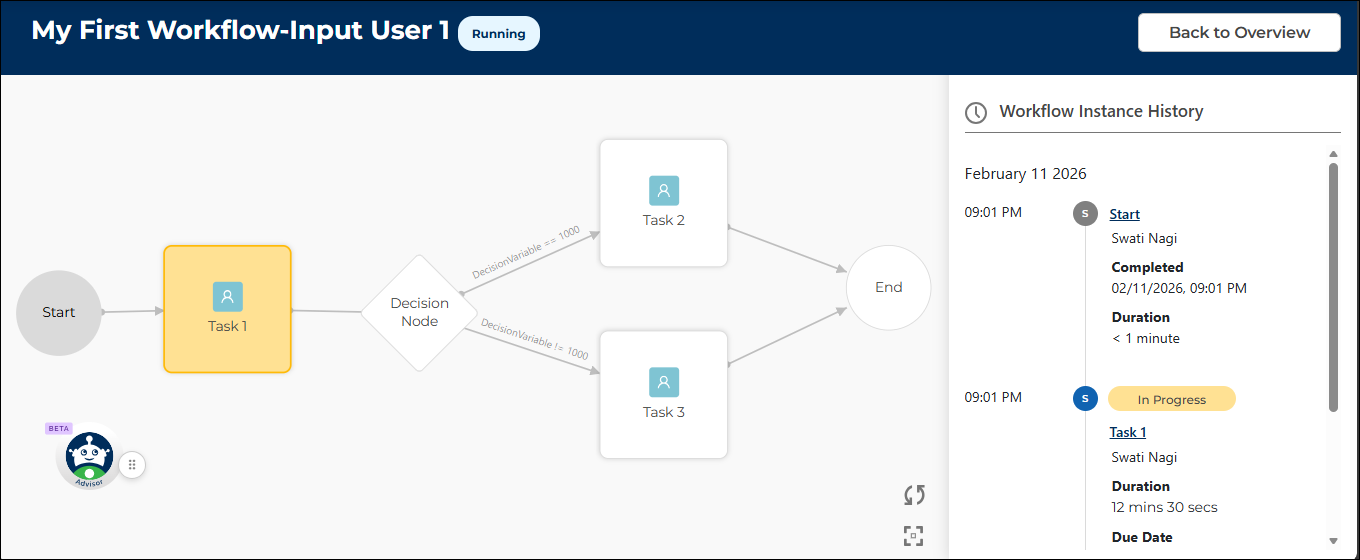
This view allows you to:
- Track instance status such as Running, Completed, or Stopped.
- View step-by-step task history in the right pane, including:
- Task name
- Status (Open, In Progress, Completed, or Stopped)
- Timestamp and duration to complete each task
- Understand workflow progression visually:
- Grey: Completed tasks
- Yellow: In-progress tasks
- White: Not yet started
- Red: Overdue tasks
- Open task forms (if available) by double-clicking on any task name in the Workflow Instance History pane to see the submitted data.
Authorized Start Group members can also manage the instance from this view, including pausing, resuming, or stopping the workflow.
Double-click a task name in the Workflow Instance History pane to view the data submitted through its form. This is helpful for reviewing previous input or verifying task history.
Stopping and Starting Workflow Instances:
If the instance is currently running, you’ll see a Stop Instance button at the bottom of the history pane.
- Clicking it prompts a confirmation asking for a reason for termination.
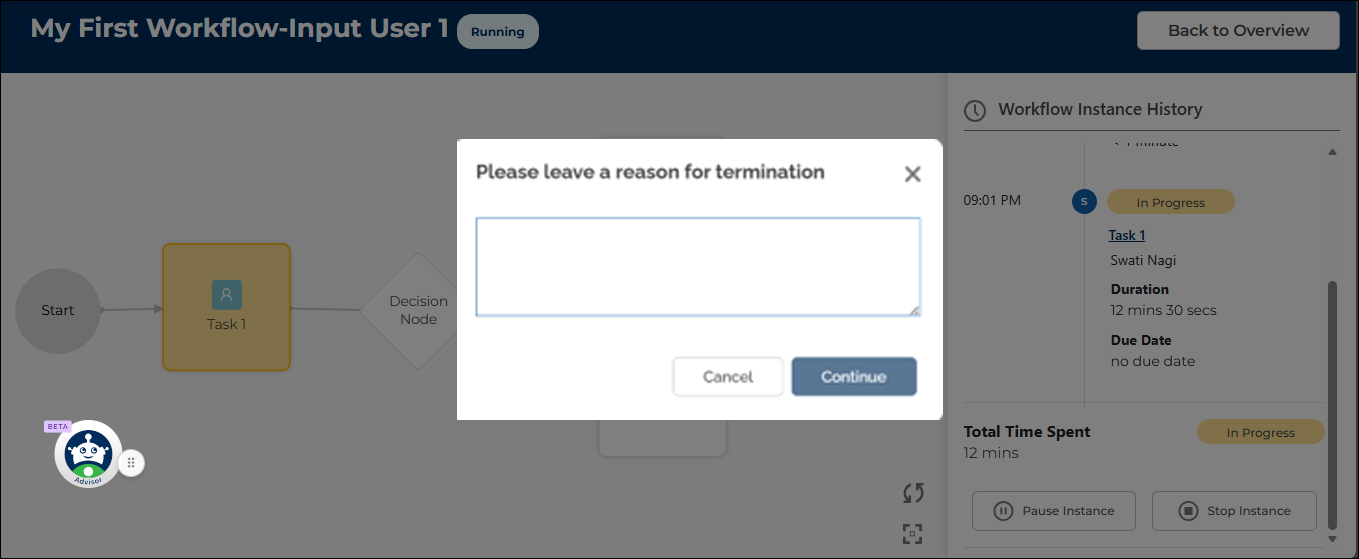
- Choose Continue to stop the instance or Cancel to return.
Once stopped:
- The instance status updates to Stopped.
- Any task in progress is also marked as Stopped and removed from assignee buckets.
- The stop button disappears from the panel.
- The instance history shows the updated task status.
If you have the required permissions, you can also click Start Instance from the same page to launch a new instance. This opens the Start Form, and the new instance enters a Running state.
- Workflows: Use this tab to create new workflows or view those you’ve already created. This is your main workspace for designing and managing automation templates.

- Groups
In this tab, you can create and manage user groups. Groups are helpful when you want tasks to be available to a set of users, rather than assigning them to an individual. See Managing Groups in Workflow.

To view disabled workflows, enable the Show Disabled checkbox on the Workflows page.
Disabled workflows cannot be started until they are enabled again.
Use the Search bar on the Workflow, My Work, and Groups pages to quickly find specific workflows, tasks, or user groups by their names. This helps streamline navigation and task management.
Last updated: June 10, 2026