Welcome to the HuLoop Documentation FAQs! This guide provides answers to common questions and offers step-by-step instructions to help you navigate HuLoop efficiently.
- Go to the HuLoop URL provided by the HuLoop team.

- Enter your HuLoop email and password, and click Sign In.
- On the sign-in page, click Forgot Password below the Sign In button.

- Follow the instructions to reset your password.
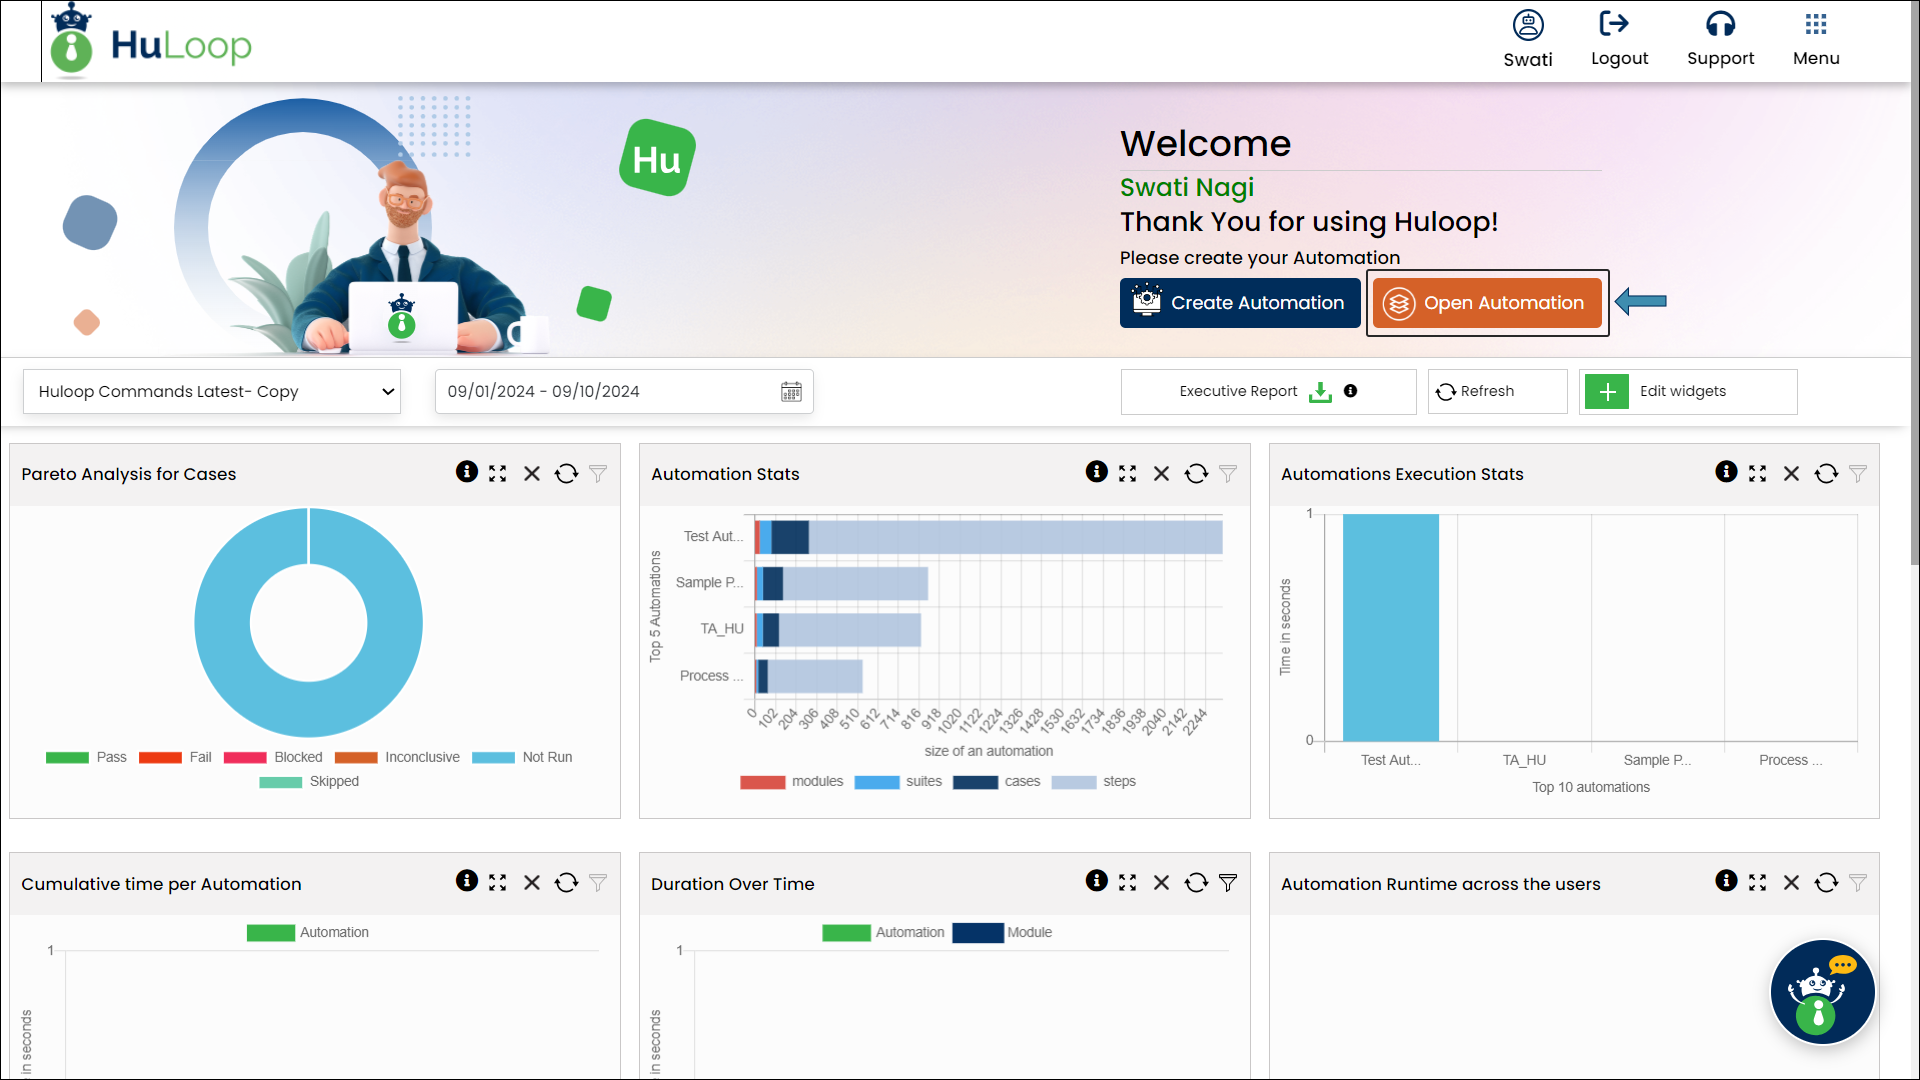
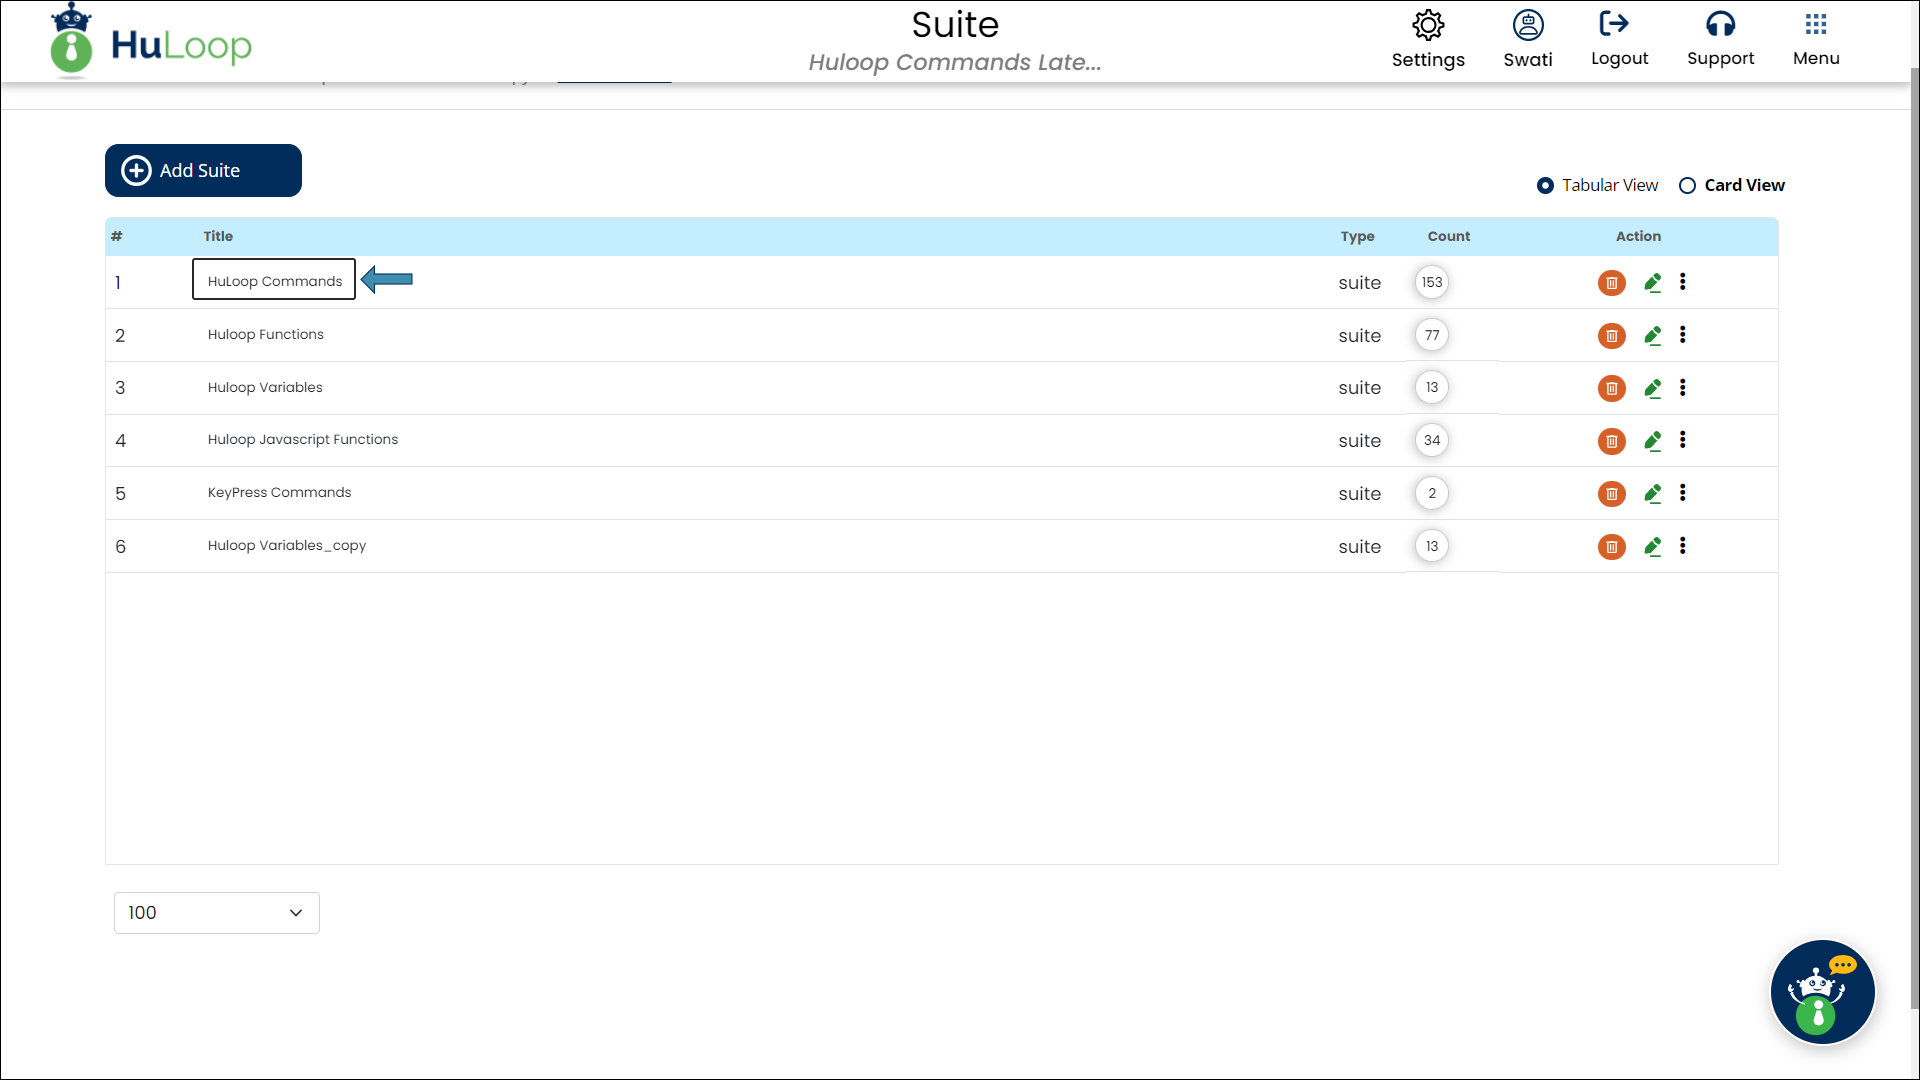
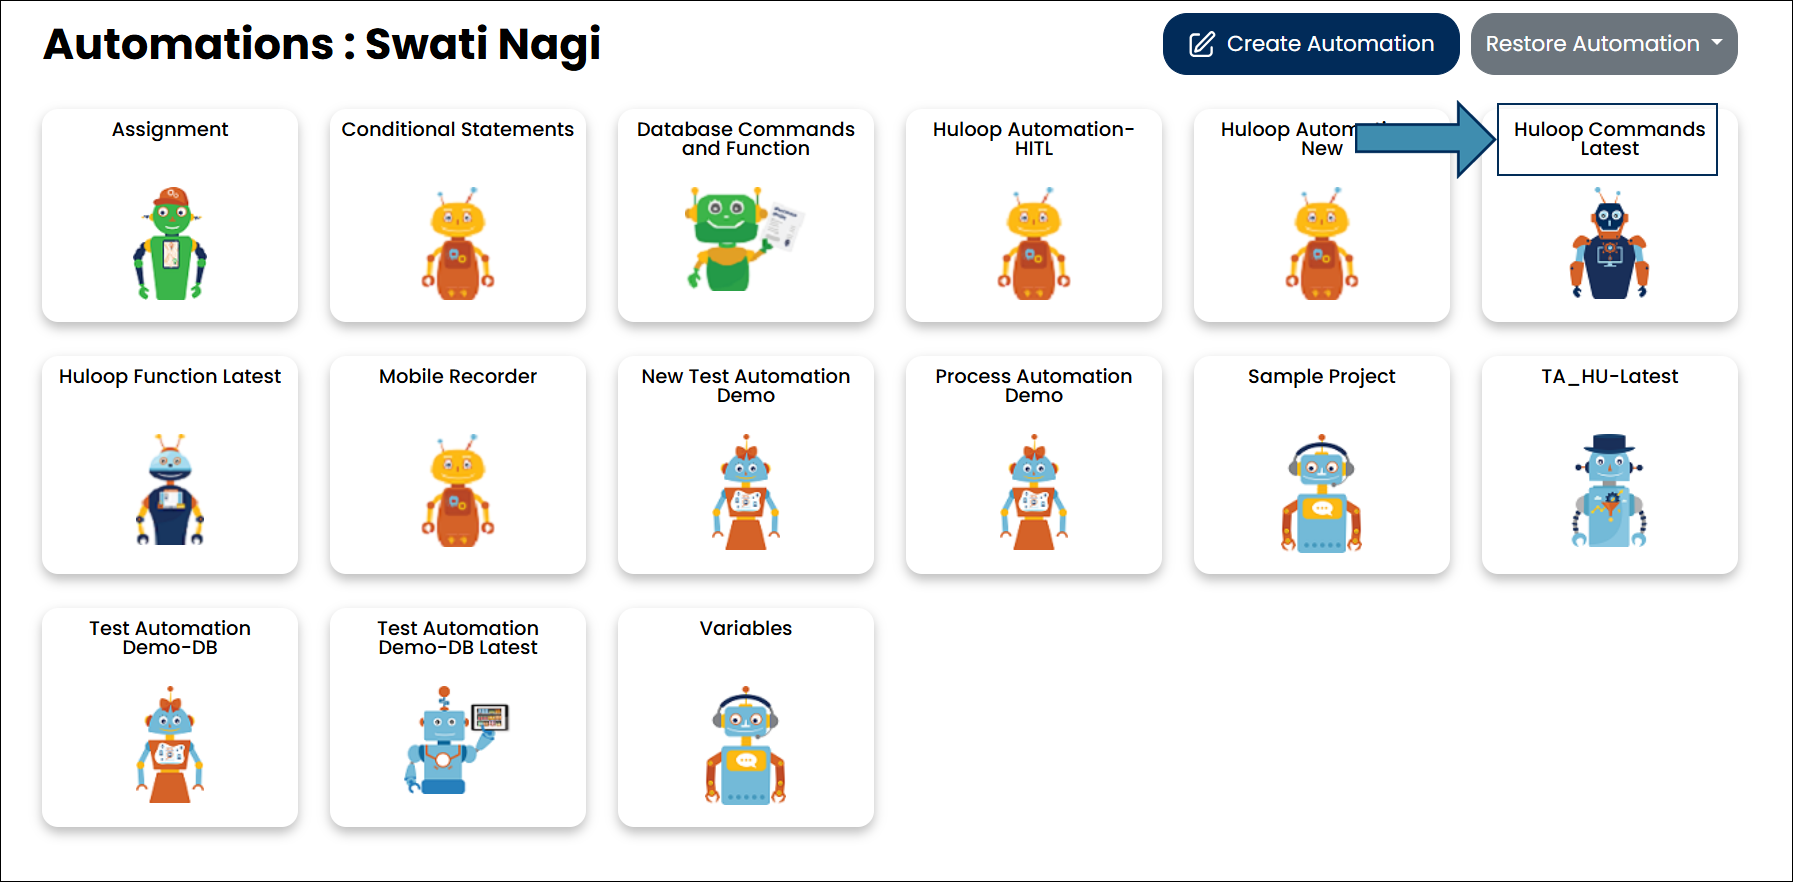
- Sign in to your HuLoop account.
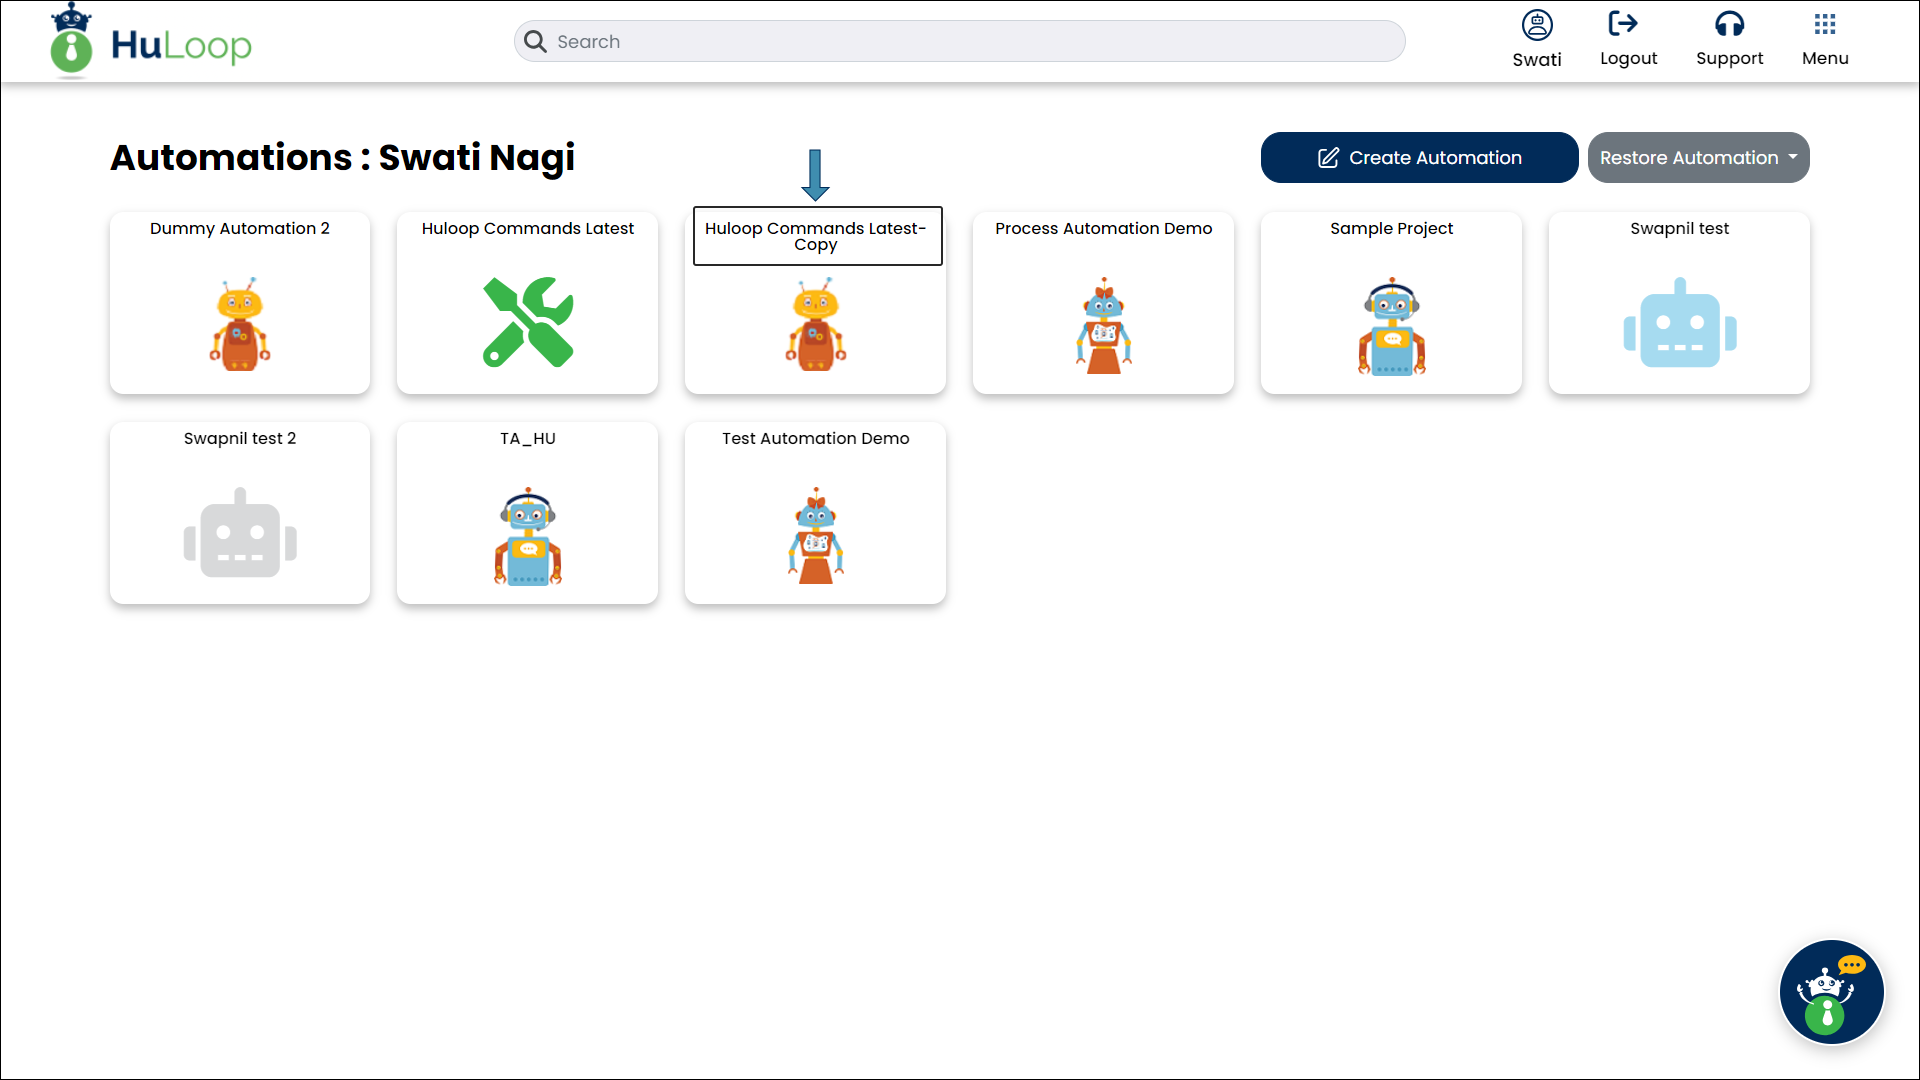
- Click Open Automation.
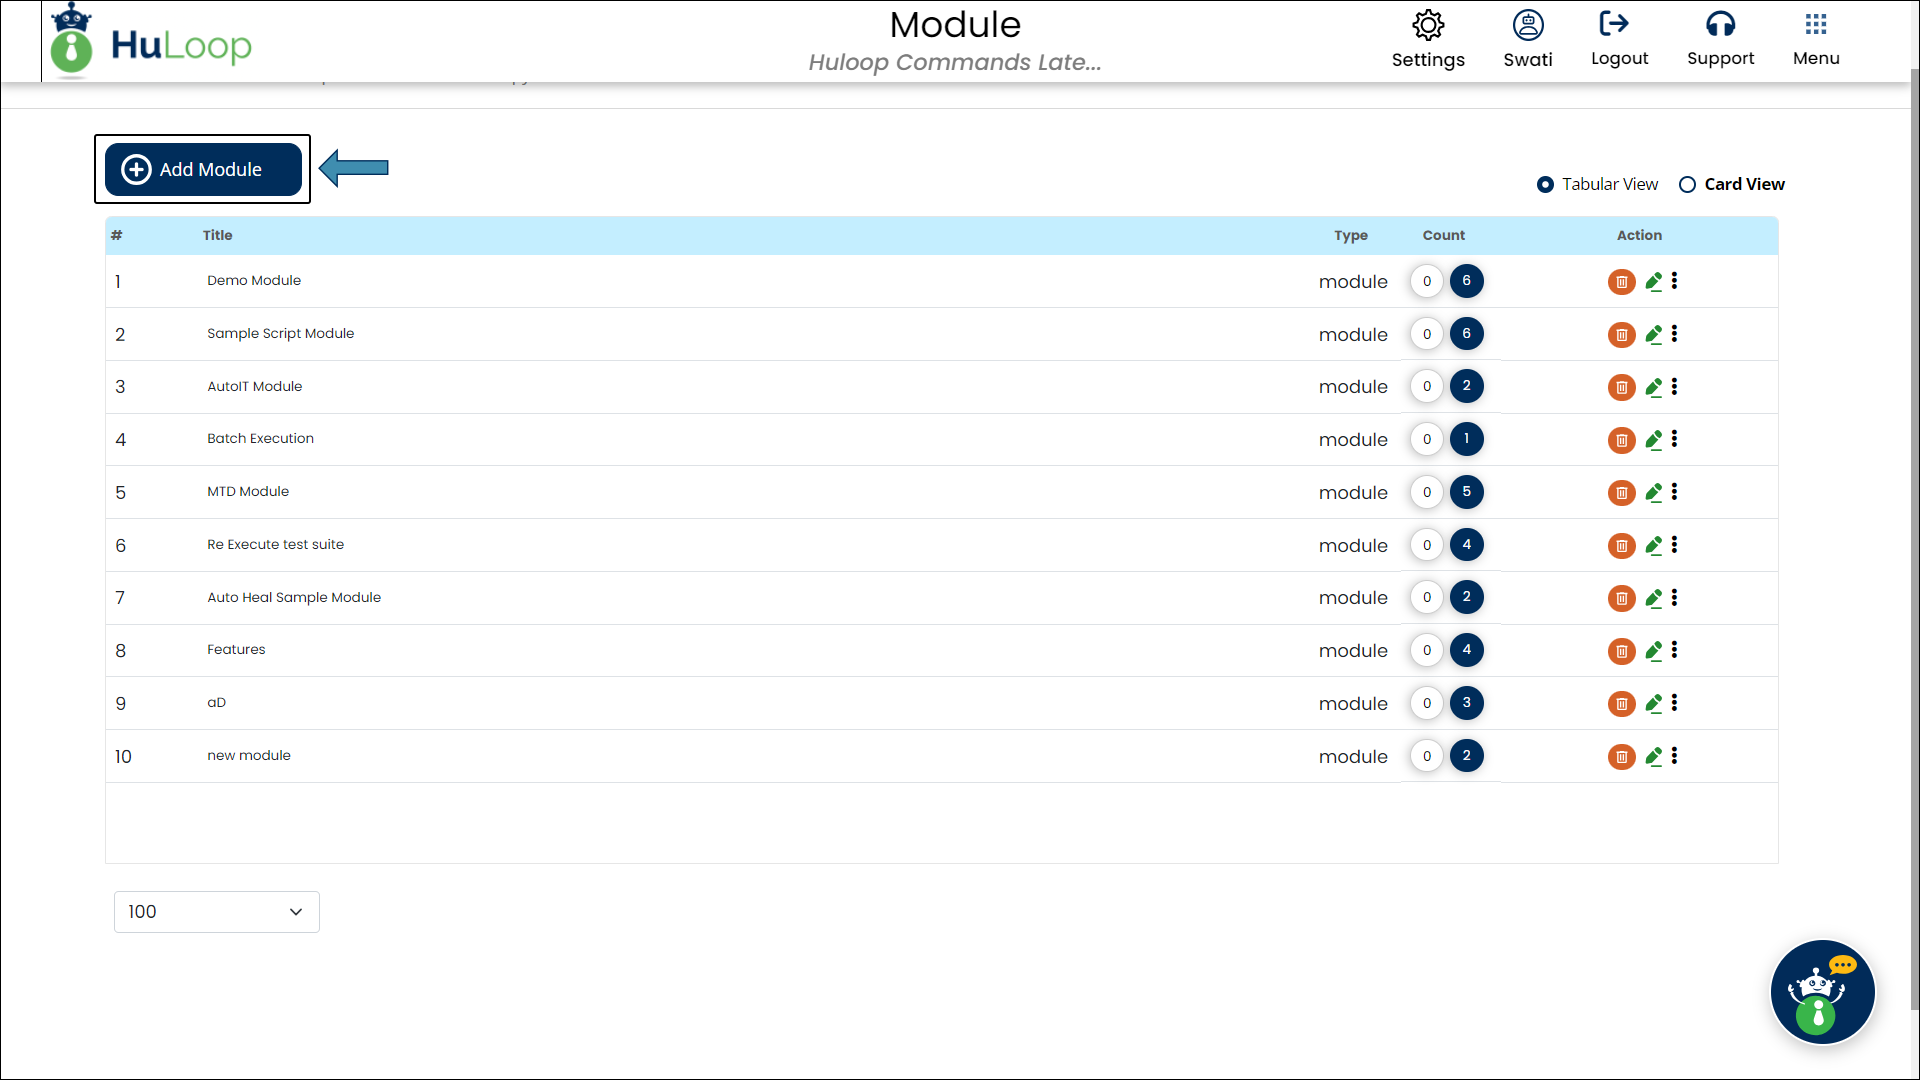
- Click the title of the automation project you want to work on.
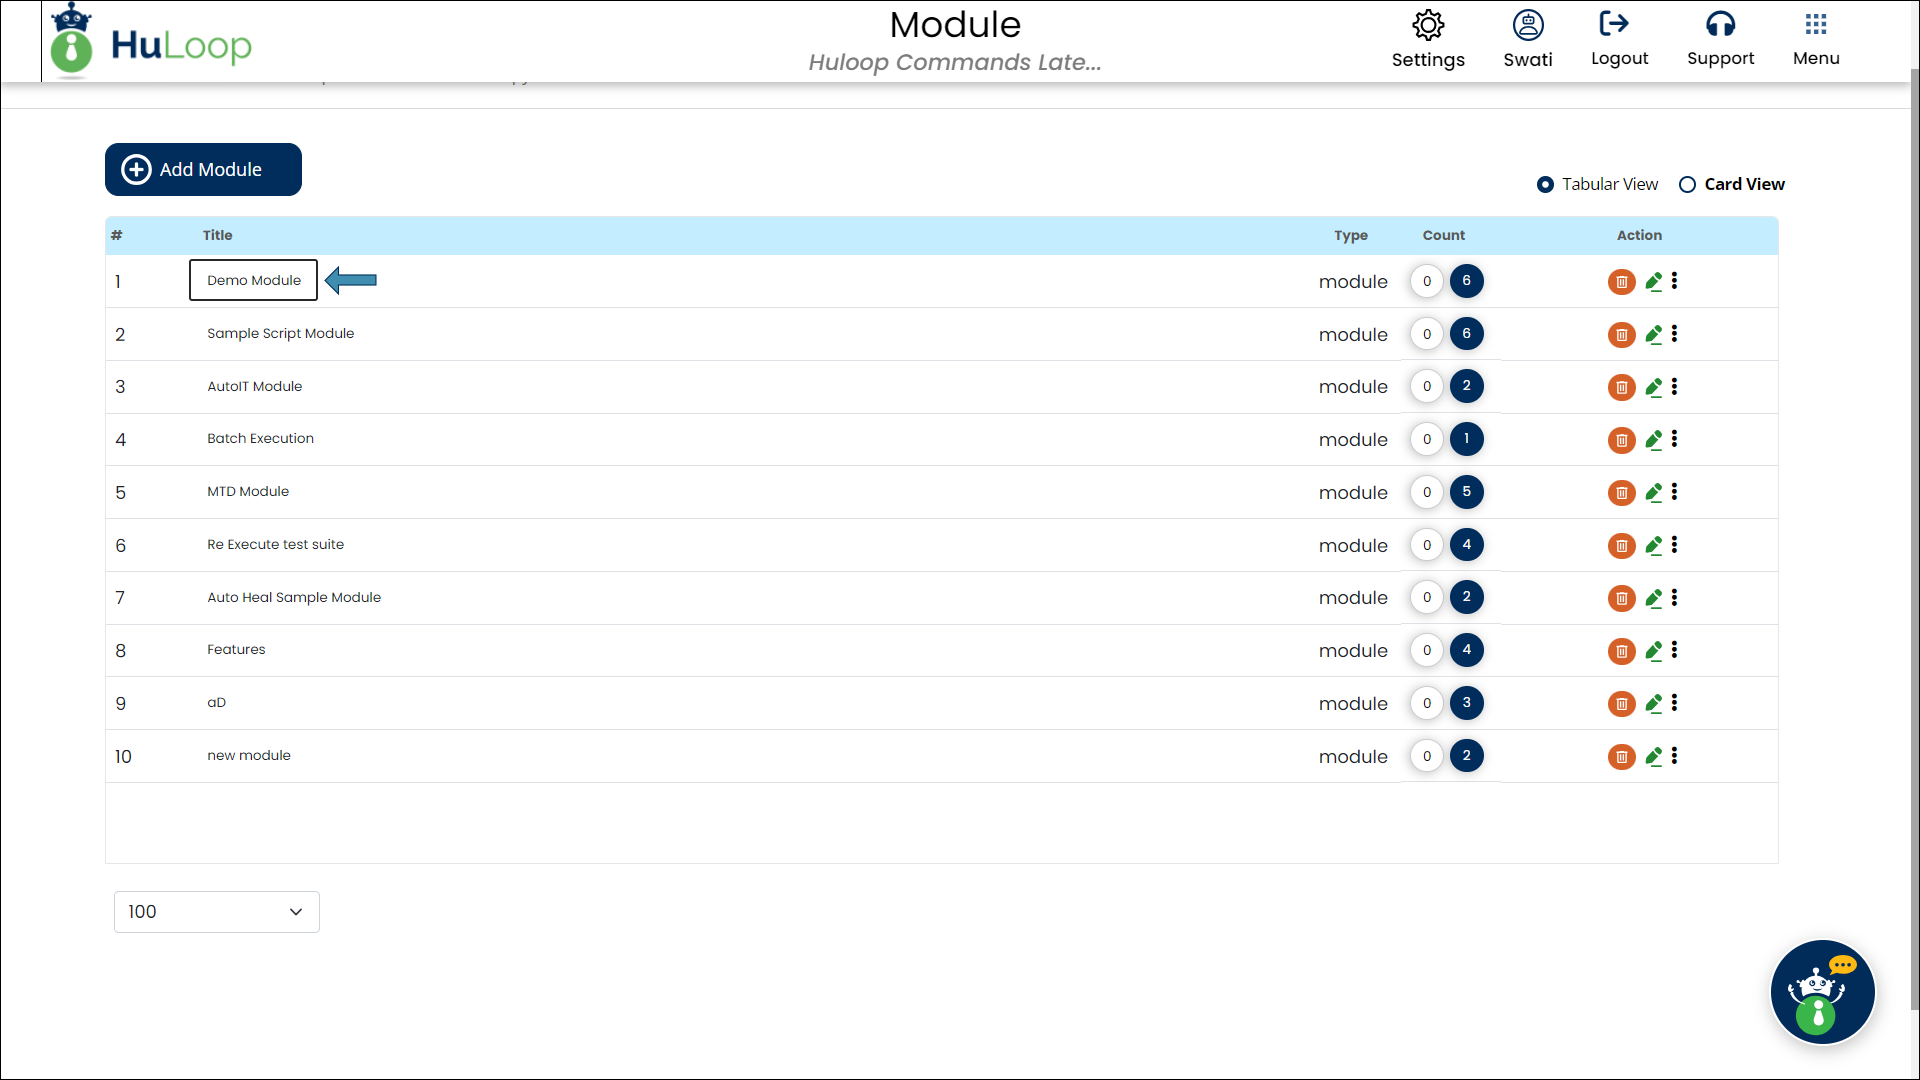
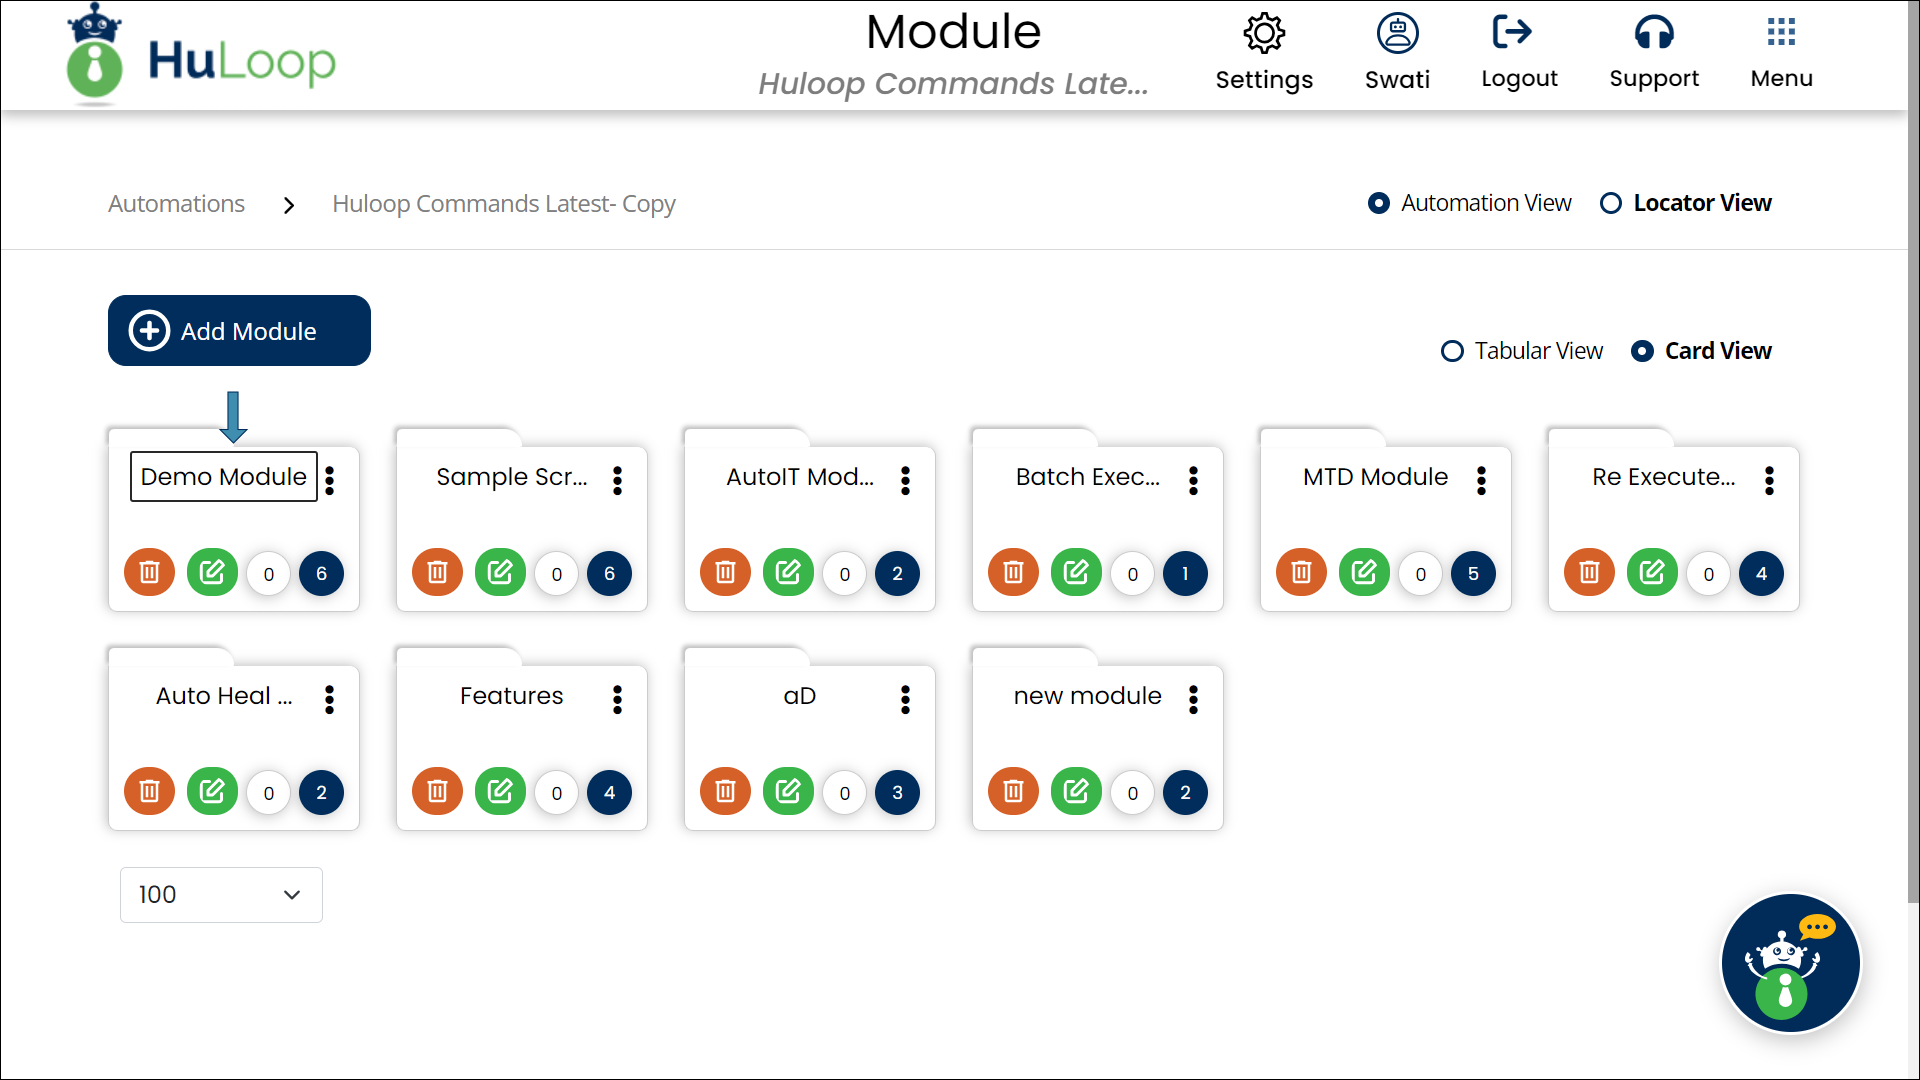
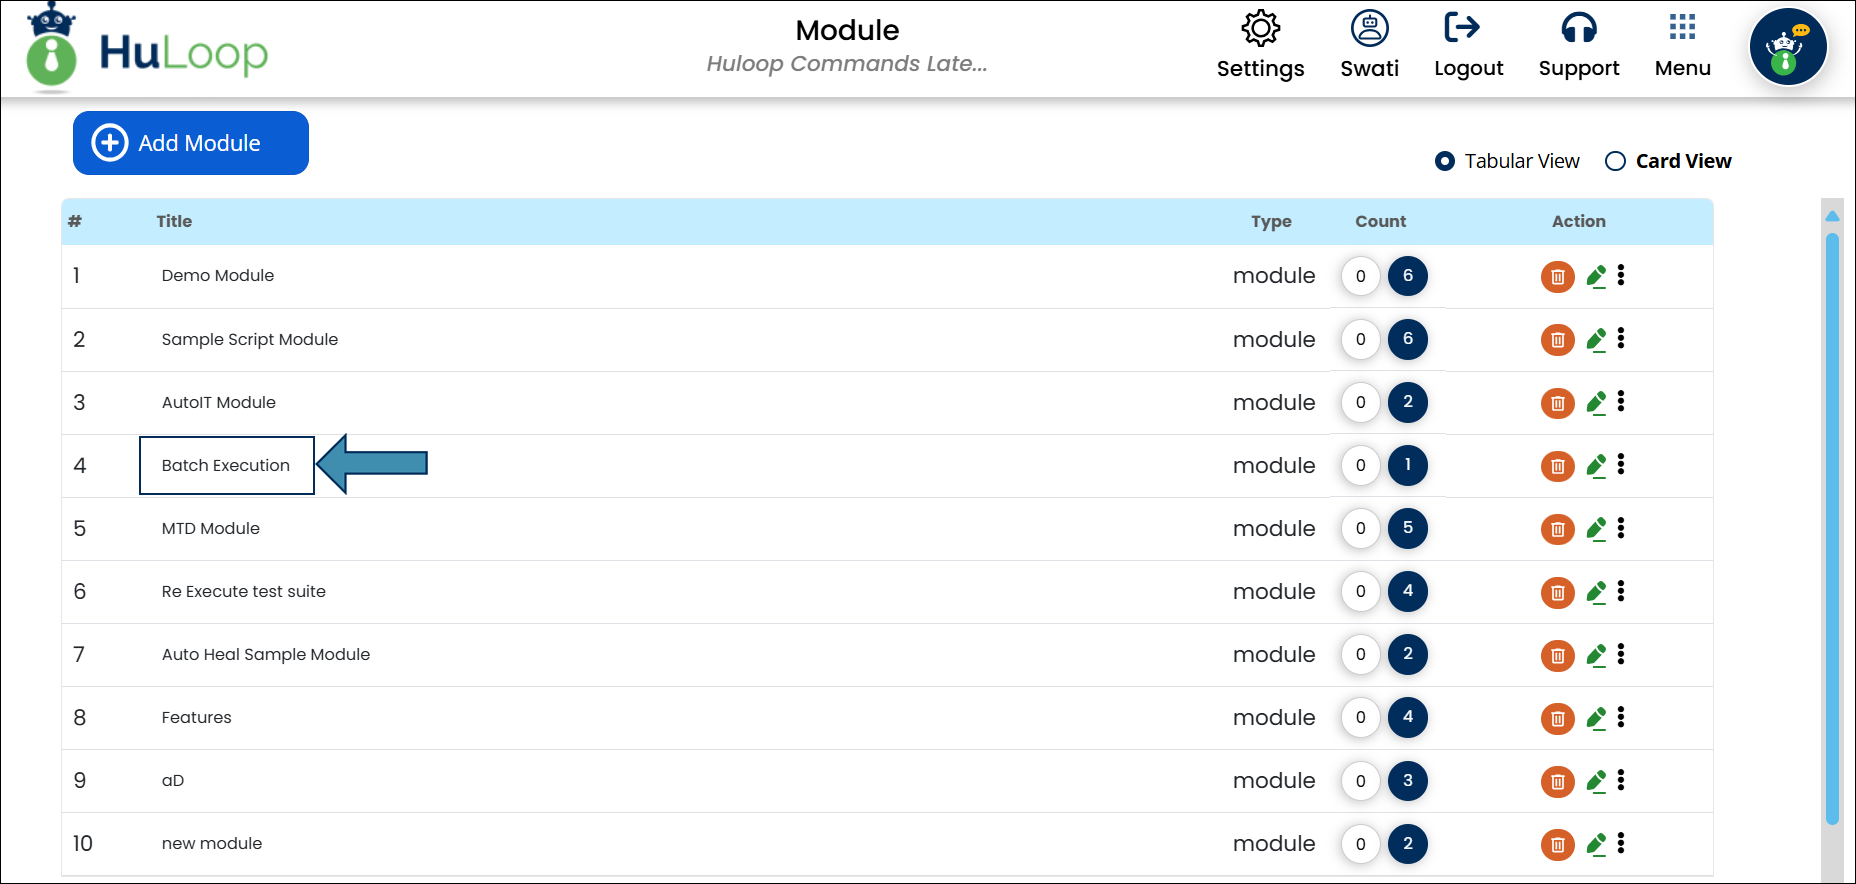
- To view Test Suites, select the corresponding module title.
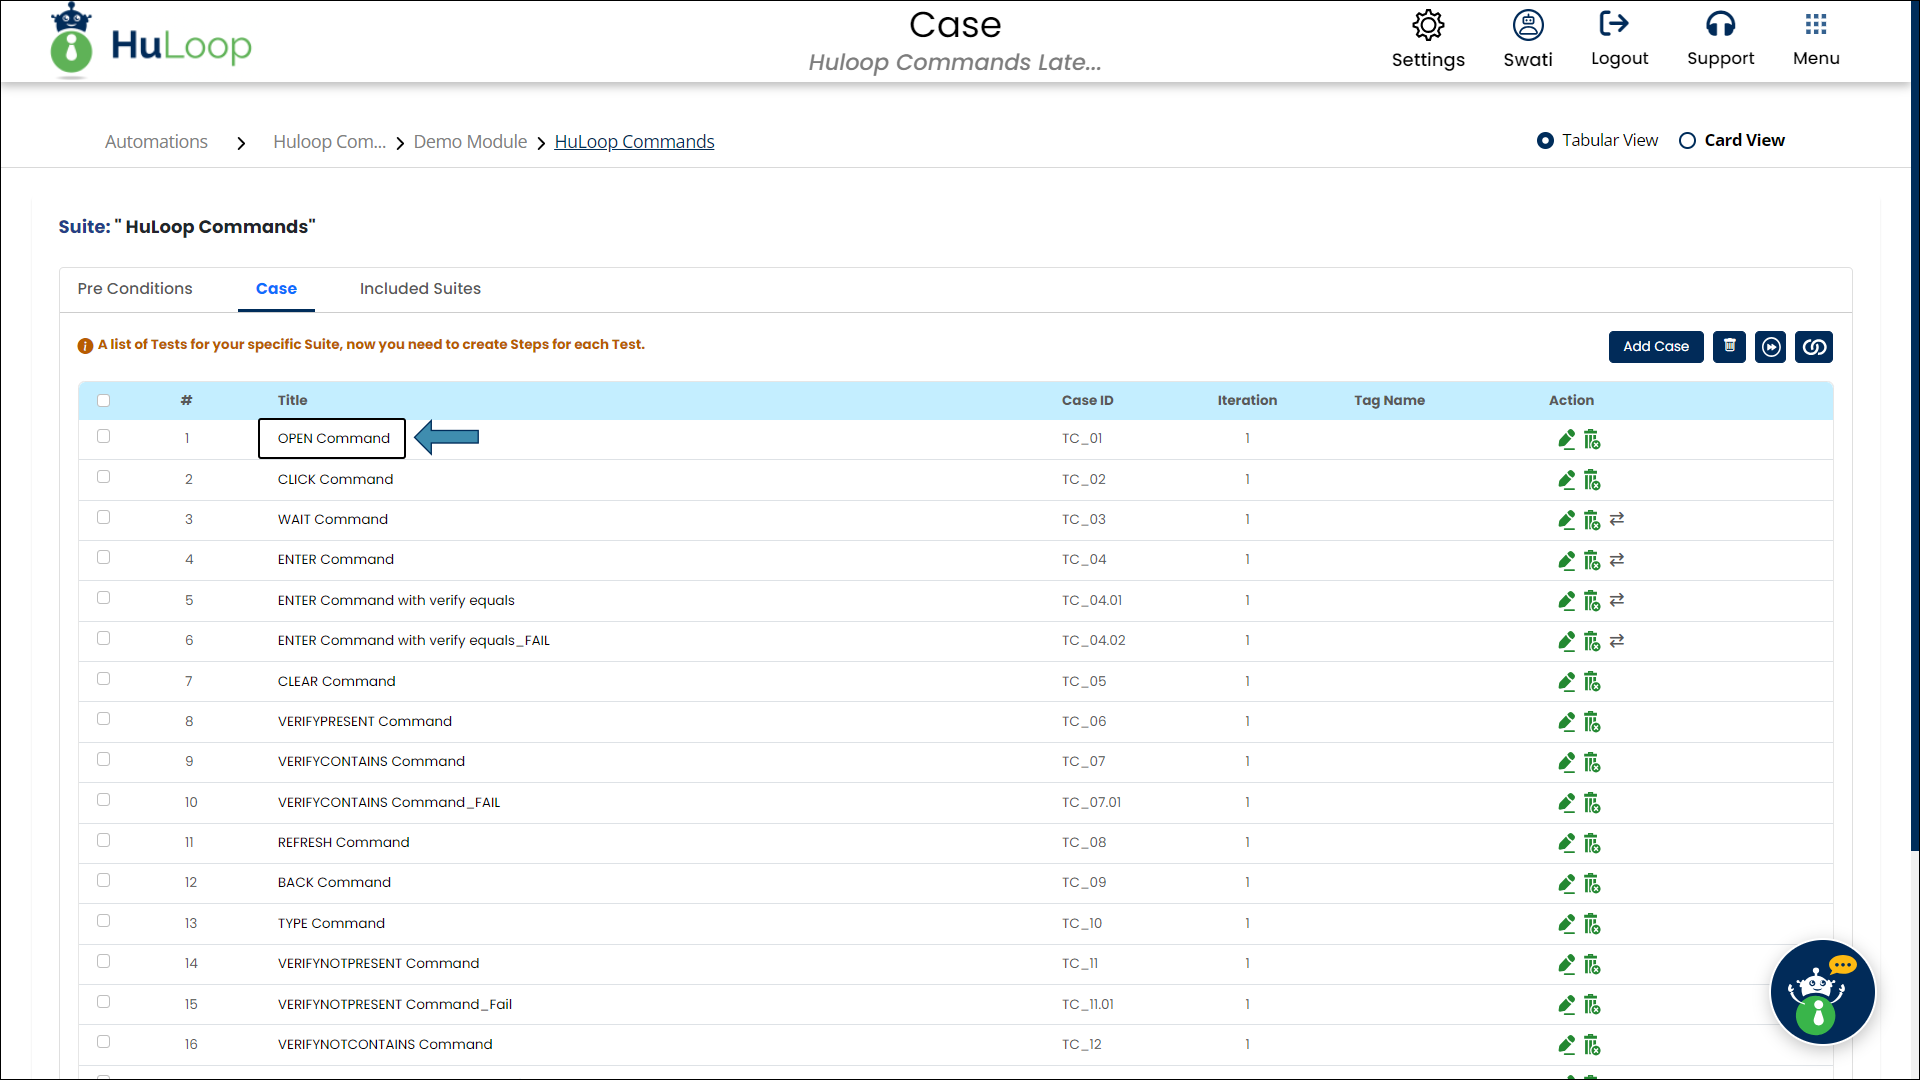
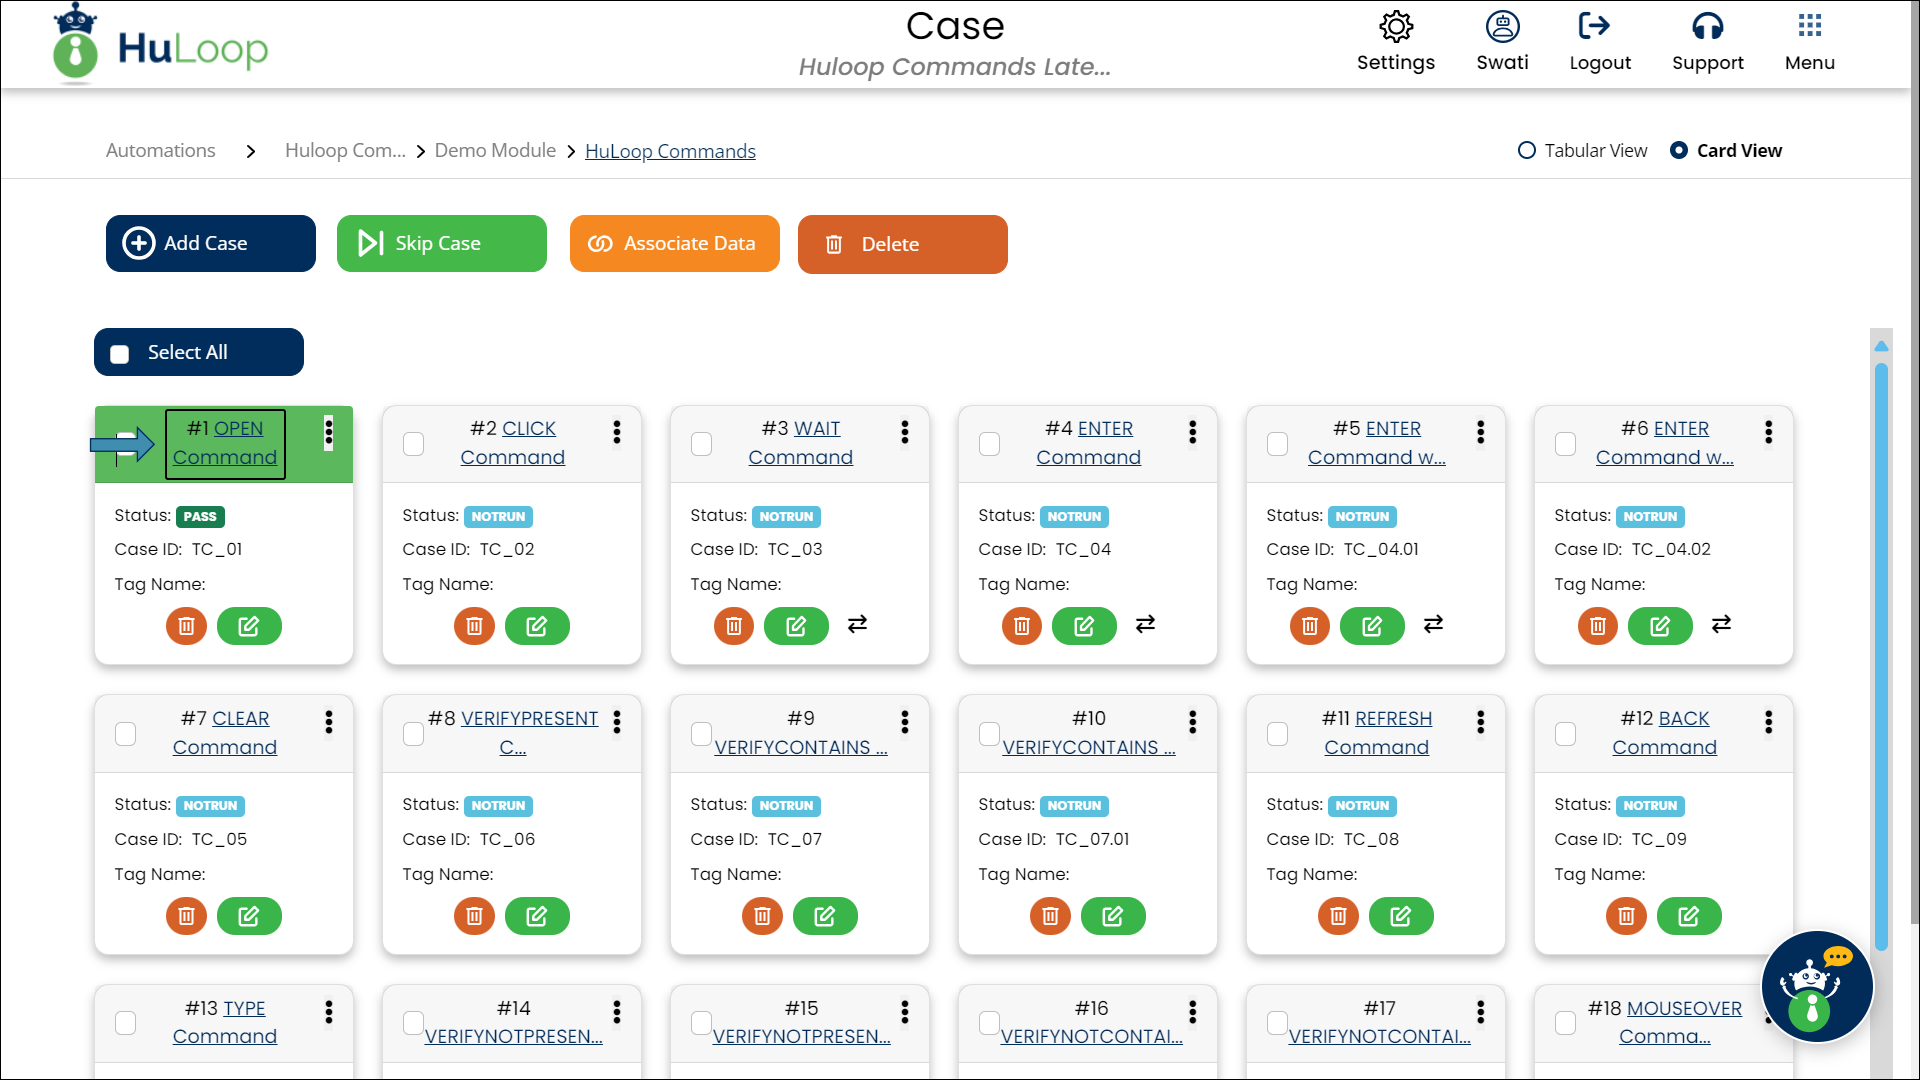
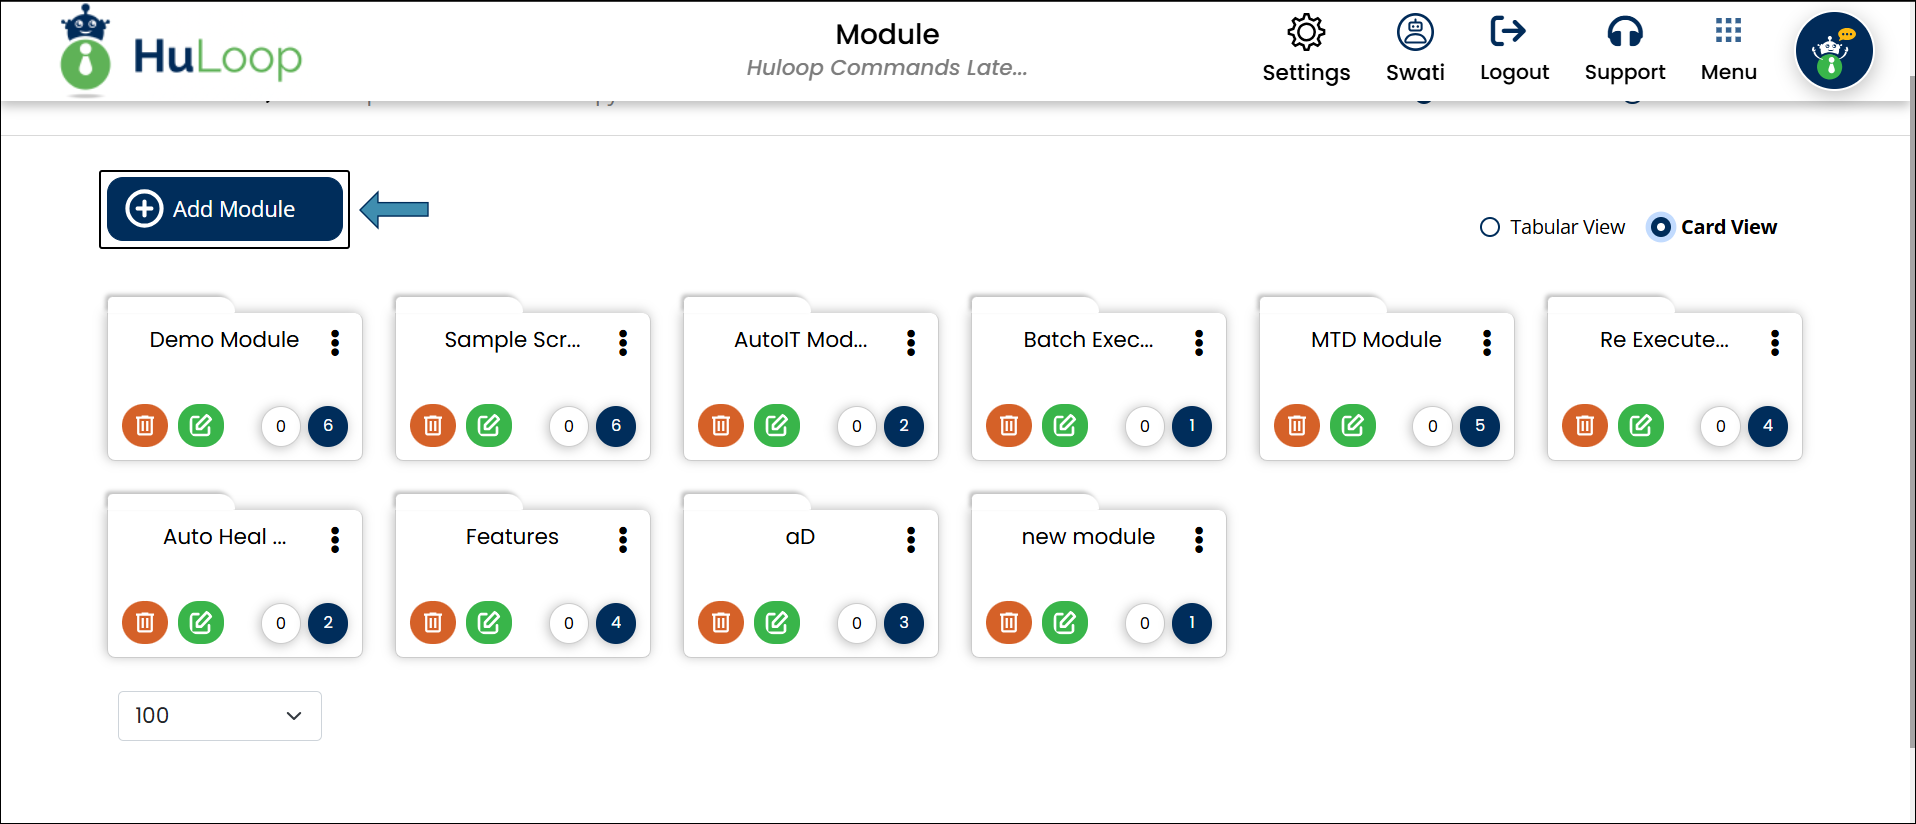
Note: HuLoop supports Tabular View and Card View. The screenshots provided show both views to help you navigate based on your preferred interface. While functionality remains the same, the layout may differ.
- For Test Cases, click on the title of the relevant test suite.

- Finally, click on a test case title to view its steps.
HuLoop offers two interface views:
- Tabular View
- Card View
You can change views on any screen after opening an automation project. By default, the Tabular View is selected, and you can easily switch to Card View by selecting the radio button.
Refer to the provided screenshots for examples of each view:
When you switch between views, a notification will appear in the top-right corner of the window, confirming the change.
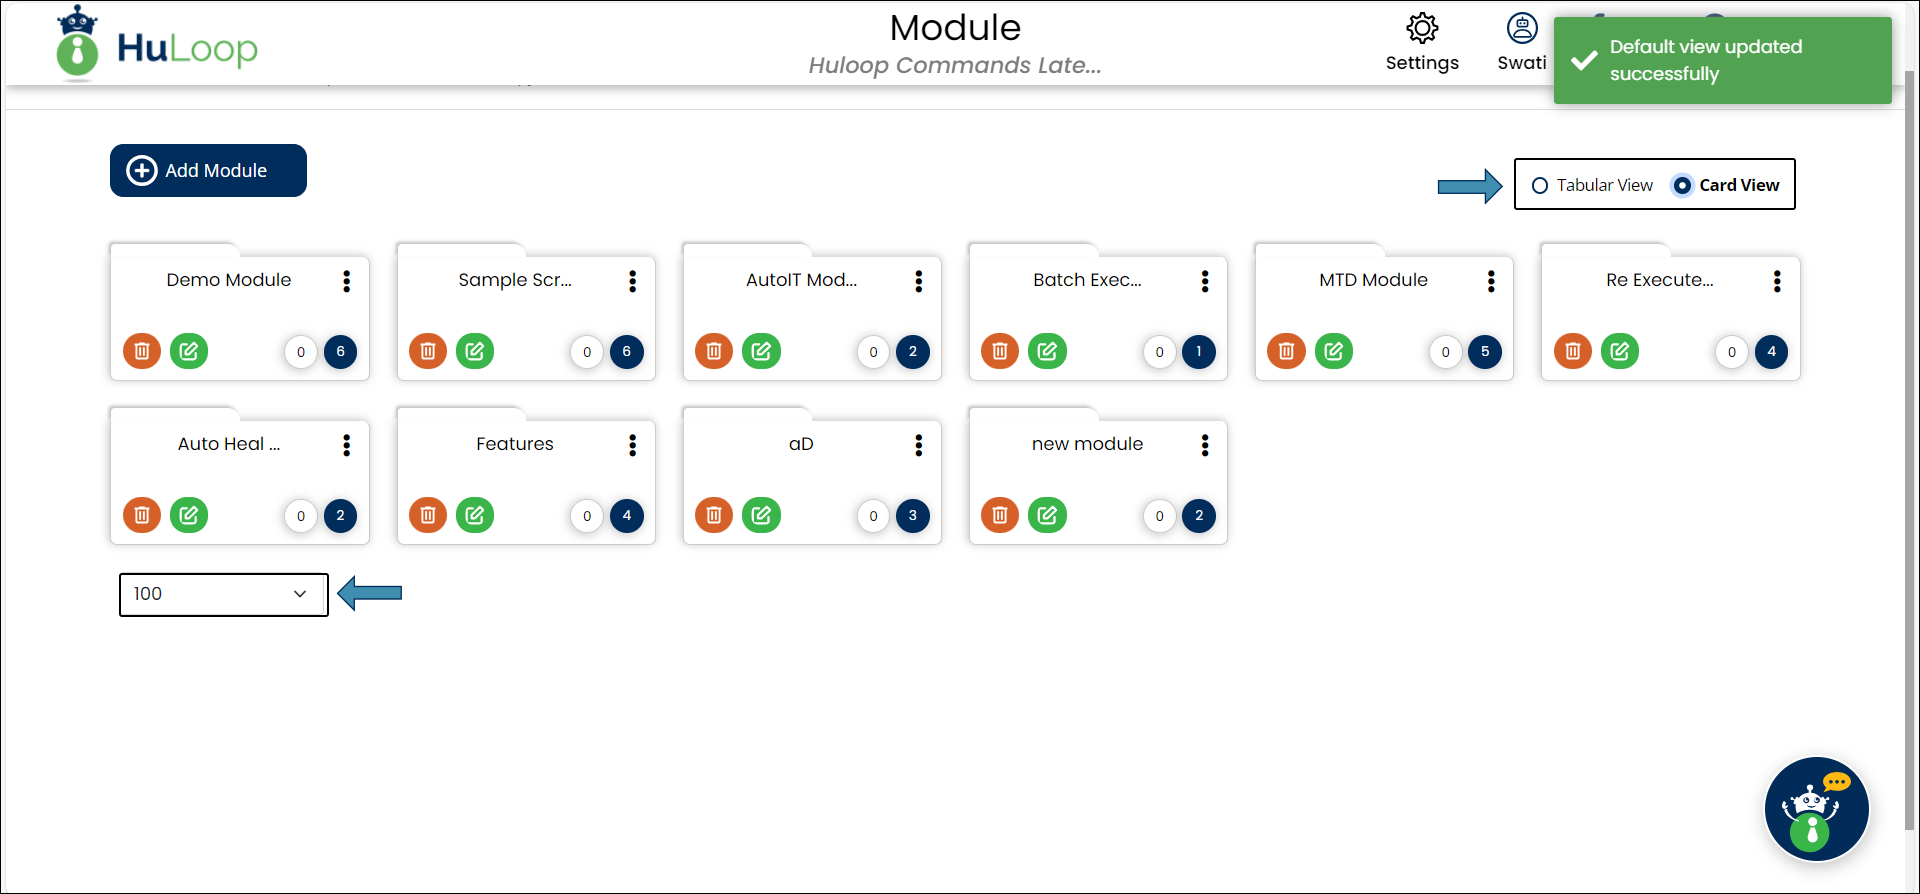
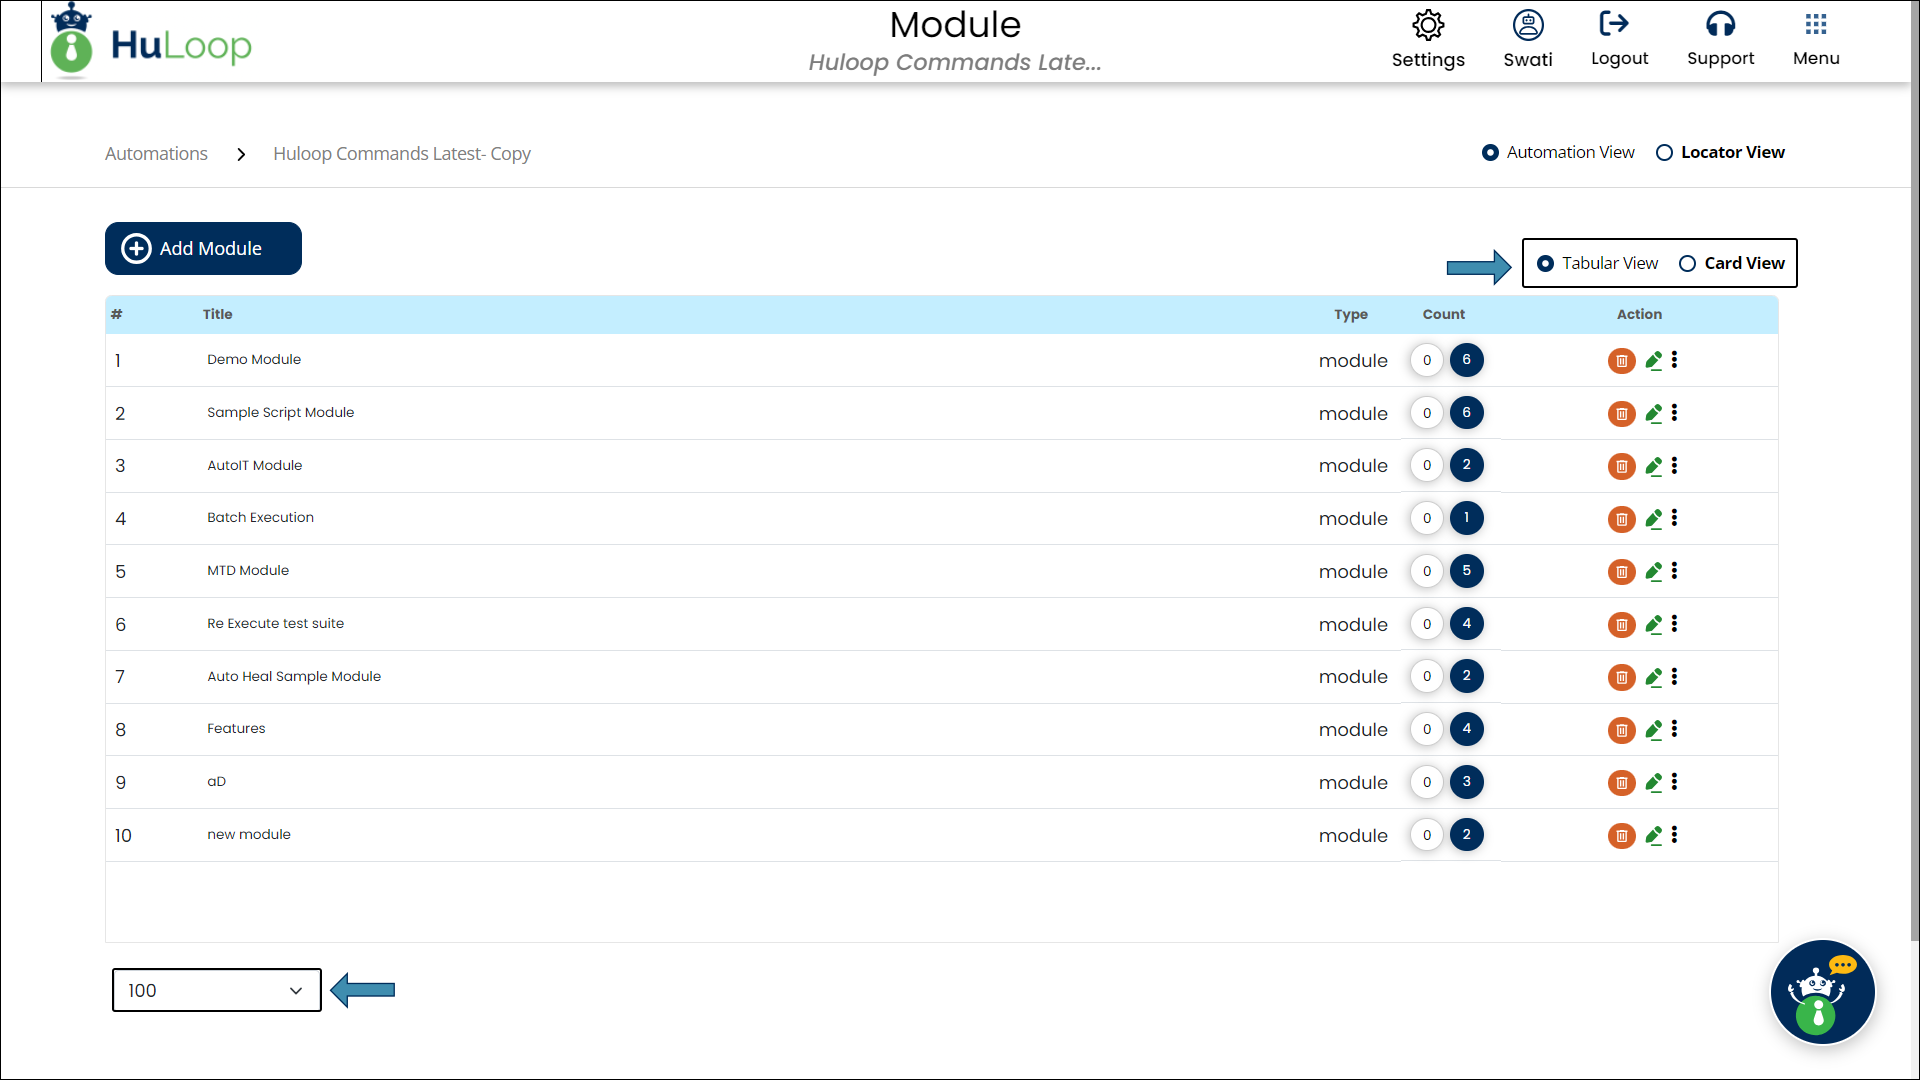
You can customize the number of items displayed on the screen using the Pagination dropdown, located at the bottom left. Simply select from the options to view 20, 25, 50, or 100 items at a time.
- Sign in to your HuLoop account.
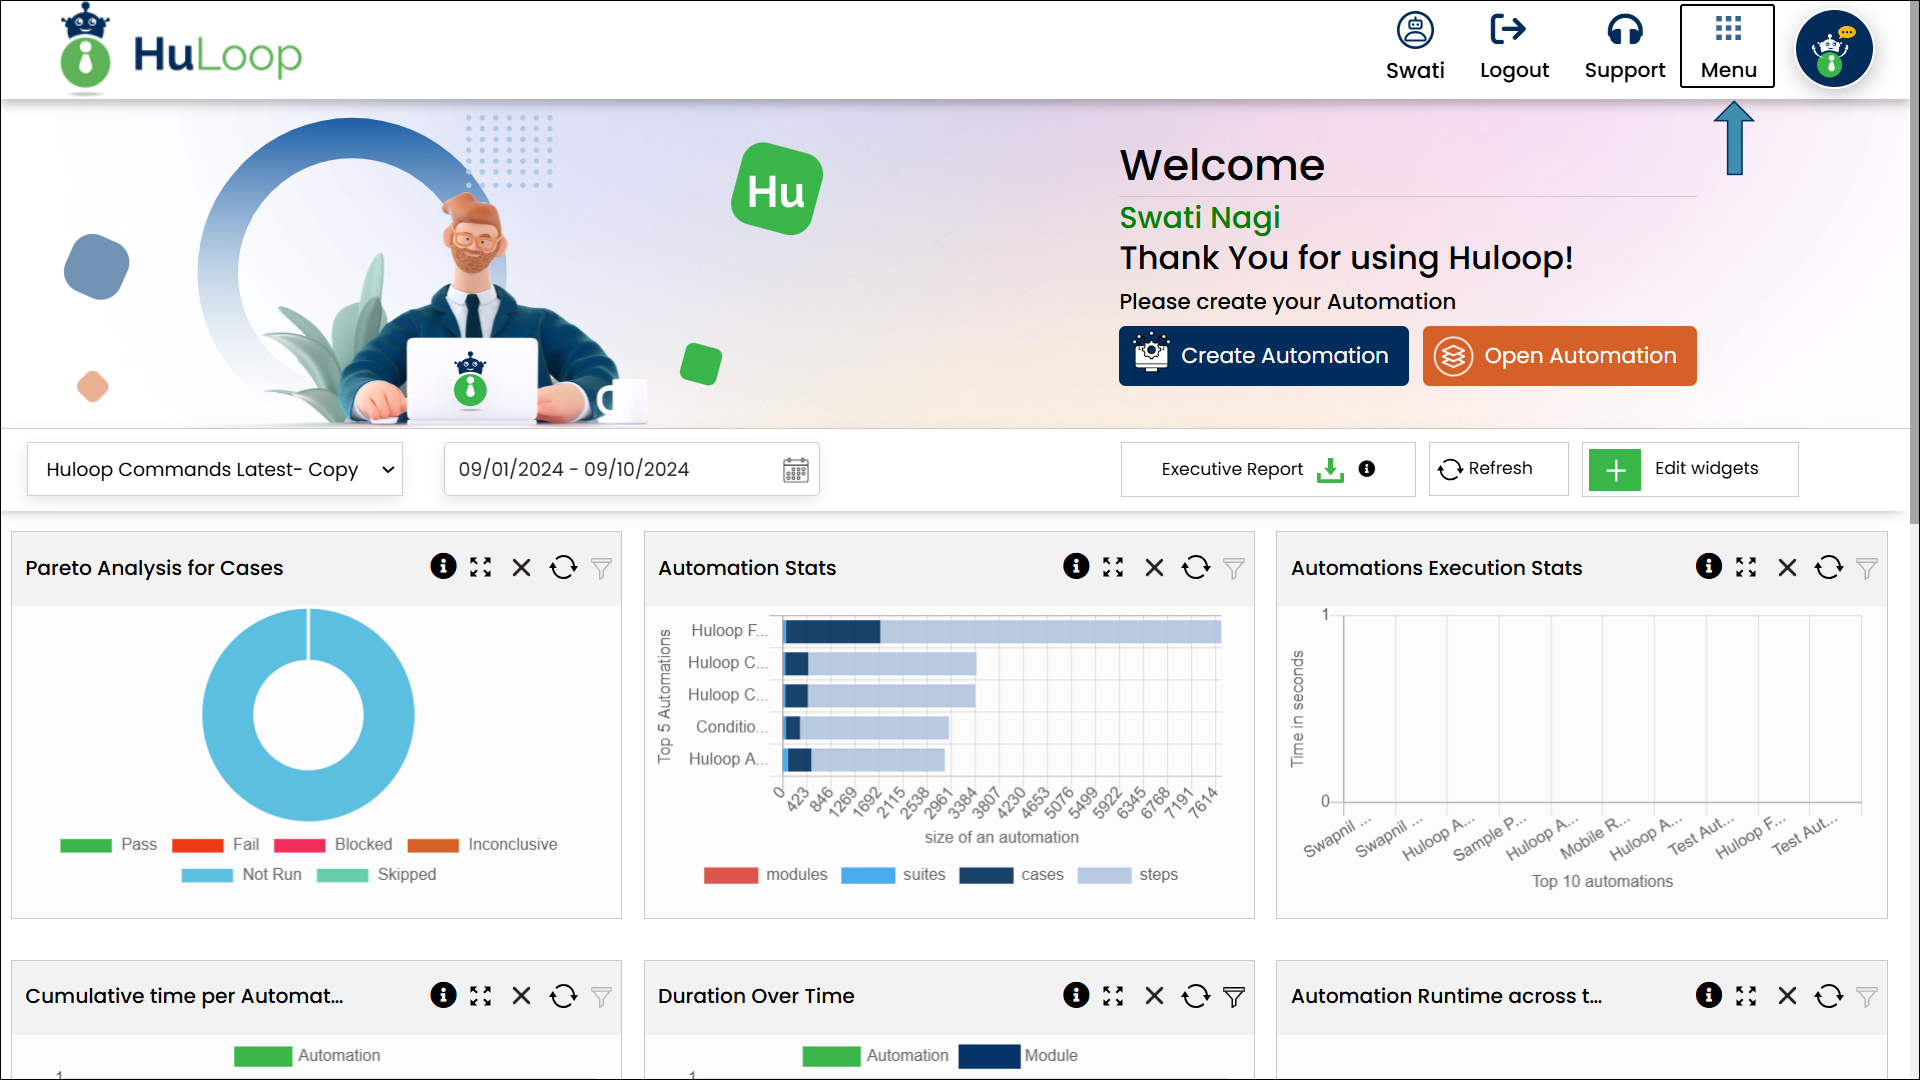
- Click Menu in the top-right corner.
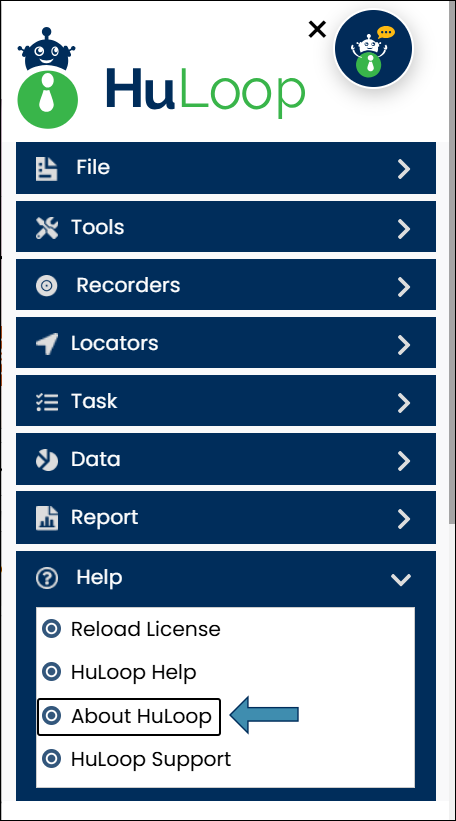
- In the menu, expand the Help section by selecting the
 icon, then choose About HuLoop.
- A pop-up will display your HuLoop license version.
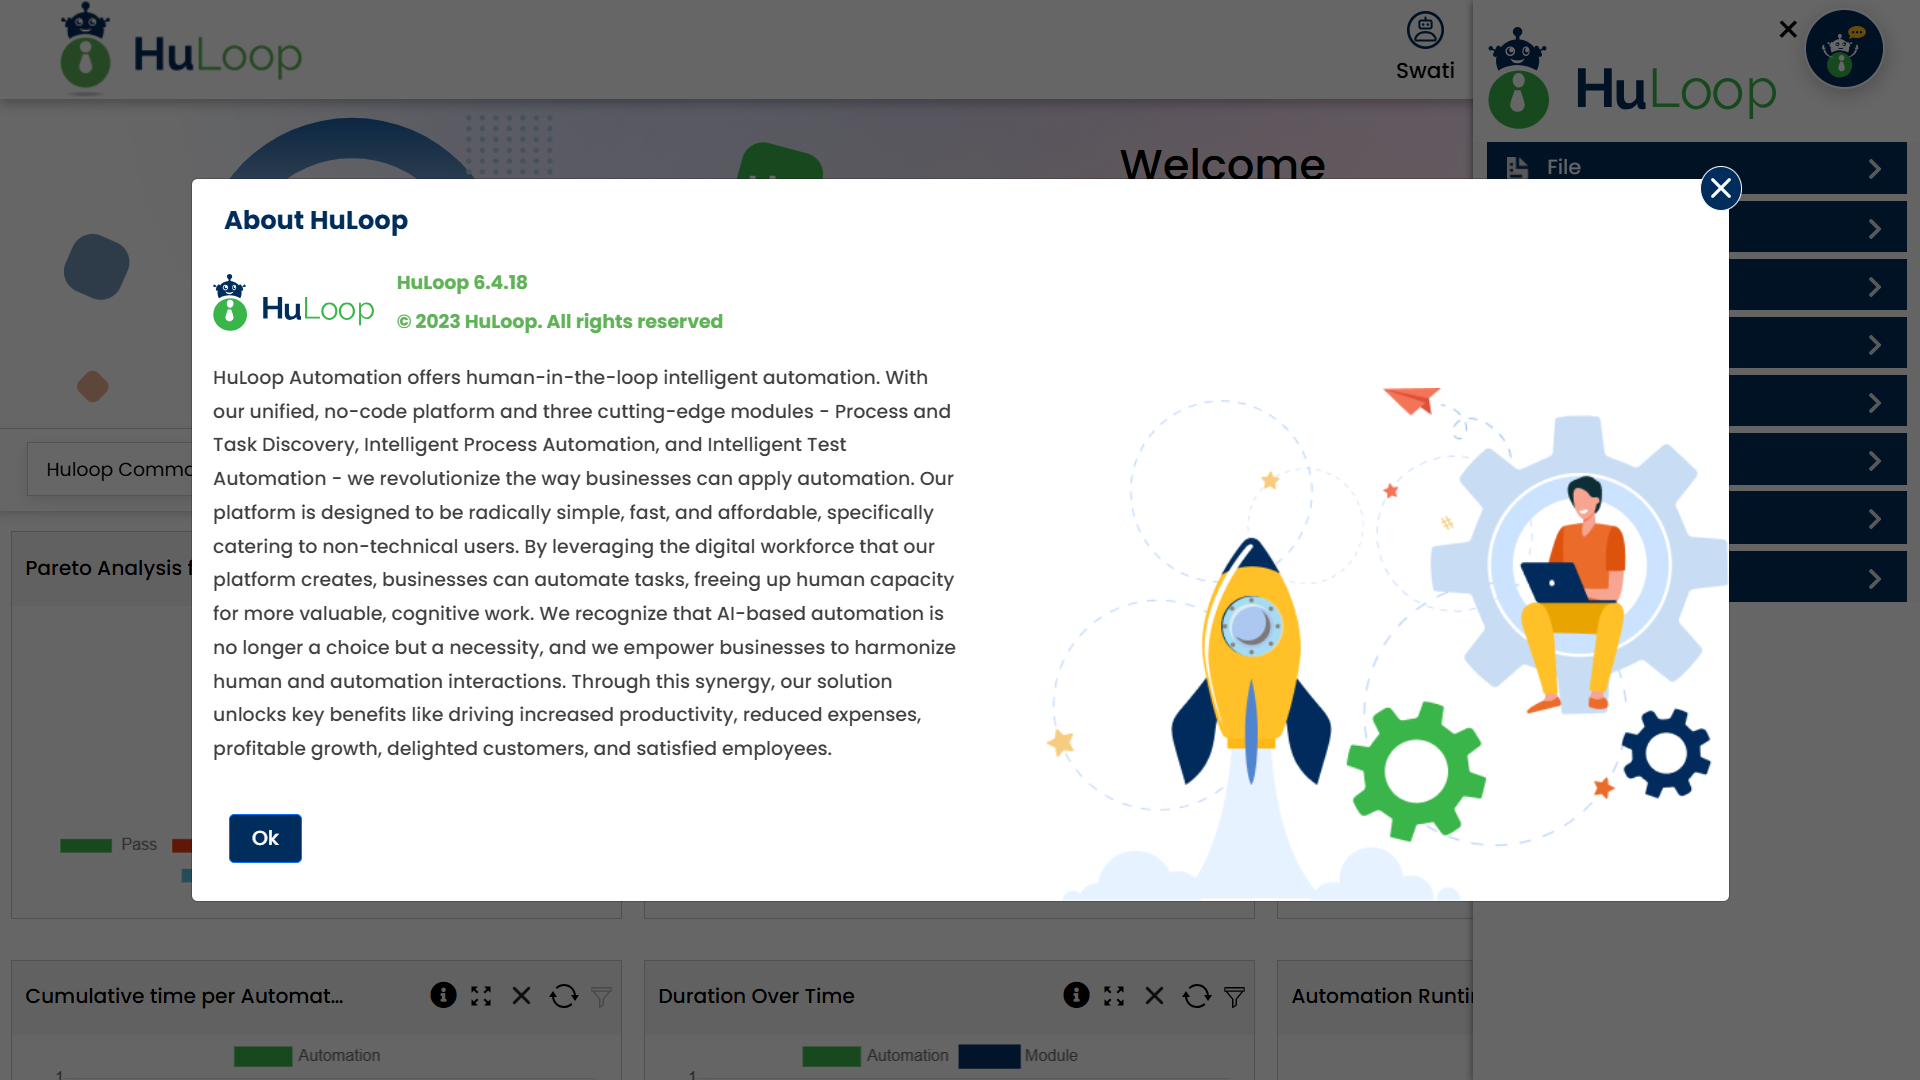
- Click OK to go back to the HuLoop home page.
- Sign in to your HuLoop account.
- Click Open Automation.
- Select the icon of the automation project you want to export.
![]()
- A pane will appear on the right.
- Click the three dots
 next to the automation project title and choose Export Automation.
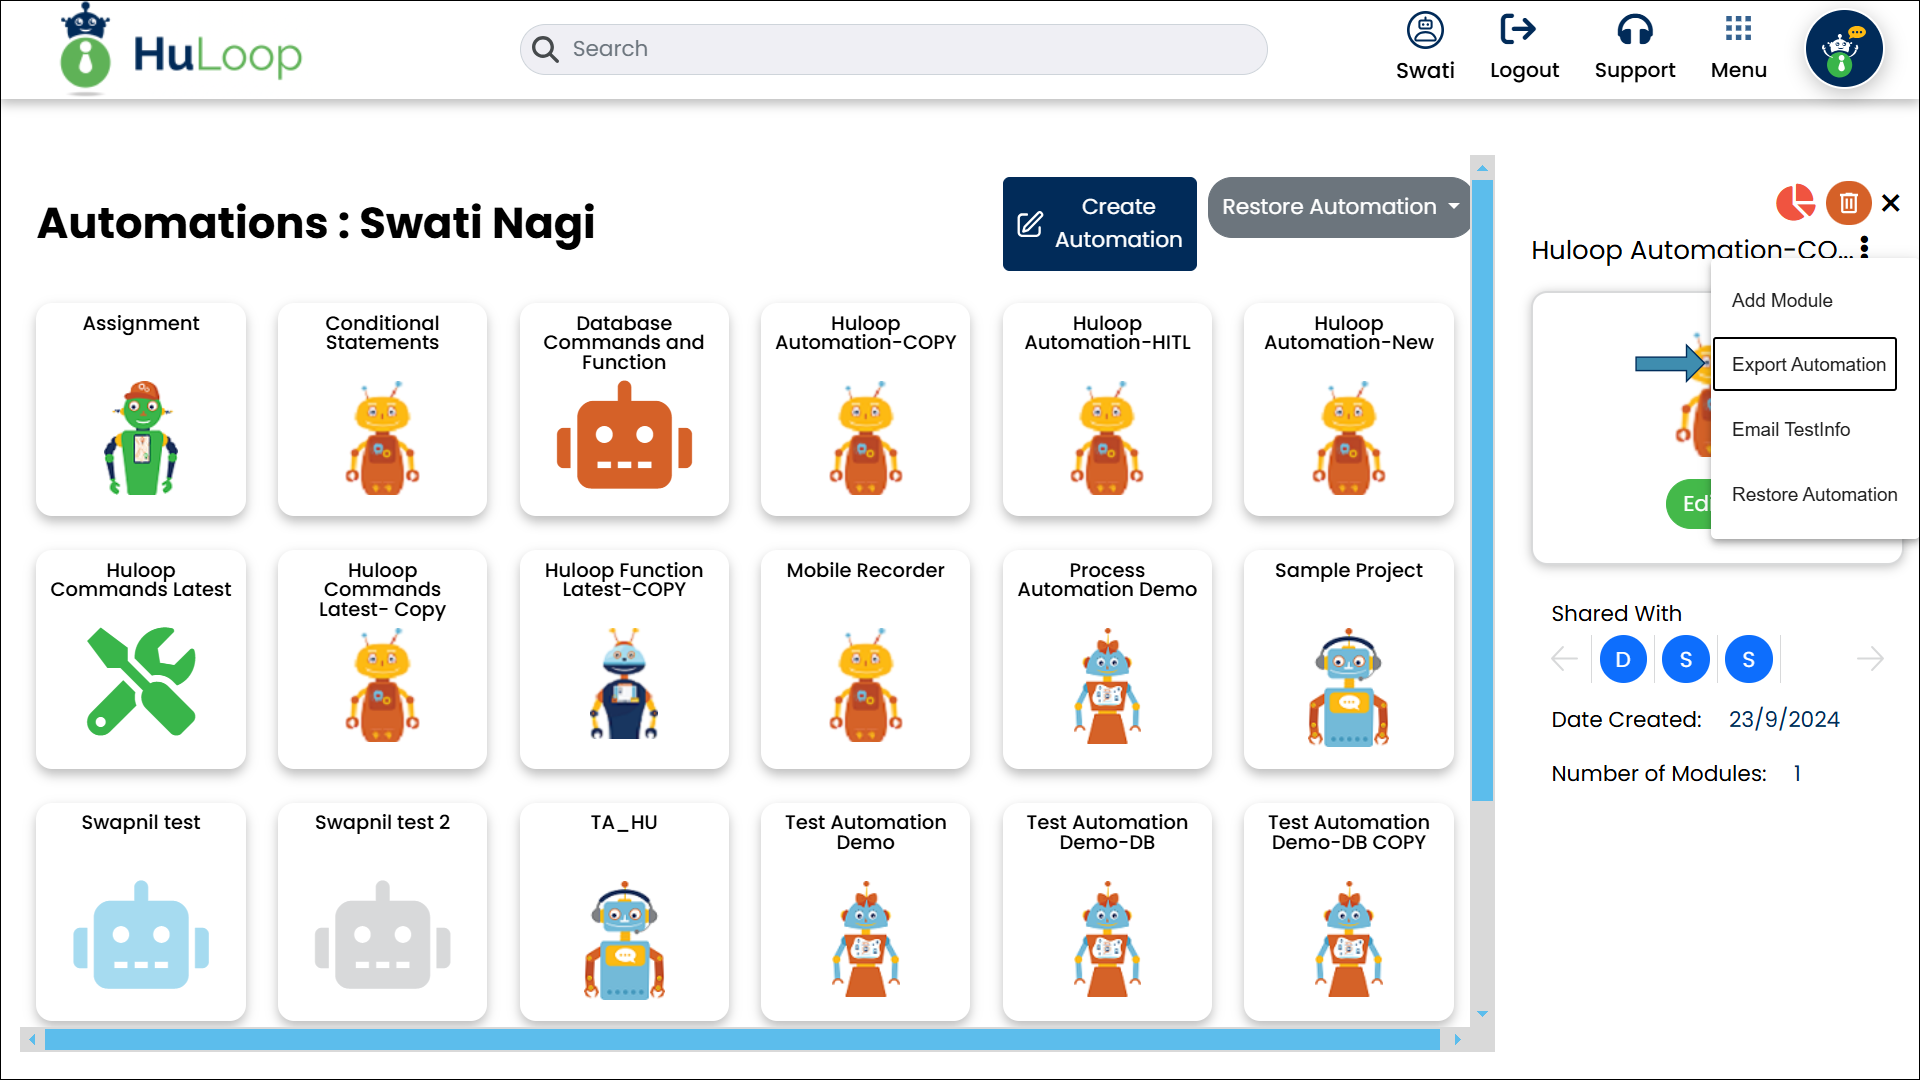
- The automation project will download as a ZIP file which can be found in your Downloads folder.
- Sign in to your HuLoop account.
- Click Create Automation.
- Select Choose File (.zip) to upload a ZIP file of the project.
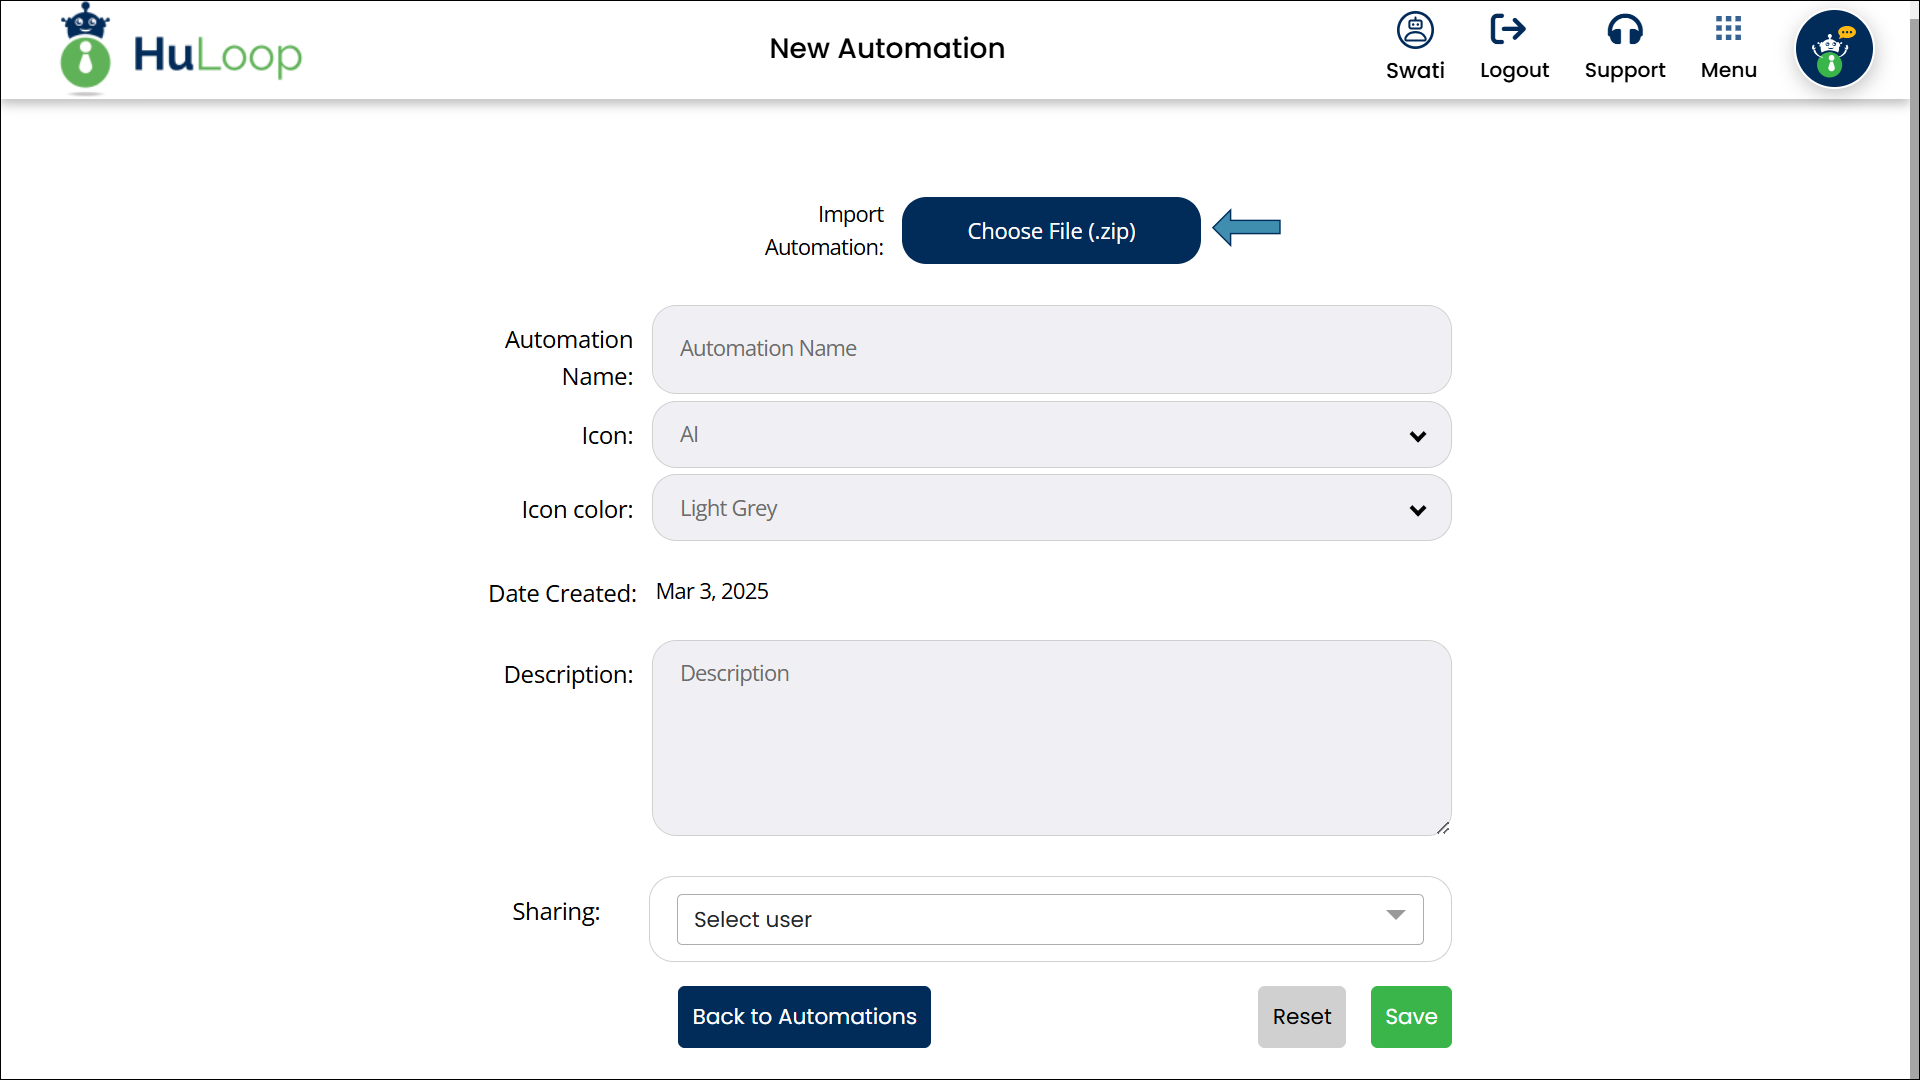
- You can rename the project in the Automation Name field if needed.
- Click Save and you will receive a notification once the import is complete.
Prerequisites
Before you begin, make sure you have access to the XML suite file from an existing automation project. The Case in that file must be synced with the HuLoop Agent to ensure successful import.
You can find the XML file at:
C:\Users\<YourUser>\HuLoop\Huloop Automation\testxml\<ModuleName>
- Replace <YourUser> with your Windows username.
- Replace <ModuleName> with the name of the module you want to import the Case from.
Example: C:\Users\swati.nagi\HuLoop\Huloop Automation\testxml\Command Module
Steps to Import a Case:
- Sign in to your HuLoop account.
- Click Automation.
- Select or create an Automation Project: Click the title of the automation project you want to work on or create a new one, if required.
- This will navigate you to the Module page.
- Select or create a Module: Select the Module in which you want to import the Case by clicking the module title or create a new module using the Add Module button if you want to.
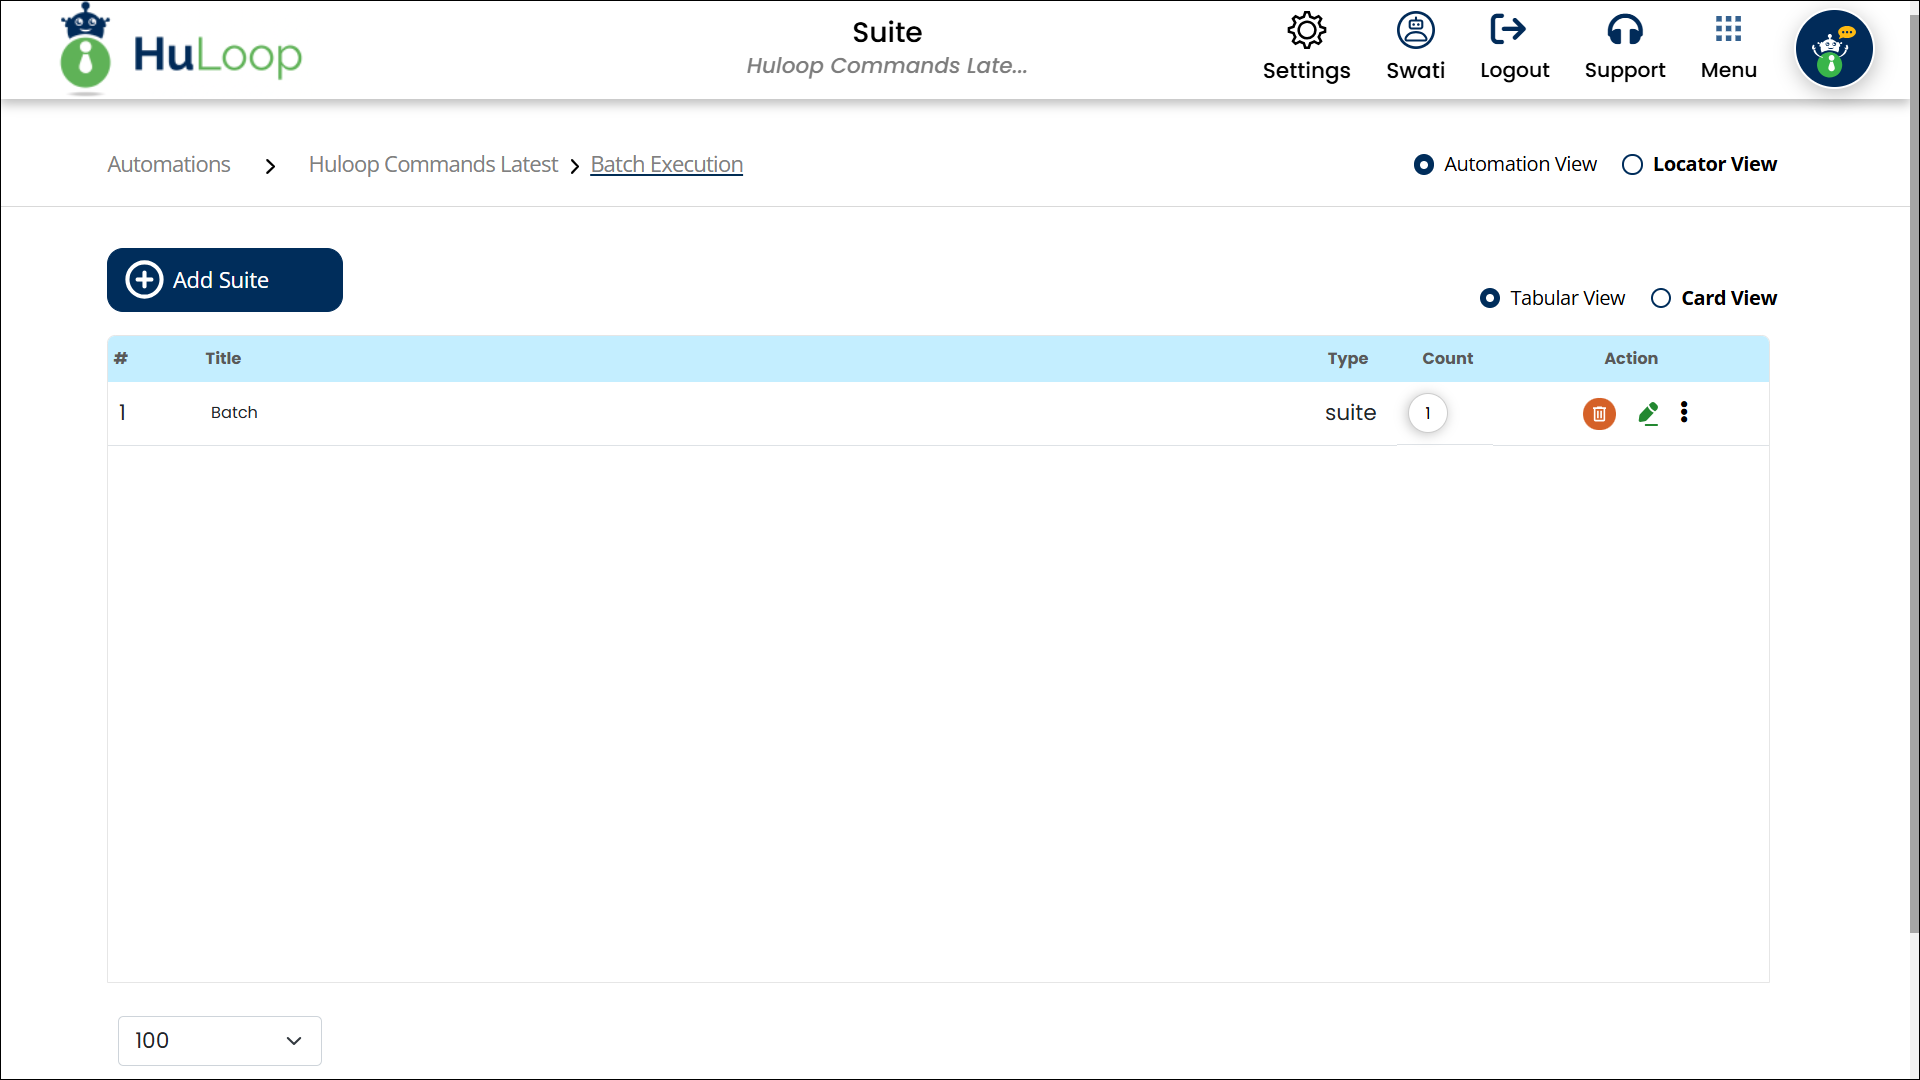
- Select or create a Suite: Create a new Suite by using the Add Suite button if you do not already have a Suite in which you want to import the Case.
You can import Cases into existing Suites. The imported Case will appear alongside existing Cases in that Suite.
- Import the Case: Click the 3 dots menu next to the Suite name and select Import Case.
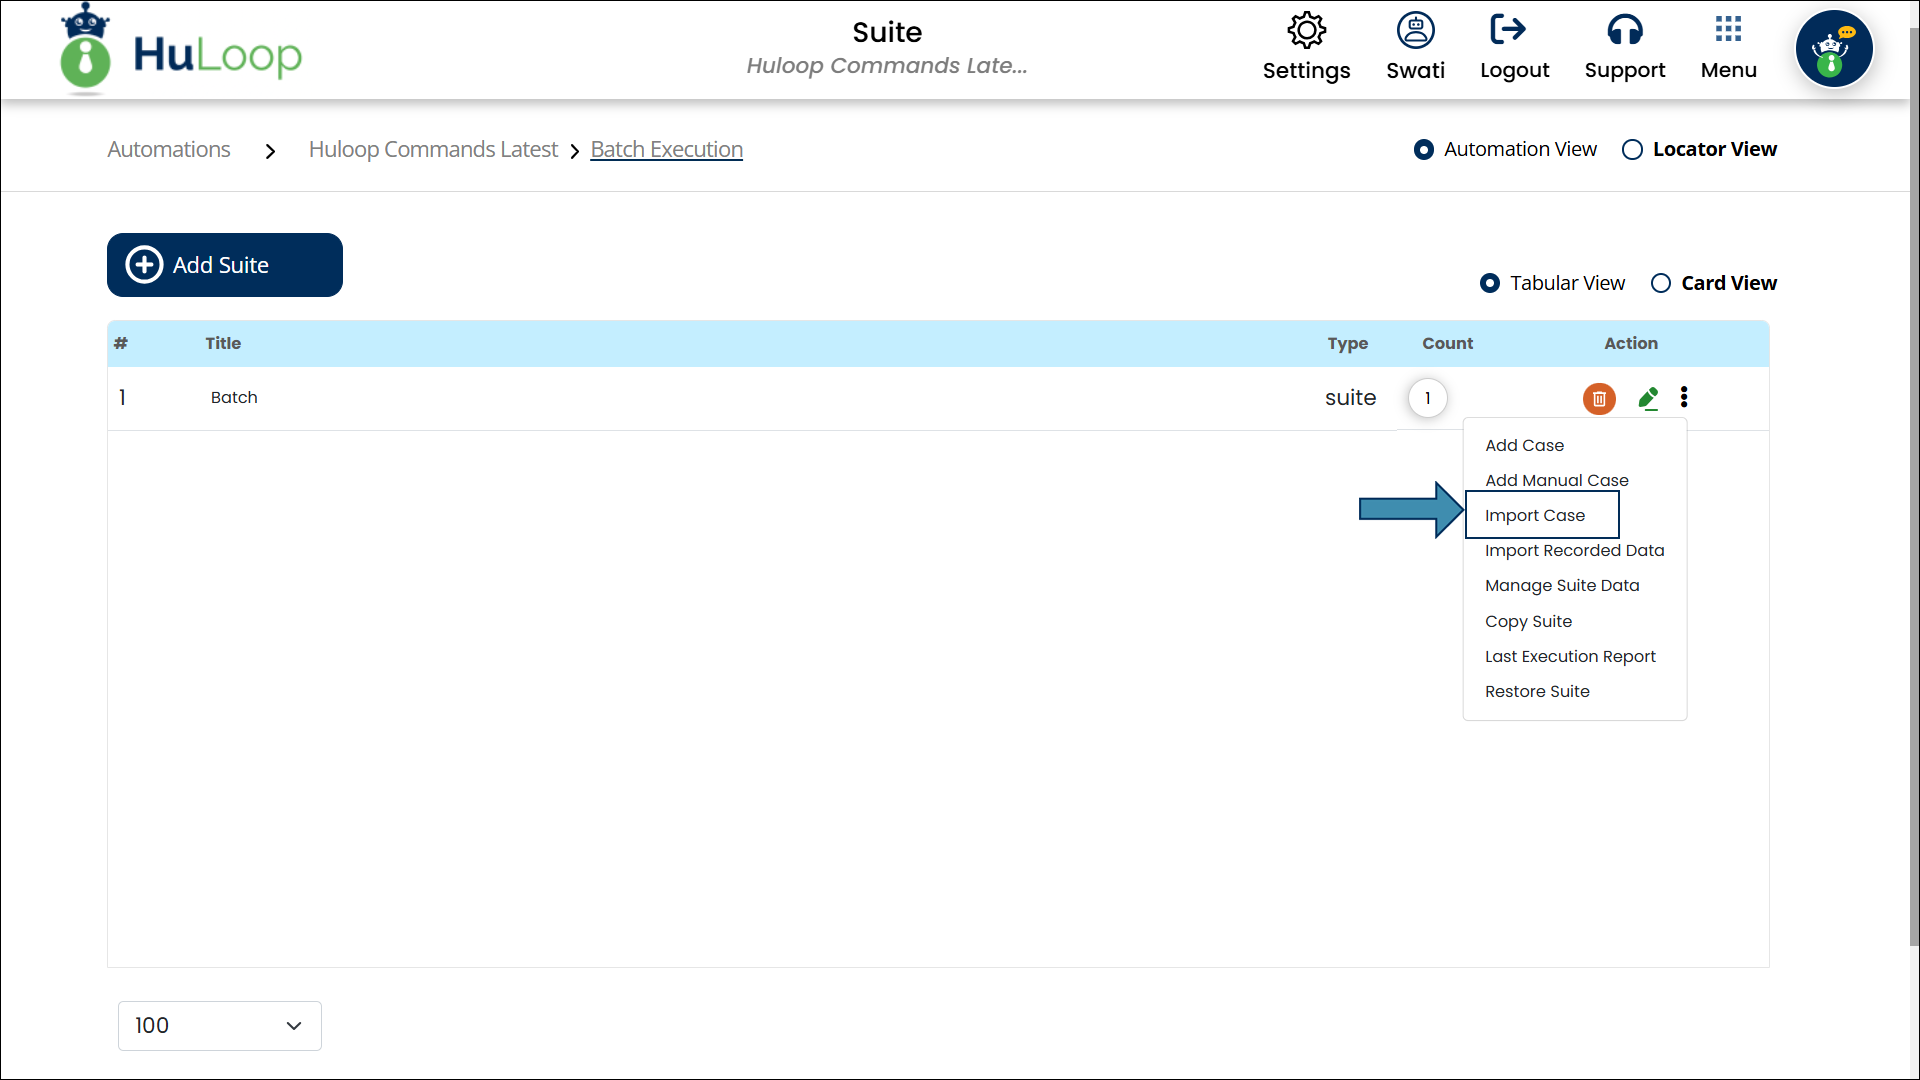
- You will see a pop-up window prompting you to upload the XML Case file.
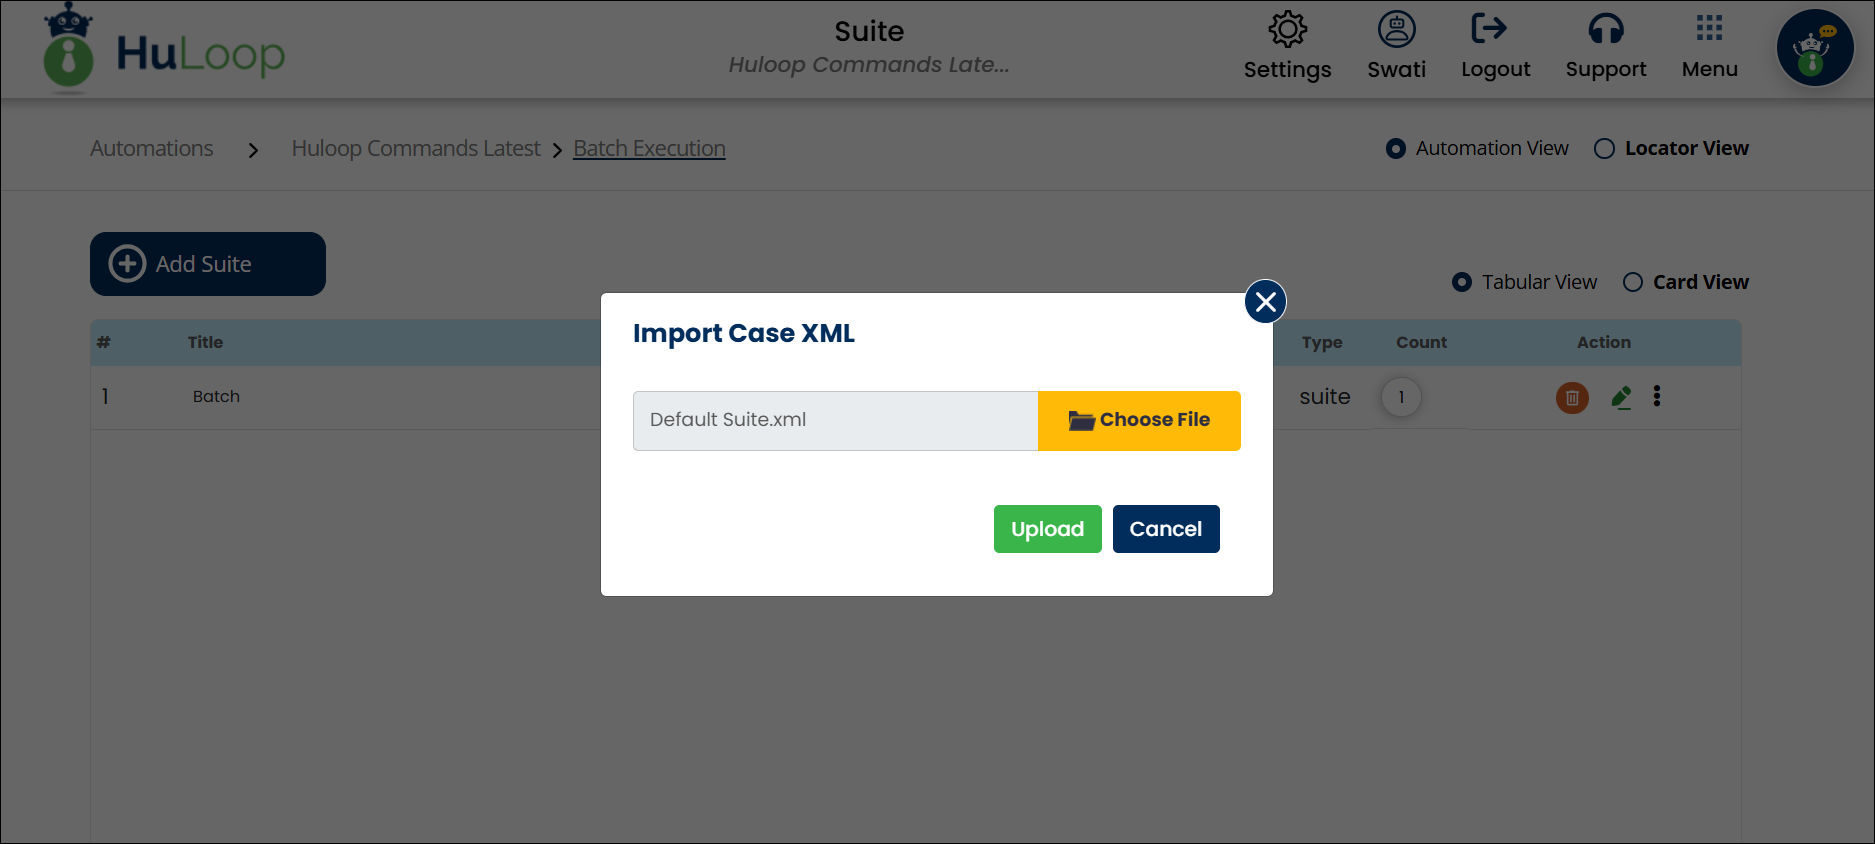
- After choosing the file, click Upload.
- This will import all the cases in this suite.
Note: When importing a Case, only the steps are imported, locators are not included in the suite file. You need to import the locators separately.
Steps to Import Locators:
- Navigate to the module level of your project
- Go to Locator View
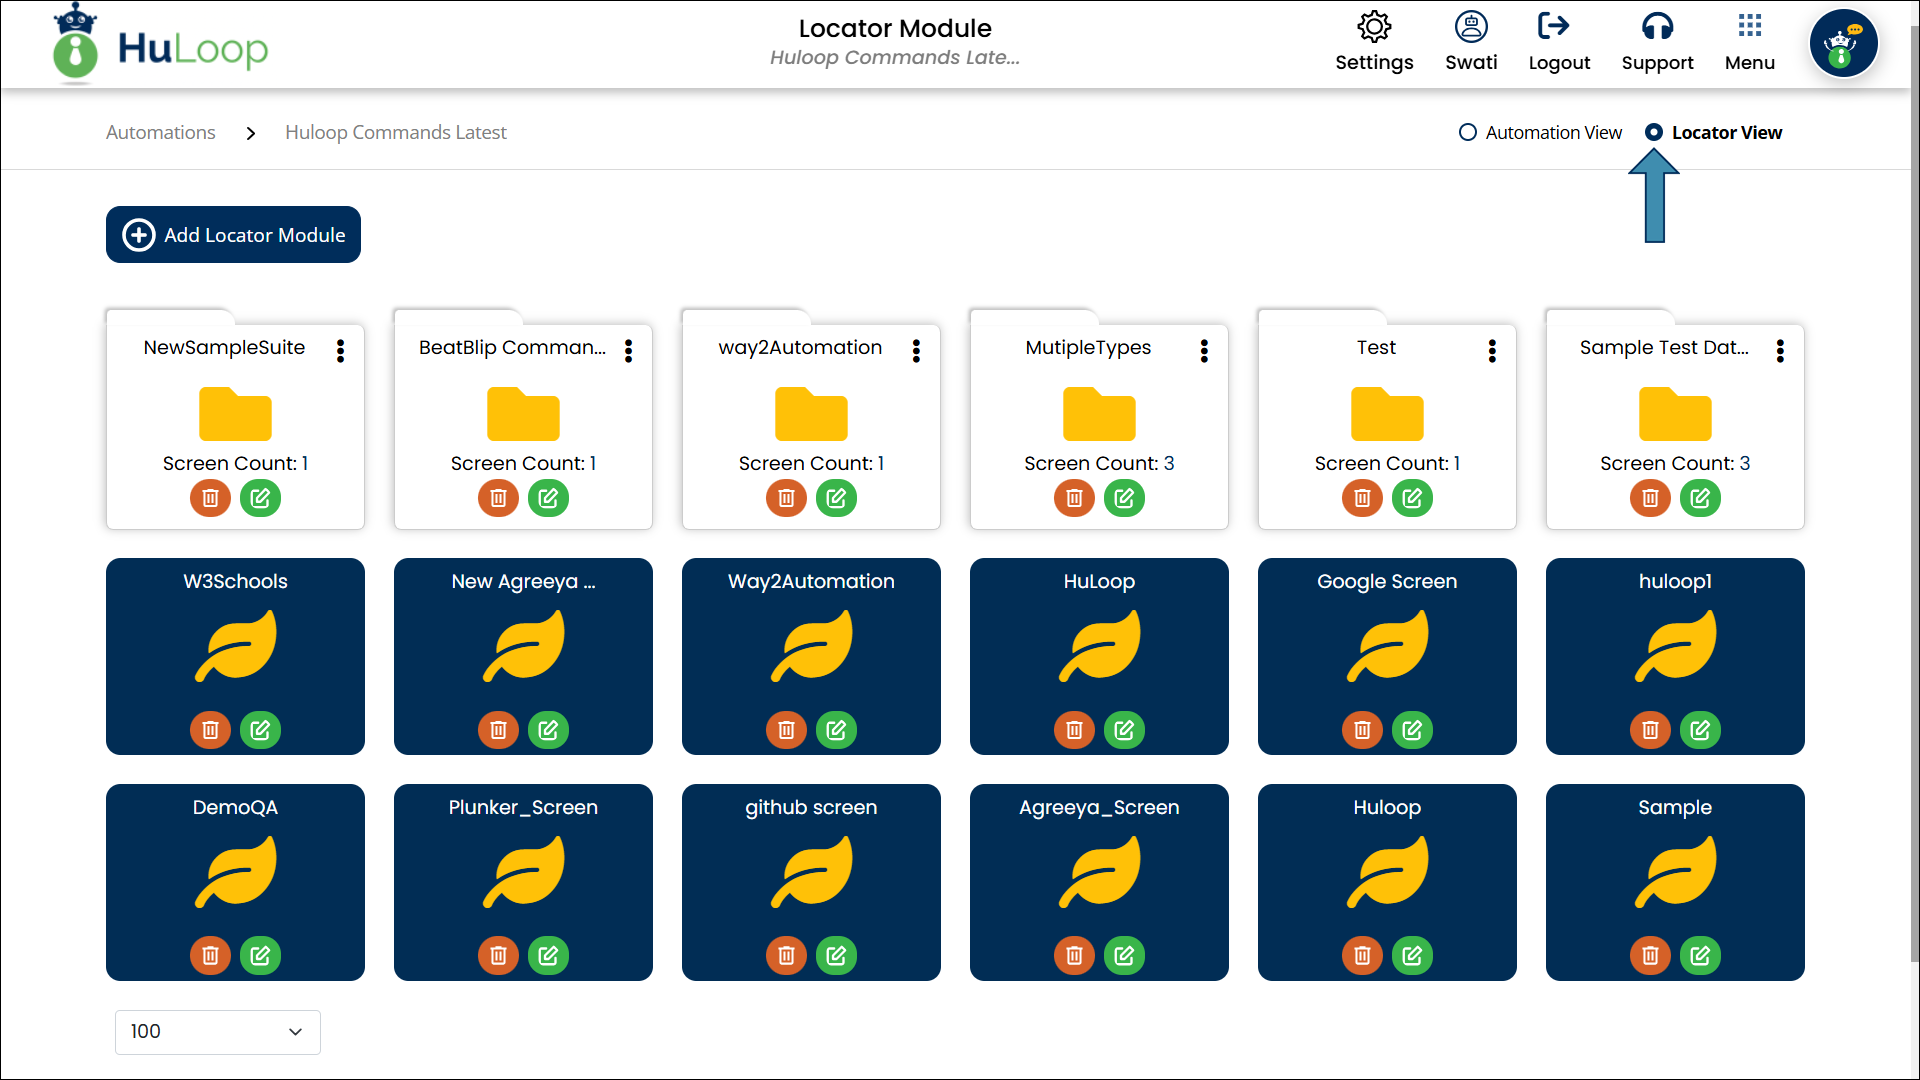
- Create a new Locator Module: Click Add Locator Module, and name it appropriately (for example, Batch Module).
- Import the locators: Click the 3 dots menu next to this locator module and select Import Locators.
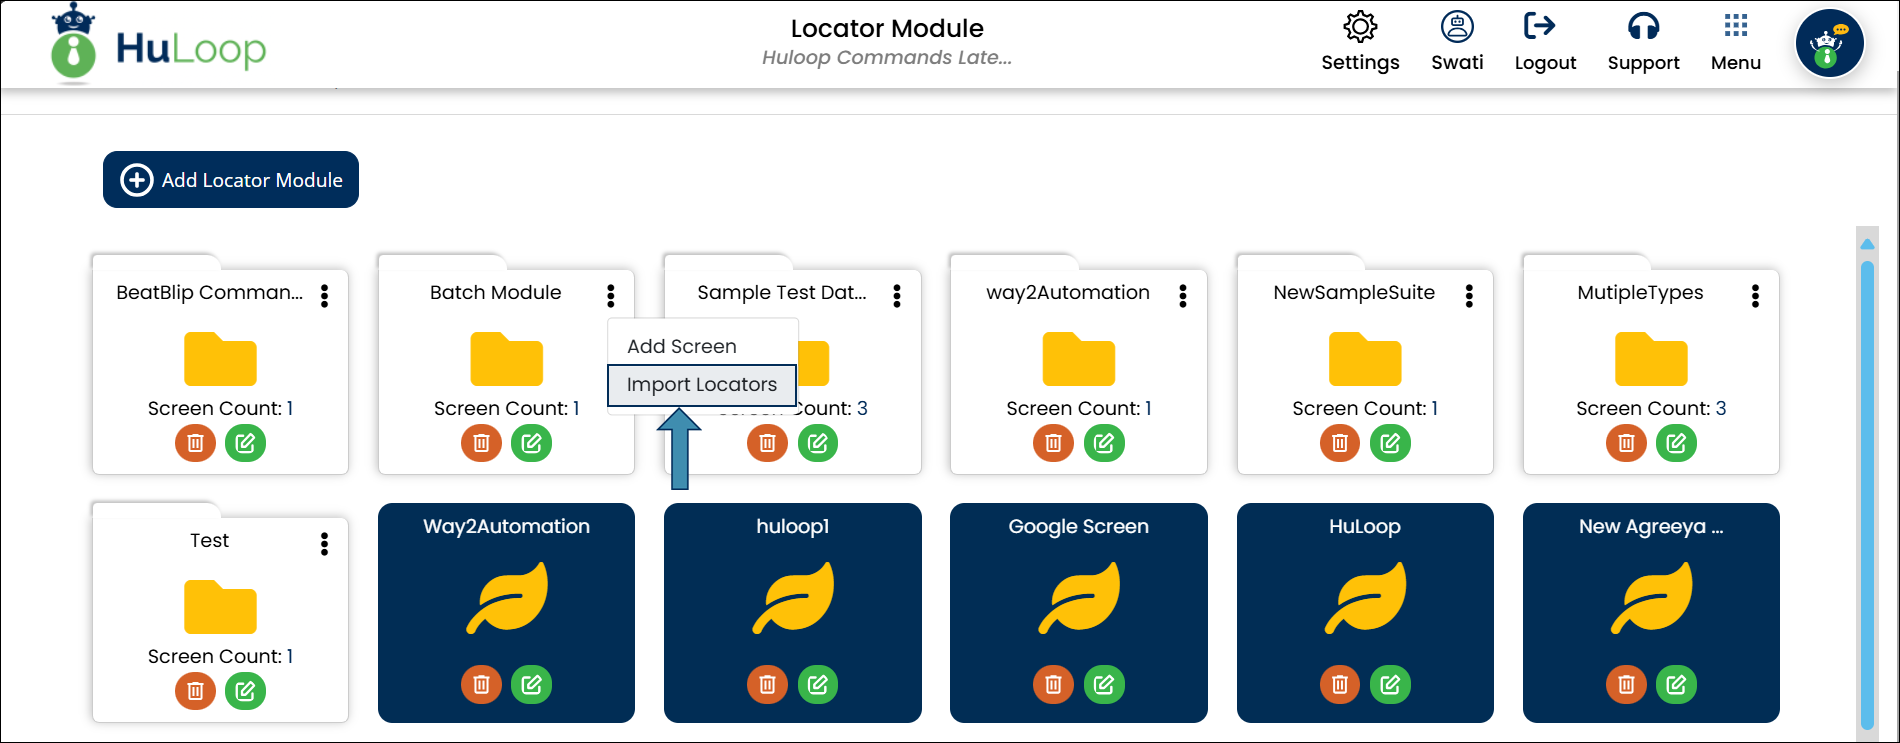
- A pop-up will appear asking you to upload the locators file:
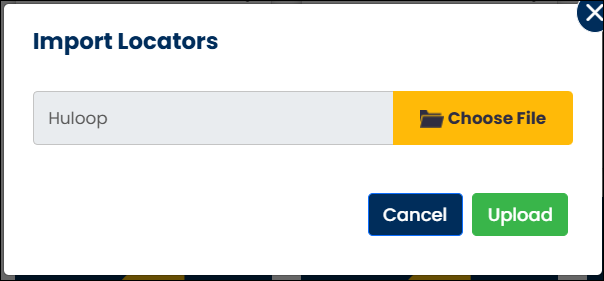
- Upload the Locators File: Choose the locators file from the same project. You can find the locator file at:
- C:\Users\<YourUser>\HuLoop\<ProjectName>\locators\<ScreenName>
- Replace <YourUser> with your Windows username.
- Replace <ProjectName> with the source project name.
- Replace <ScreenName> with the name of the screen you want to import.
Example: C:\Users\swati.nagi\HuLoop\Command Module\locators\HuLoop
- After selecting the file, click Upload to import locators.
Always ensure that the screen name matches the screen used in the imported Case. This ensures a smooth and error-free execution.
- Sign in to your HuLoop account.
- Click Open Automation.
- Select the icon of the automation project you want to delete.
- A pane will appear on the right. Click the Delete icon
 , which appears above the three dots .
![]()
- Sign in to your HuLoop account.
- Click Open Automation.
- Click the title of the automation project you want to work on.
This will navigate you to the Module page. This is the main area where you manage all tests for your project.
- Click the Add Module
Note: HuLoop supports Tabular View and Card View. The screenshots provided show both views to help you navigate based on your preferred interface. While functionality remains the same, the layout may differ.
- Fill in the Module Name (Mandatory) and Description (Optional).
- Click Save button.
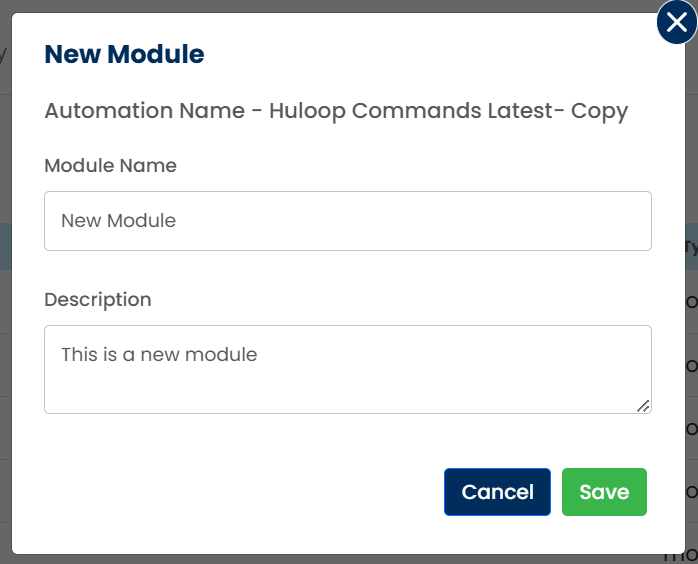
This module will appear on the Module page:

- This module will contain a default Suite which you can edit as per your requirements.
- You can access this Suite by clicking the Module name.
- Sign in to your HuLoop account.
- Click Open Automation.
- Click the title of the automation project you want to work on.
This will navigate you to the Module page. This is the main area where you manage all tests for your project.
- Select the corresponding module title in which you want to create the new Suite.
Note: HuLoop supports Tabular View and Card View. The screenshots provided show both views to help you navigate based on your preferred interface. While functionality remains the same, the layout may differ.
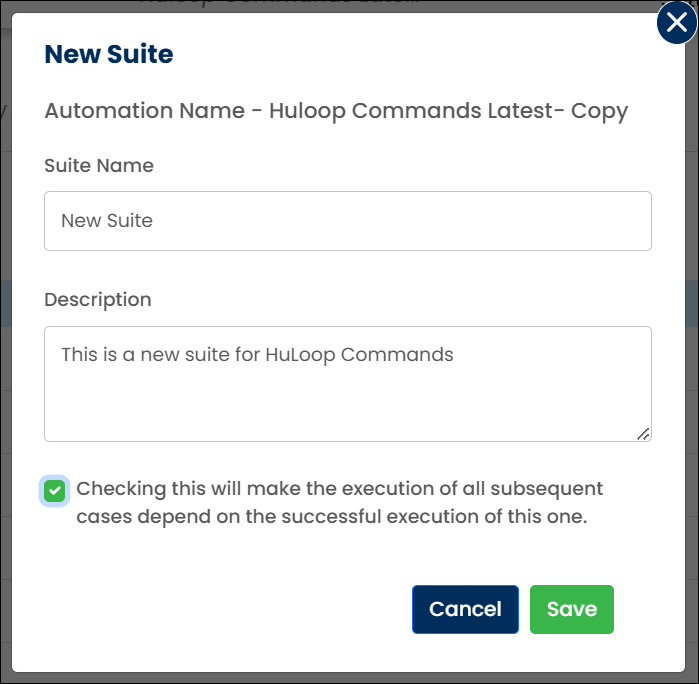
- Click the Add Suite Suite groups related Cases together, making them easier to manage.
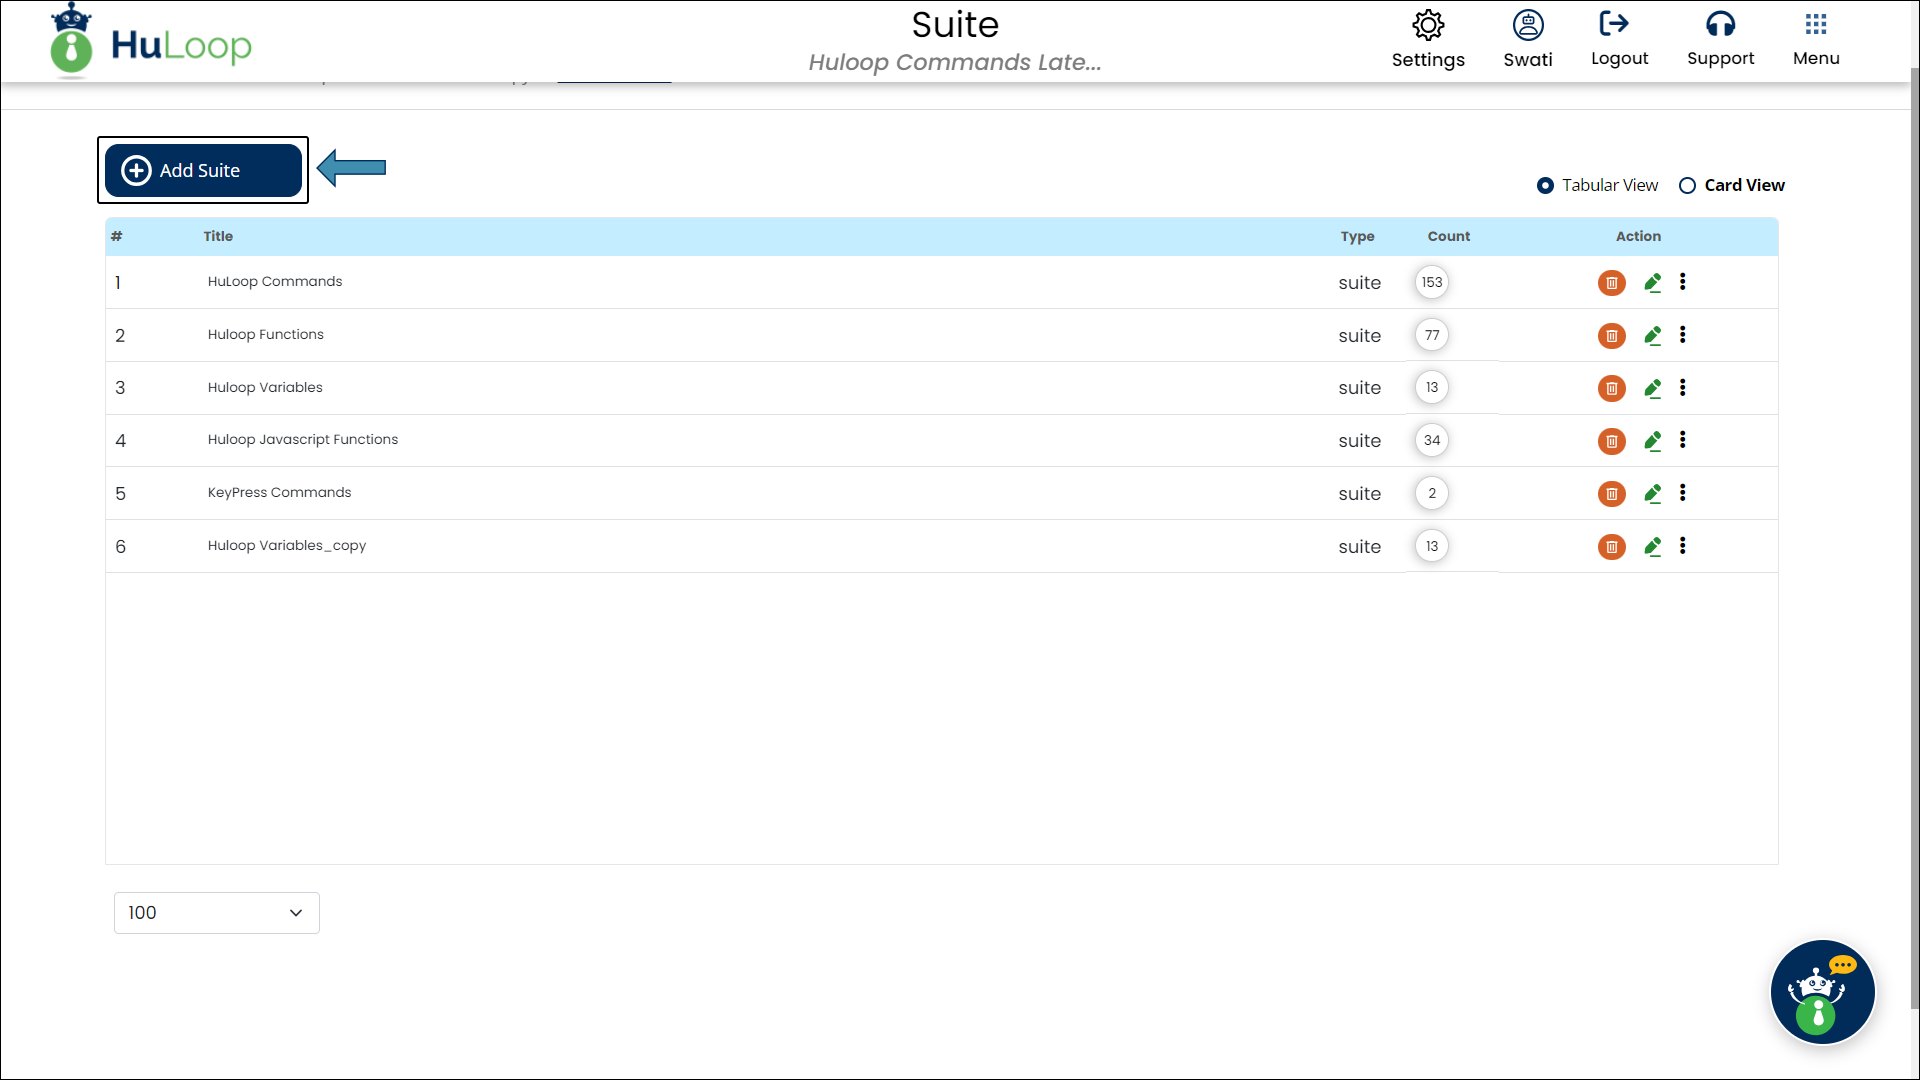
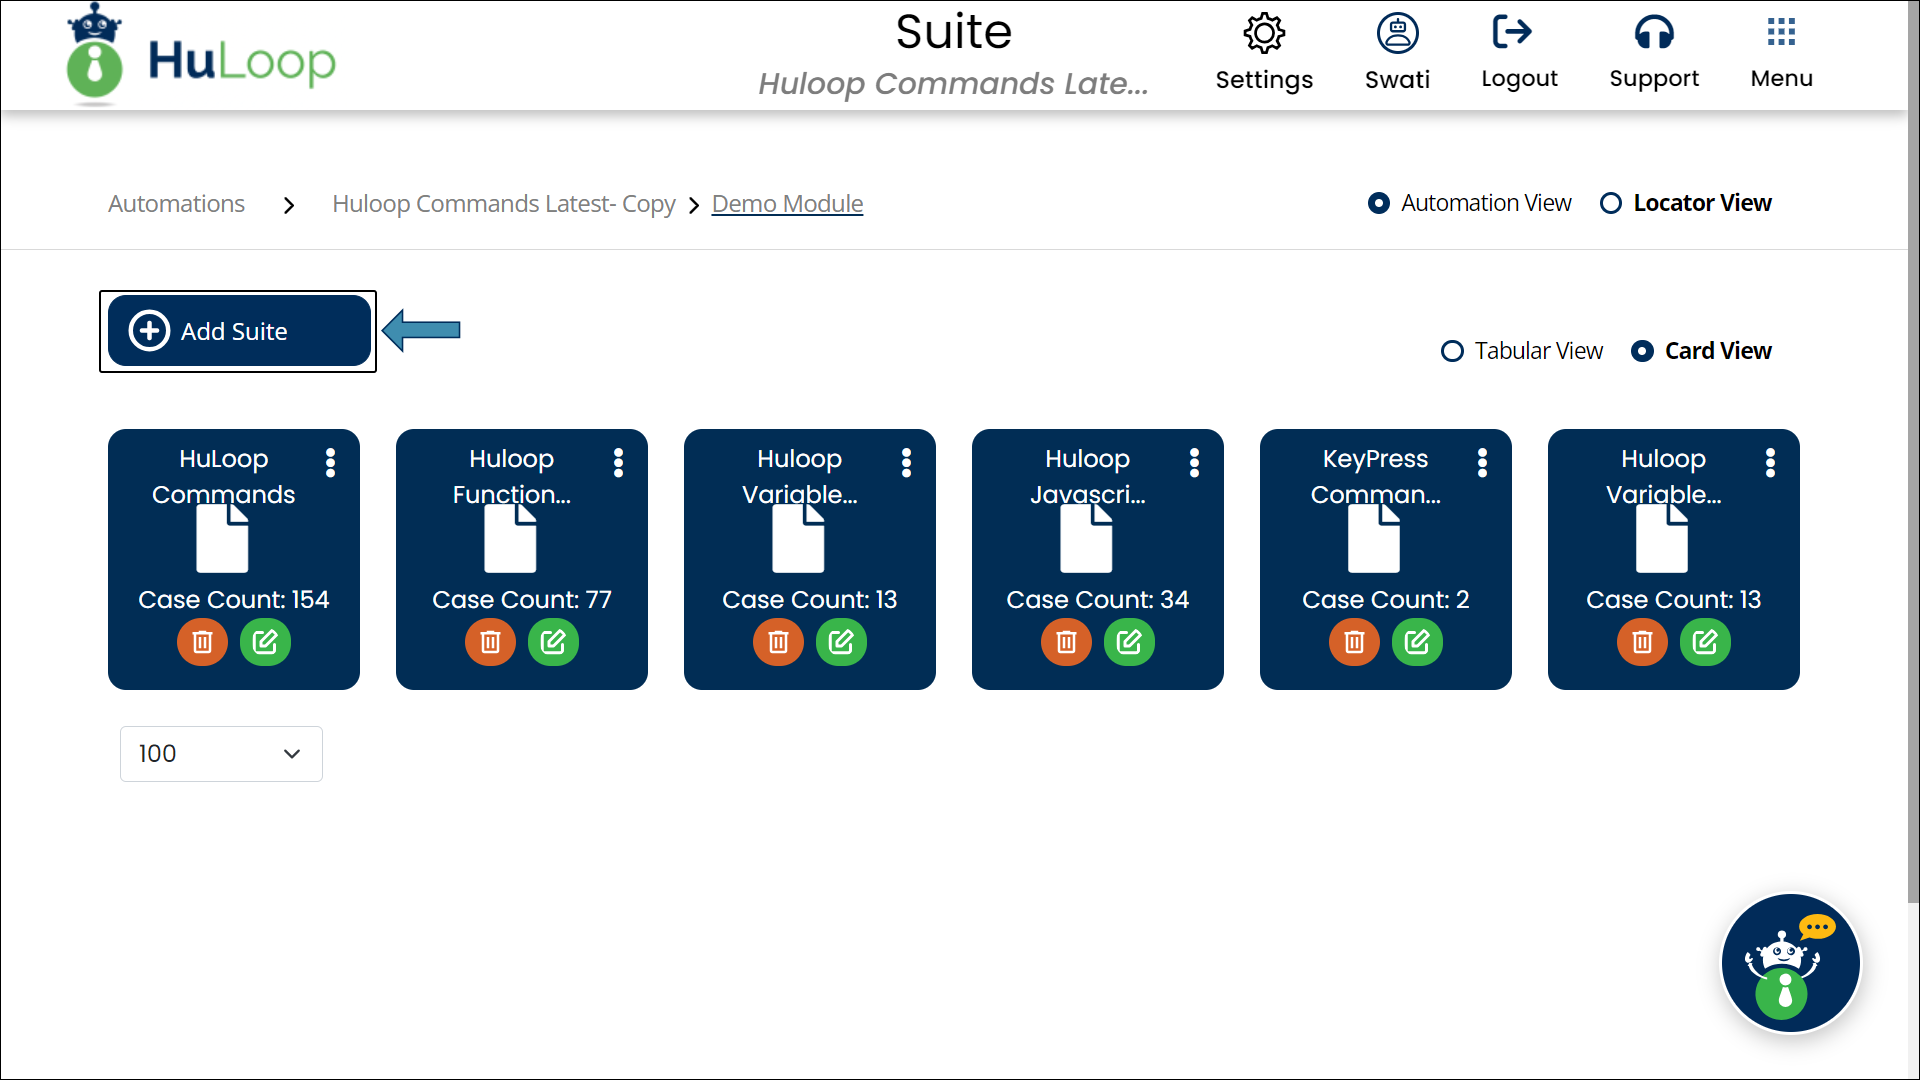
- Fill in the Suite Name (Mandatory) and Description (Optional).
- Click the Check box if you want the execution of all subsequent cases to depend on the successful execution of this one else leave it as unchecked.
- Click Save button.
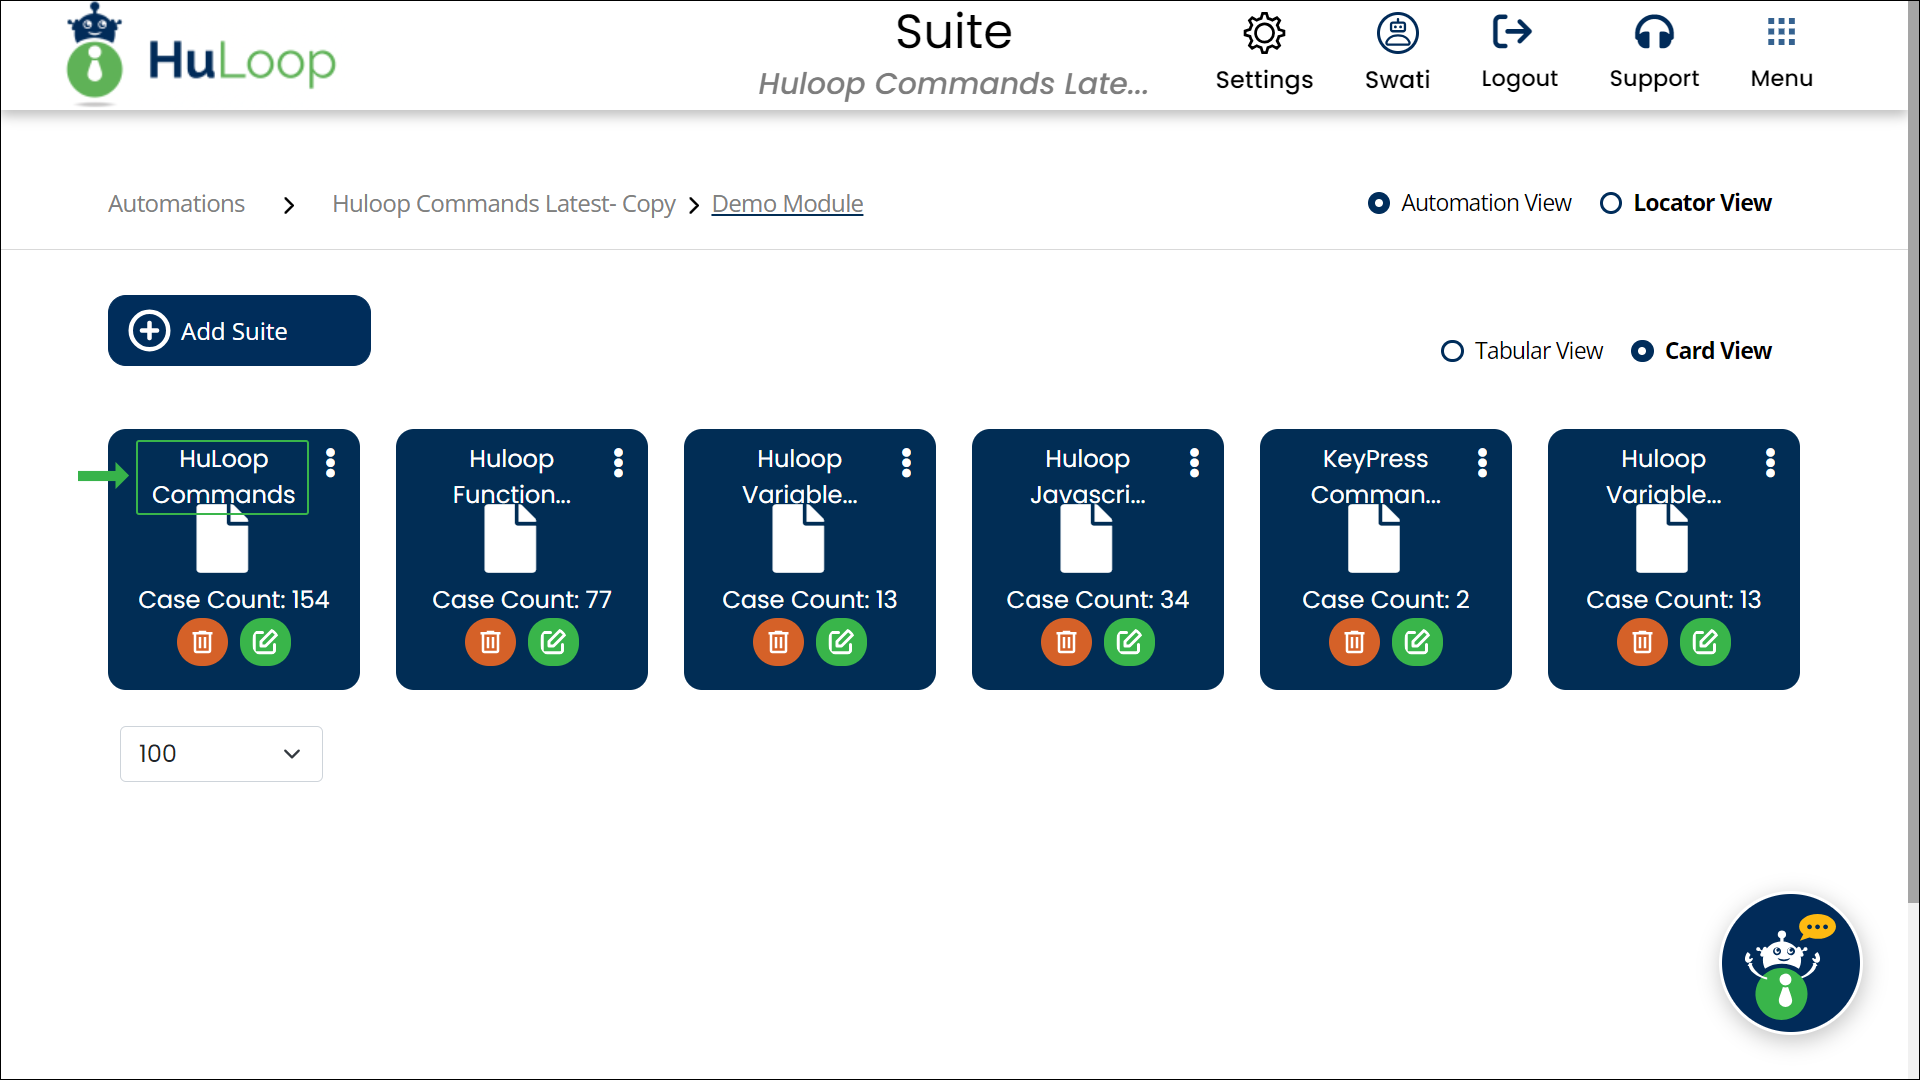
- This Suite will appear on the Suite page and will contain a default Case which you can edit as per your requirements.
- You can access this Case by clicking the Suite Name.
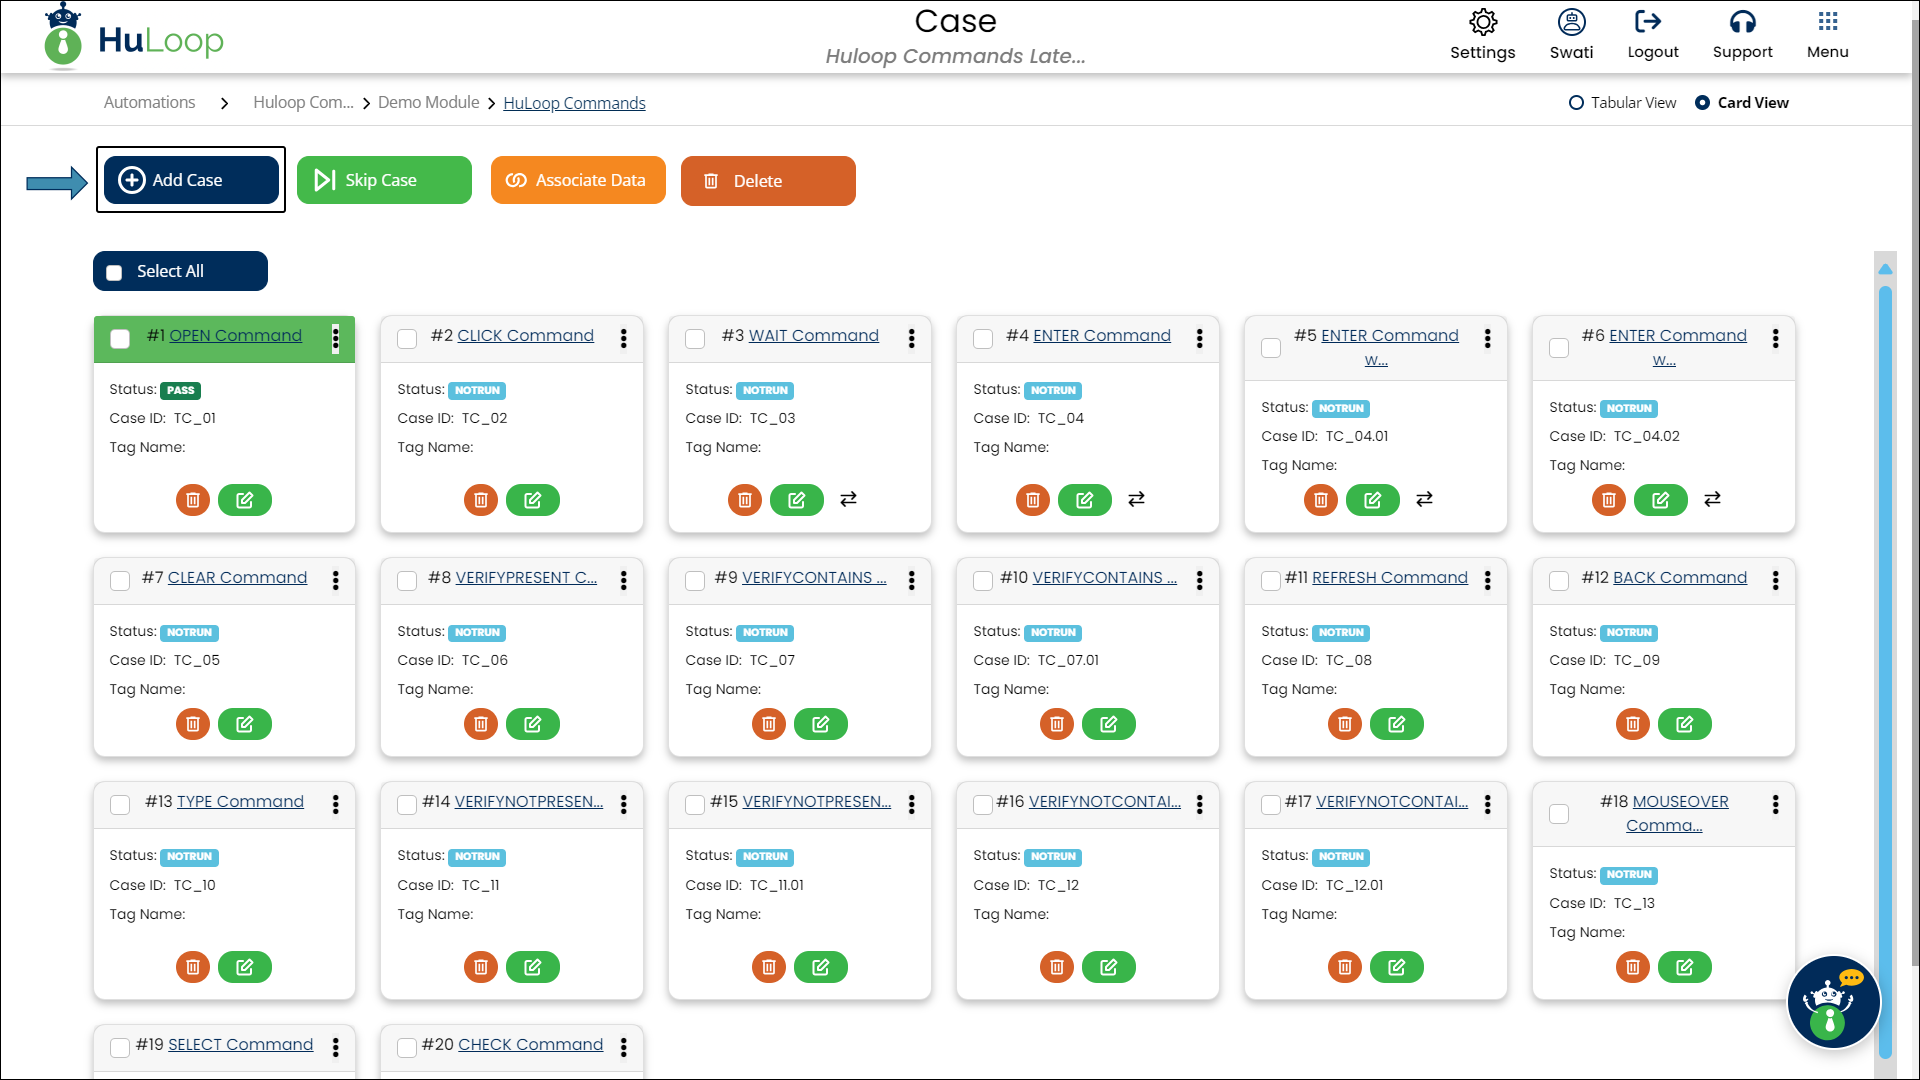
- Sign into your HuLoop account.
- Click Open Automation.
- Click the title of the automation project you want to create the Case in.
- This will navigate you to the Module page. Select the corresponding module title.
Note: HuLoop has two views: Tabular View and Card View. The default view is Tabular, but you can switch to Card View by selecting the corresponding radio button. For a clearer understanding, screenshots of both views are included in this guide.
You can customize the number of items displayed on the screen using the Pagination dropdown, located at the bottom left. Simply select from the options to view 20, 25, 50, or 100 items at a time.
- Select the Suite by clicking the corresponding suite title. The Suite groups related Cases together, making them easier to manage.

- You will see a list of existing Cases. Click Add Case to create a new case.
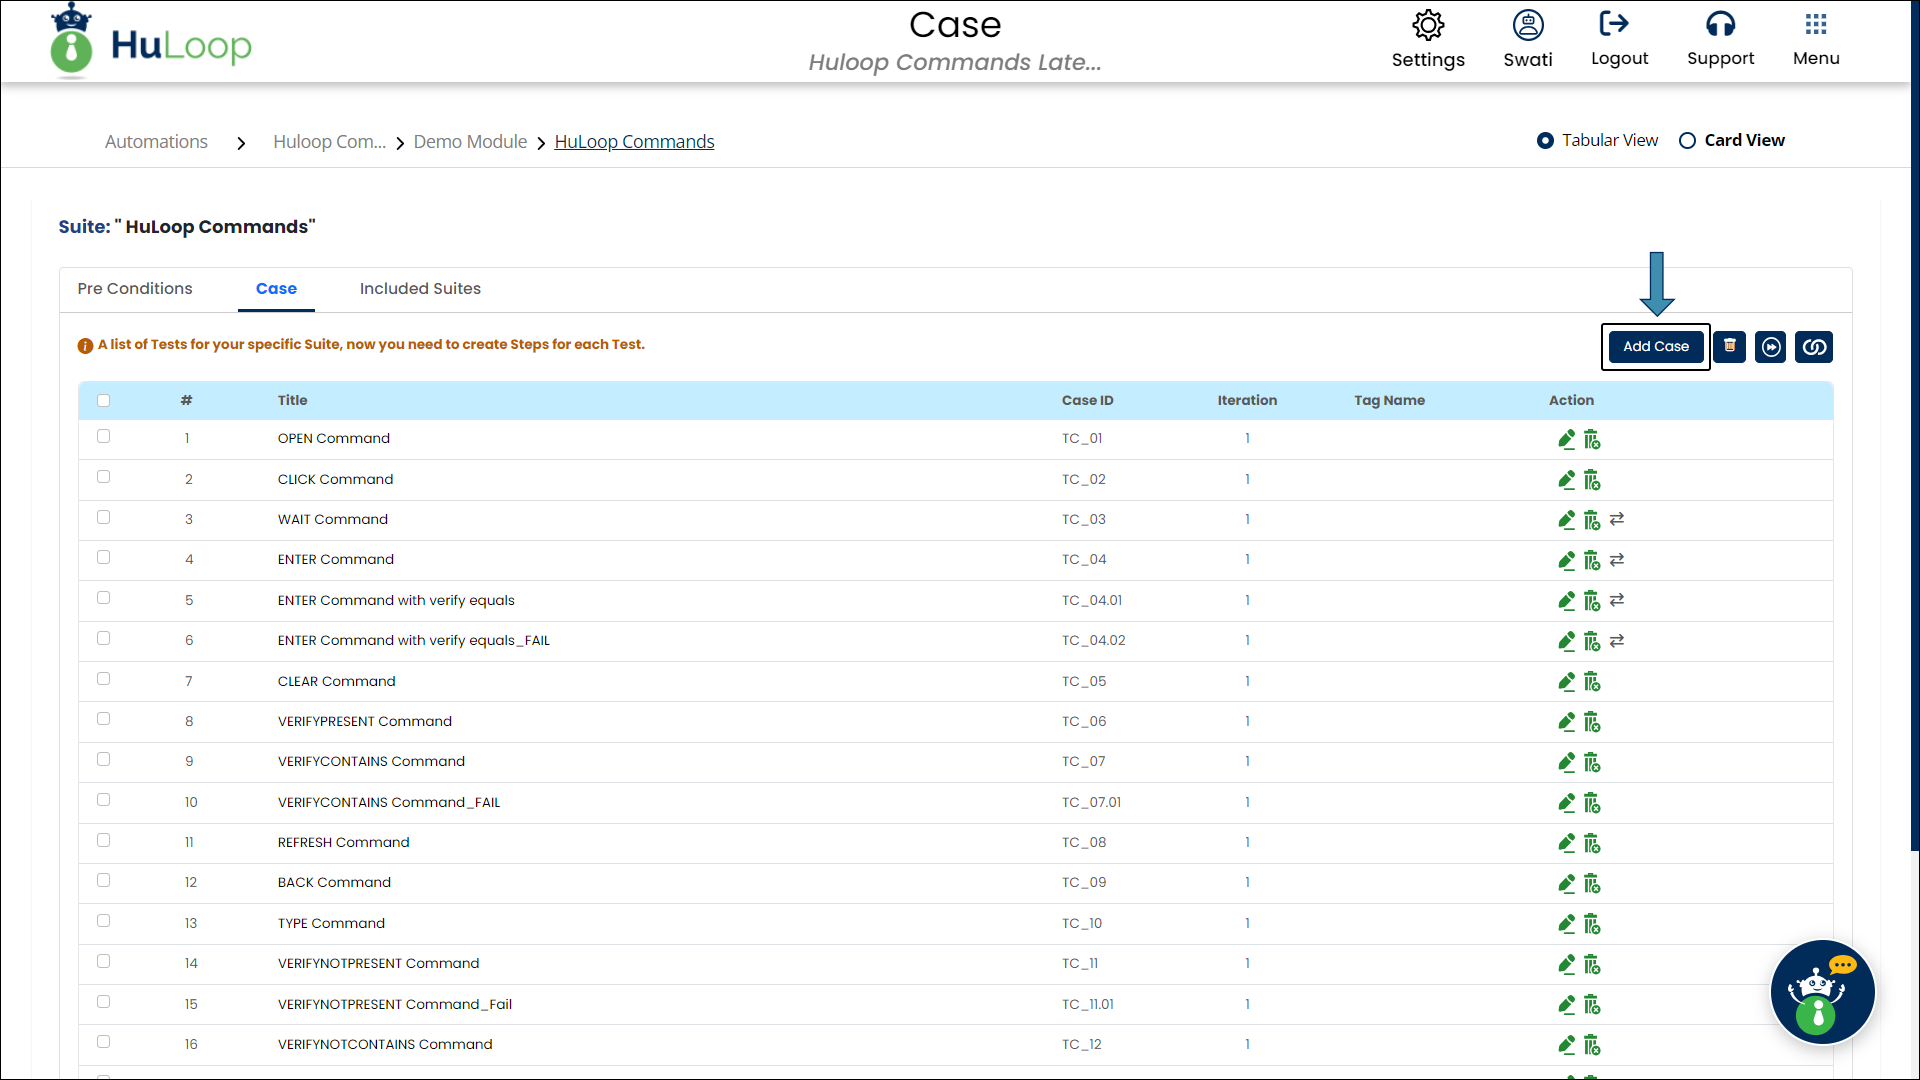
- You’ll see the Add New Case pop-up:
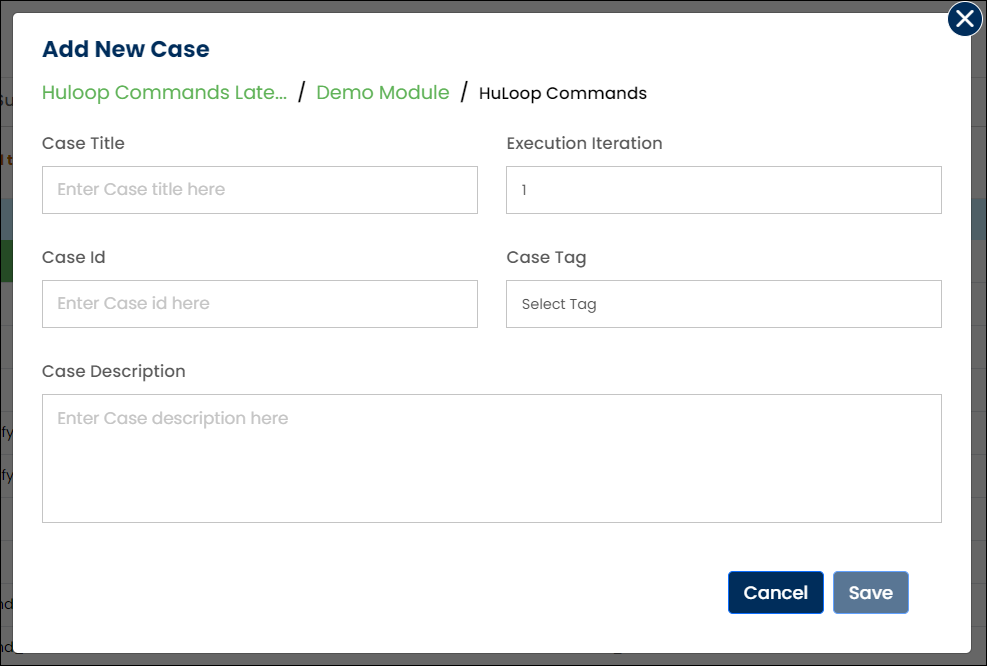
- Fill in the following details:
- Case Title: Enter the title of the Case (required).
- Execution Iteration: Choose the iteration for this case. (1 is the default value)
The execution iteration is set to 1 by default. You can delete it and enter a new value or use the ![]() ( upward and downward arrows) to increase or decrease the execution iteration values, respectively.
( upward and downward arrows) to increase or decrease the execution iteration values, respectively.
- Case Id: Enter the Case Id if applicable.
- Case Tag: Select a tag from the following options:
- IMPORTANT
- VERY_IMPORTANT
- GOOD_TO_HAVE
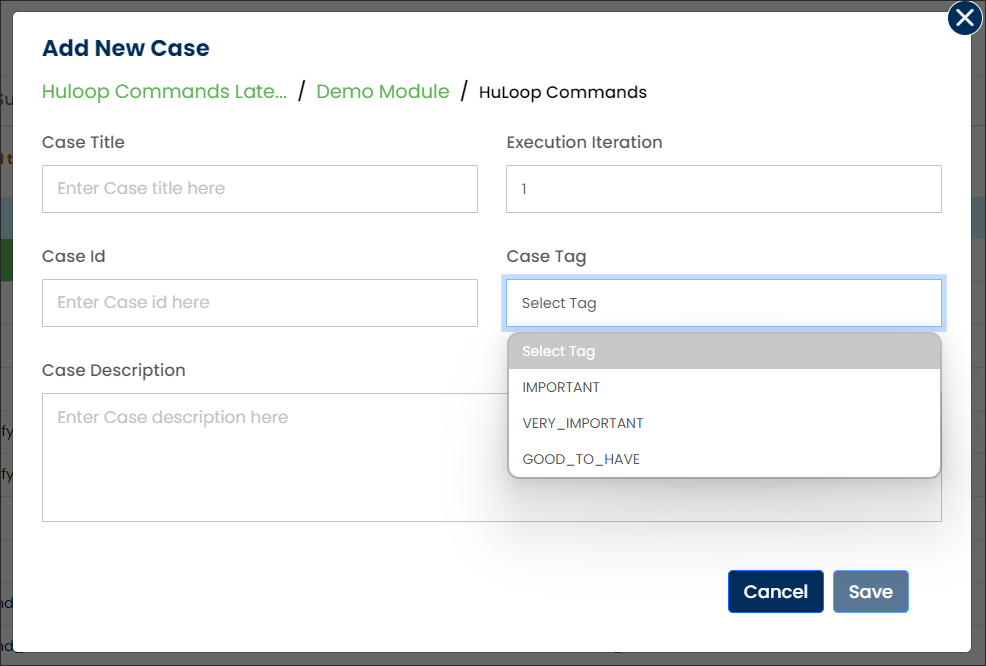
- Case Description: Provide a brief description of the Case.
Note: Case Title is a required afield.
- Click Save.
Adding steps to Cases allows you to build or modify your Case to automate tasks. Each step performs a specific action that can be customized by selecting commands and defining parameters.
Define a step in Tabular View
To define an action in Tabular View:
- Log in to your HuLoop account.
- Open the Case where you want to define a step.
- Click the ADD Step button to create a new step.

- The Add New Step pop-up will appear. This step will appear as Step 1 in the Case.
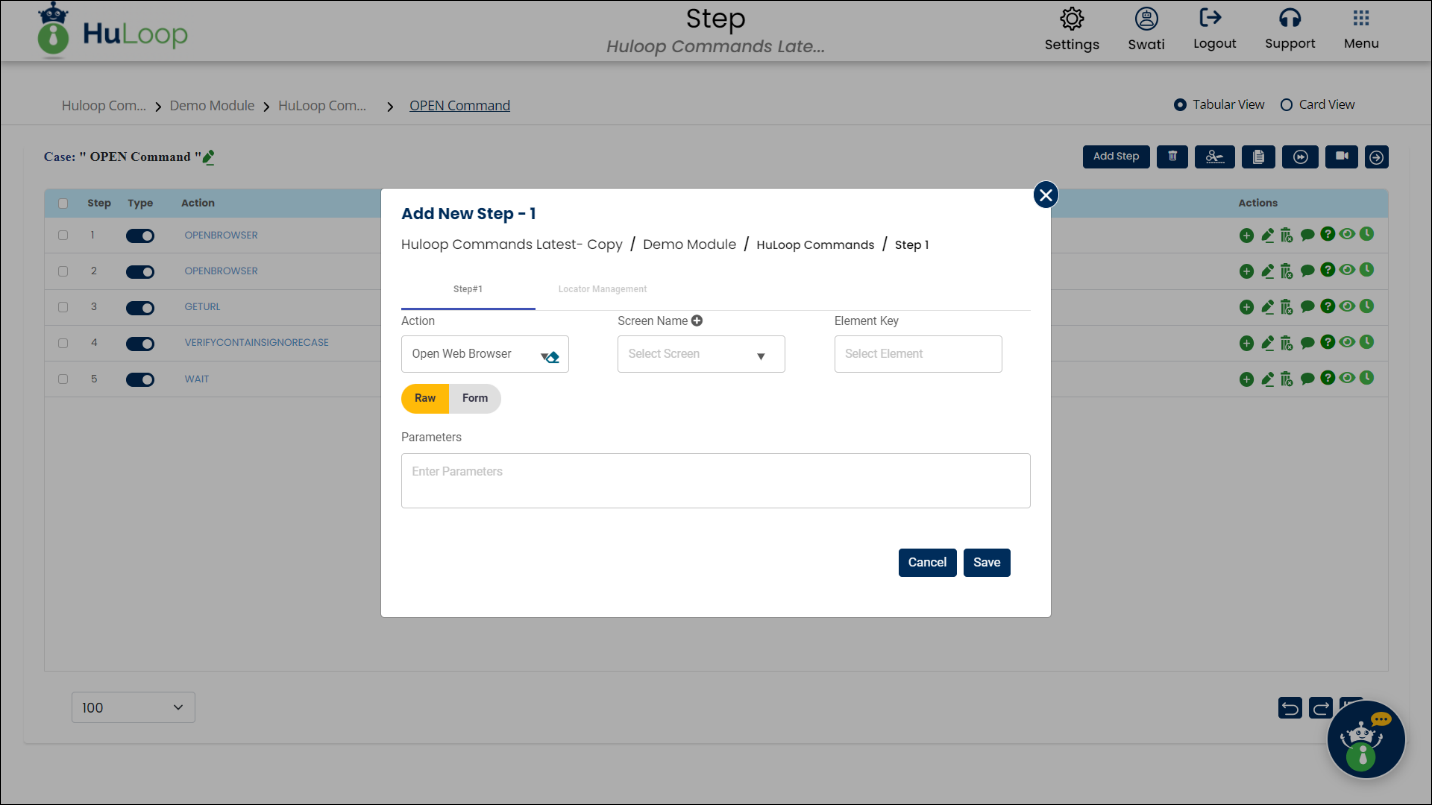
- The default action is Open Web Browser. If you want to change it, click
 to remove it and then click
  icon to get a list of actions.
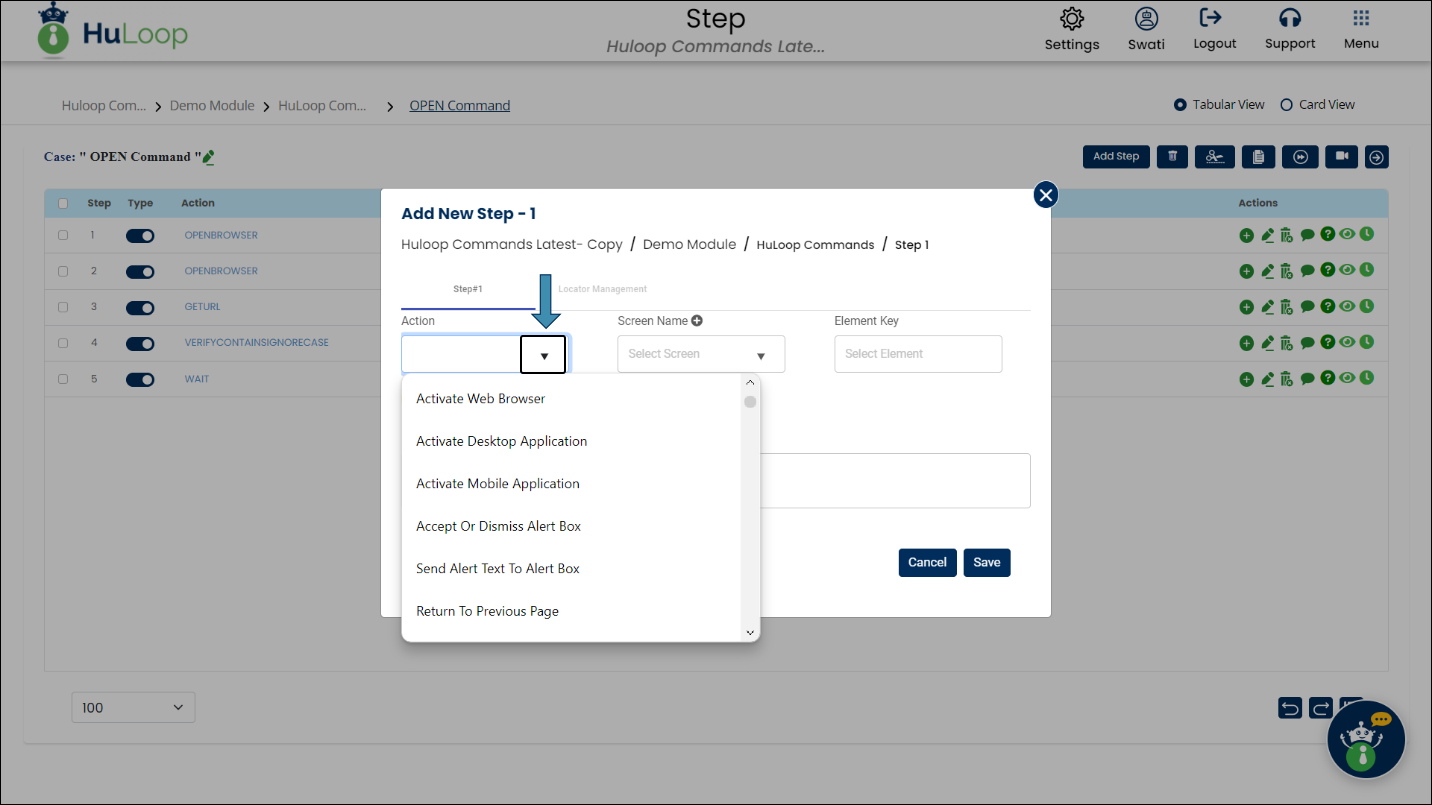
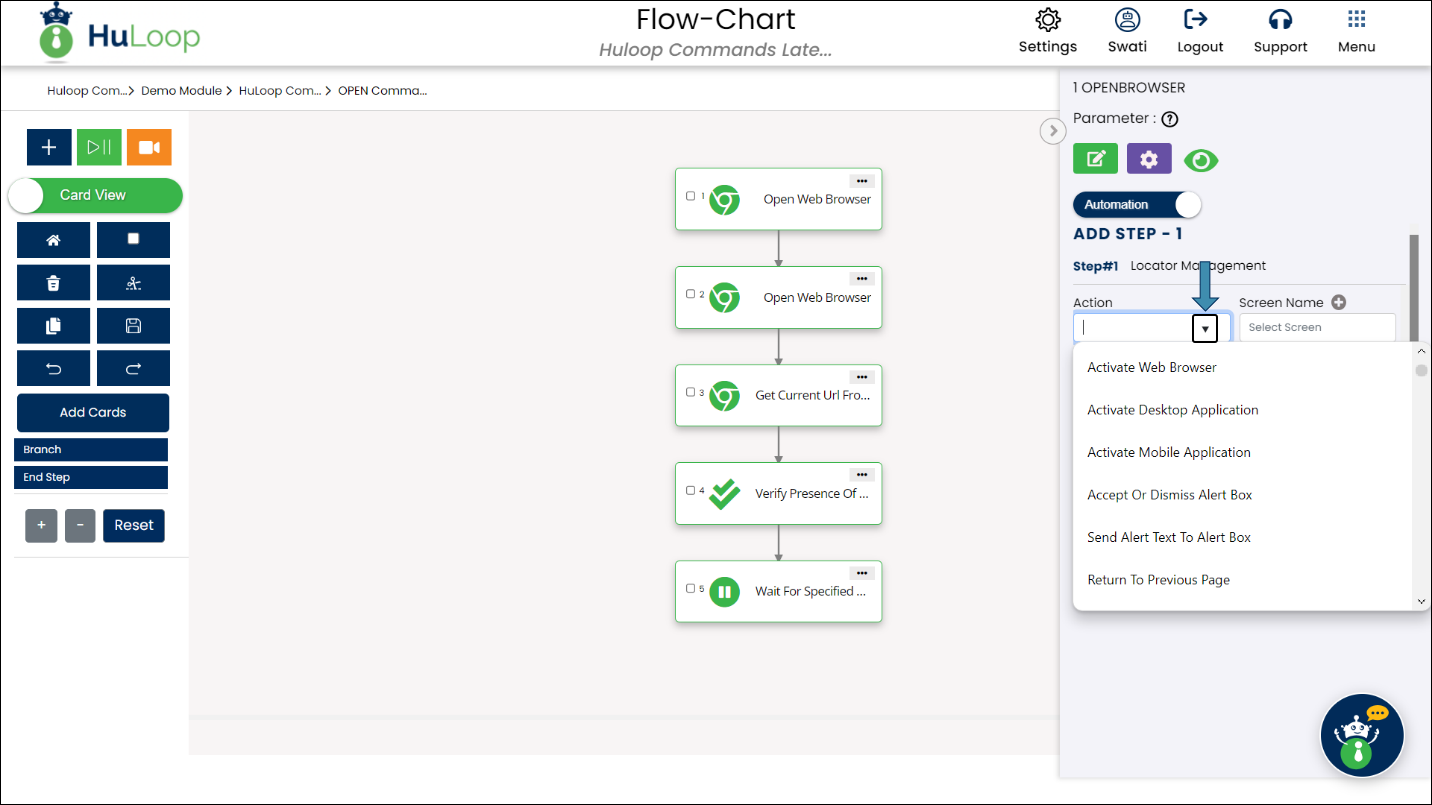
- From the Action drop-down, select the required action for the step.
You can quickly find an Action by typing a keyword into the action field. As you type, a list of matching actions will appear, and you can select the desired action from the results. This makes it faster to locate and add actions, especially when dealing with many available options.
- If required, fill in the Screen Name and Element Key and define the parameter’s value in the Parameters box.
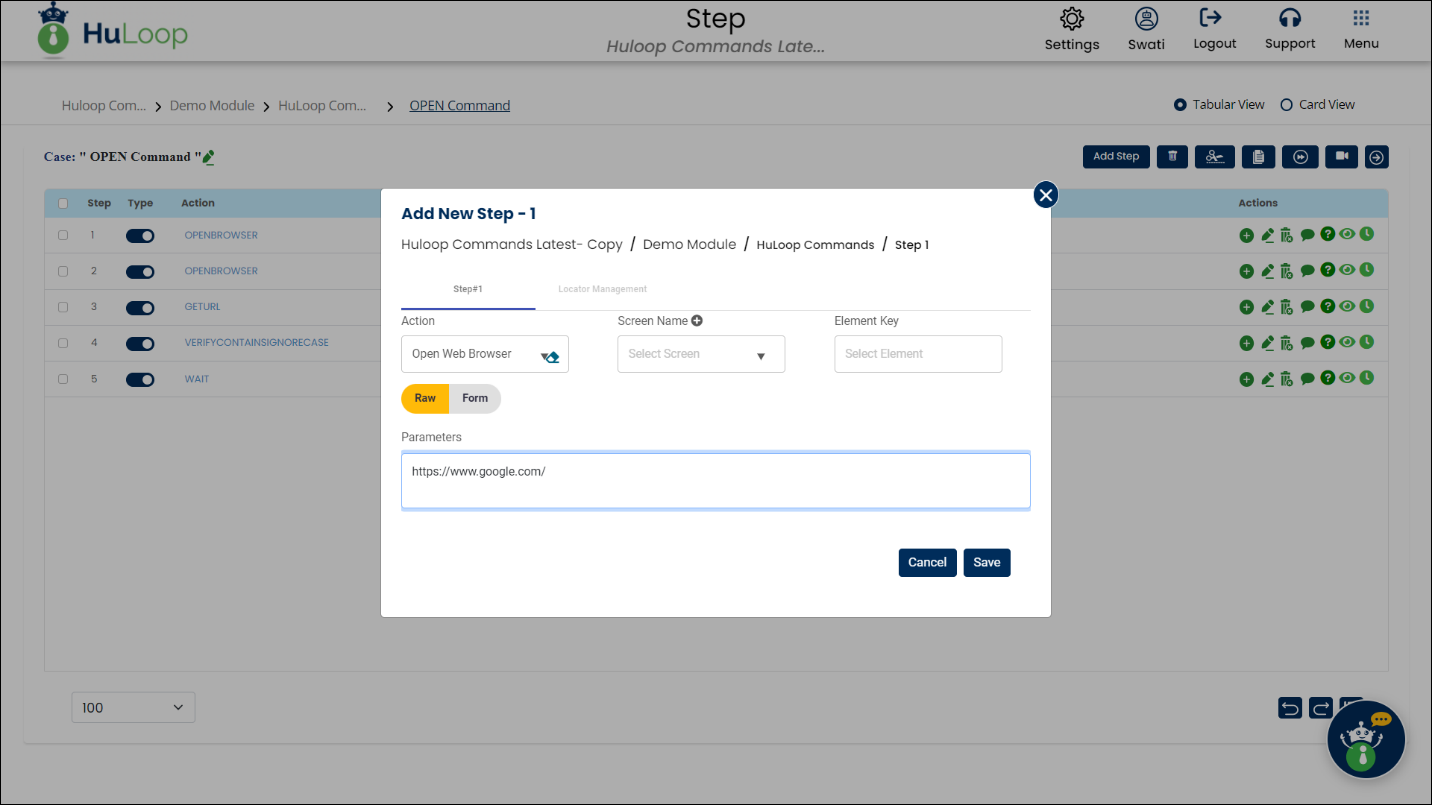
- Click Save.
You can also add a step by clicking the inline ![]() icon next to an existing step. This will insert the new step directly below the selected one. For example, clicking
icon next to an existing step. This will insert the new step directly below the selected one. For example, clicking ![]() next to step 4 will add a new step at index 5.
next to step 4 will add a new step at index 5.
Define a step in Card View
To add an action step in Card View, open the Case where you want to define a step.
You can either:
Add a step at index 1
- Click the Add Cards button to create a new step.
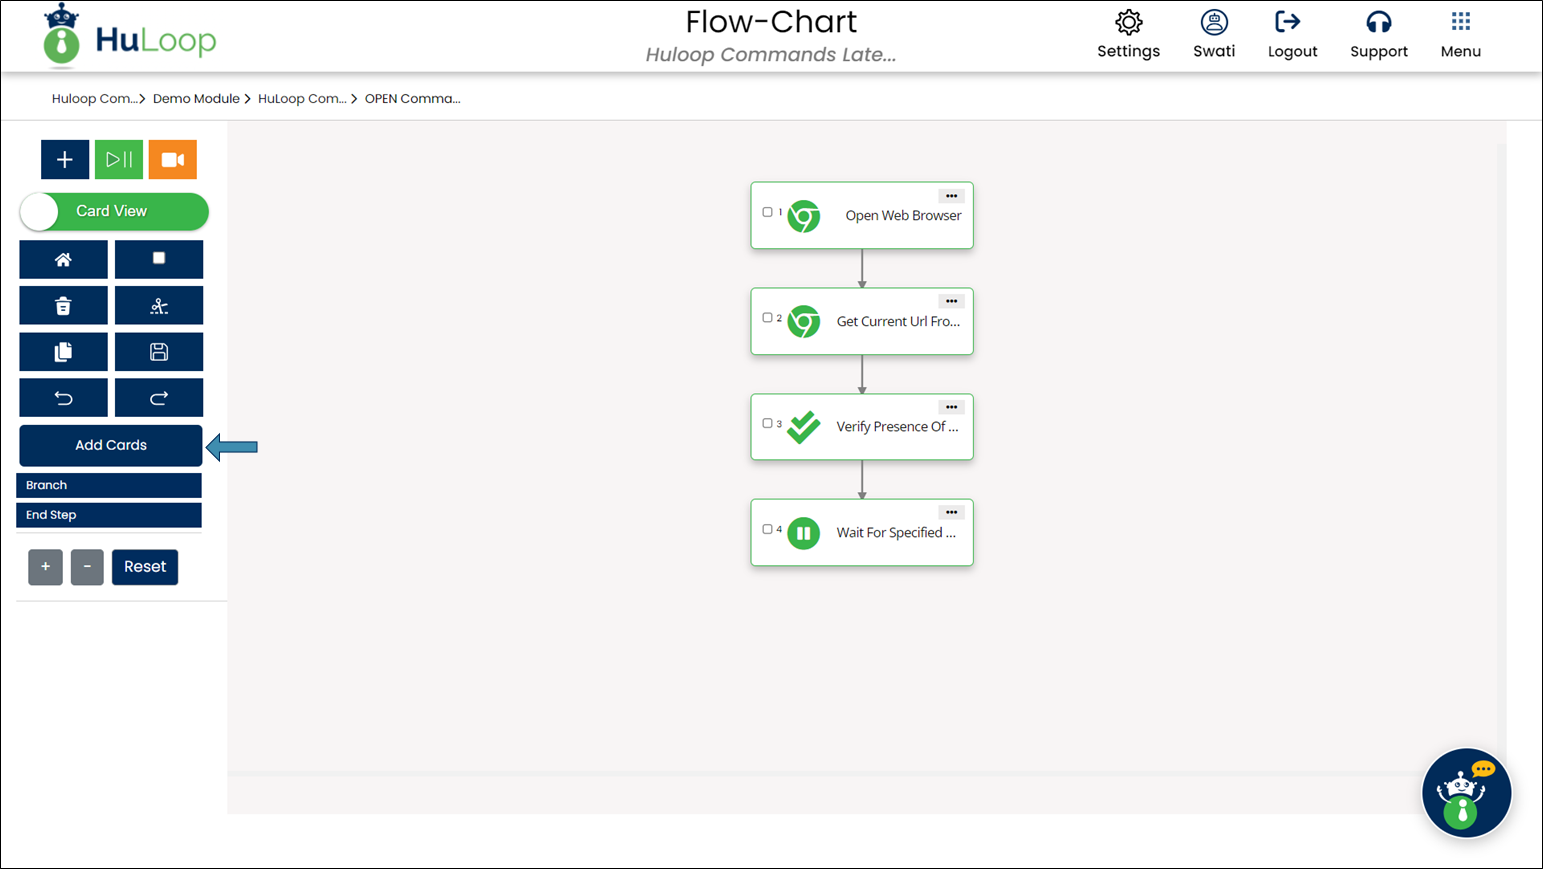
- This step will appear as Step 1 in the Case. The Add New Step panel will appear on the right side of the screen where you can define the action.
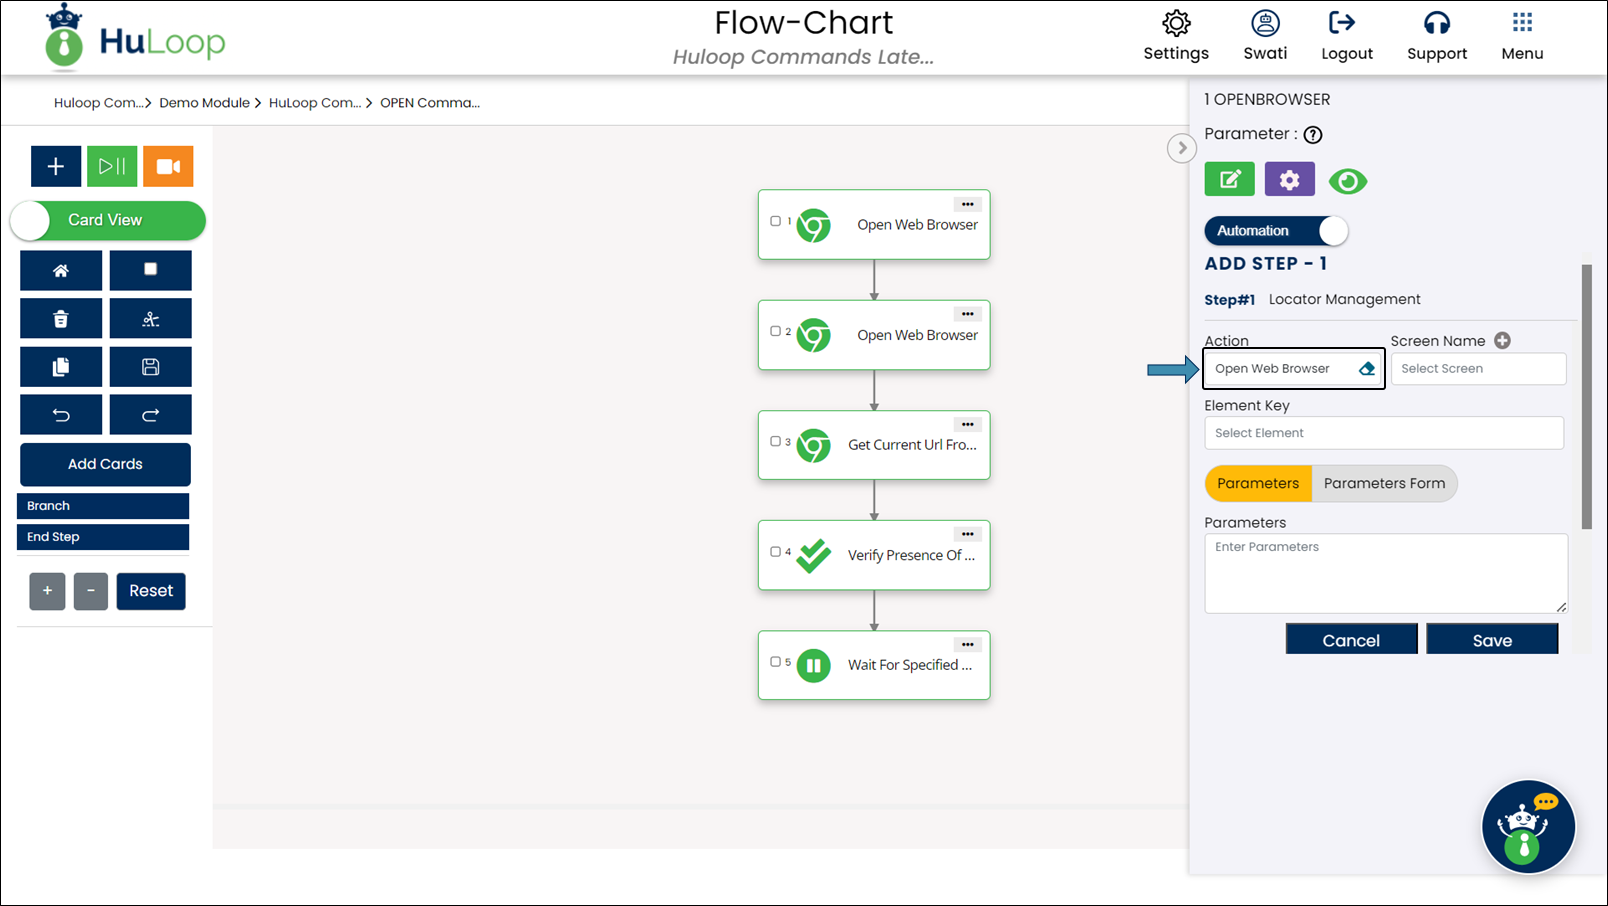
- The default action is Open Web Browser. If you want to change it, click to remove it and then click
 to get a list of actions.
- From the Action drop-down, select the required action for the step.
You can quickly find an action by typing a keyword into the action field. As you type, a list of matching actions will appear, and you can select the desired action from the results. This makes it faster to locate and add actions, especially when dealing with many available options.
- If required, fill in the Screen Name and Element Key and define the parameter’s value in the Parameters box.
- Click Save.
You can switch anytime to the Tabular view using the Card View toggle button ![]() available on left side of the screen.
available on left side of the screen.
Add a step at your chosen index
- Click the
 button as shown:

- A list of Function/Action categories will appear:
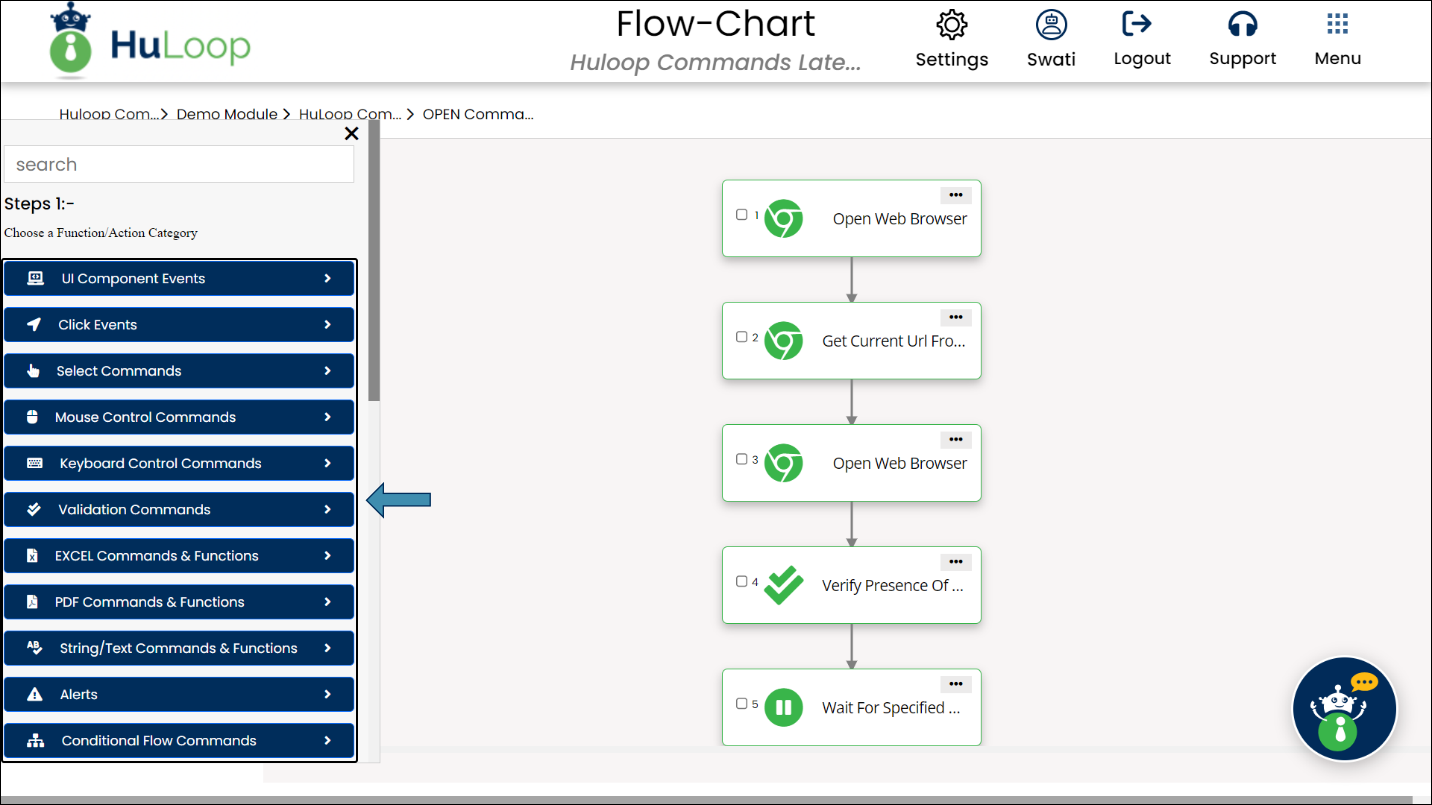
- Find the required category (e.g., Click Events), by typing in a keyword in the Search box:

- Click the icon next to a category to expand and view its actions and functions.
![]()
- Use the Search box to find the specific action you need (e.g., Double Click Element).
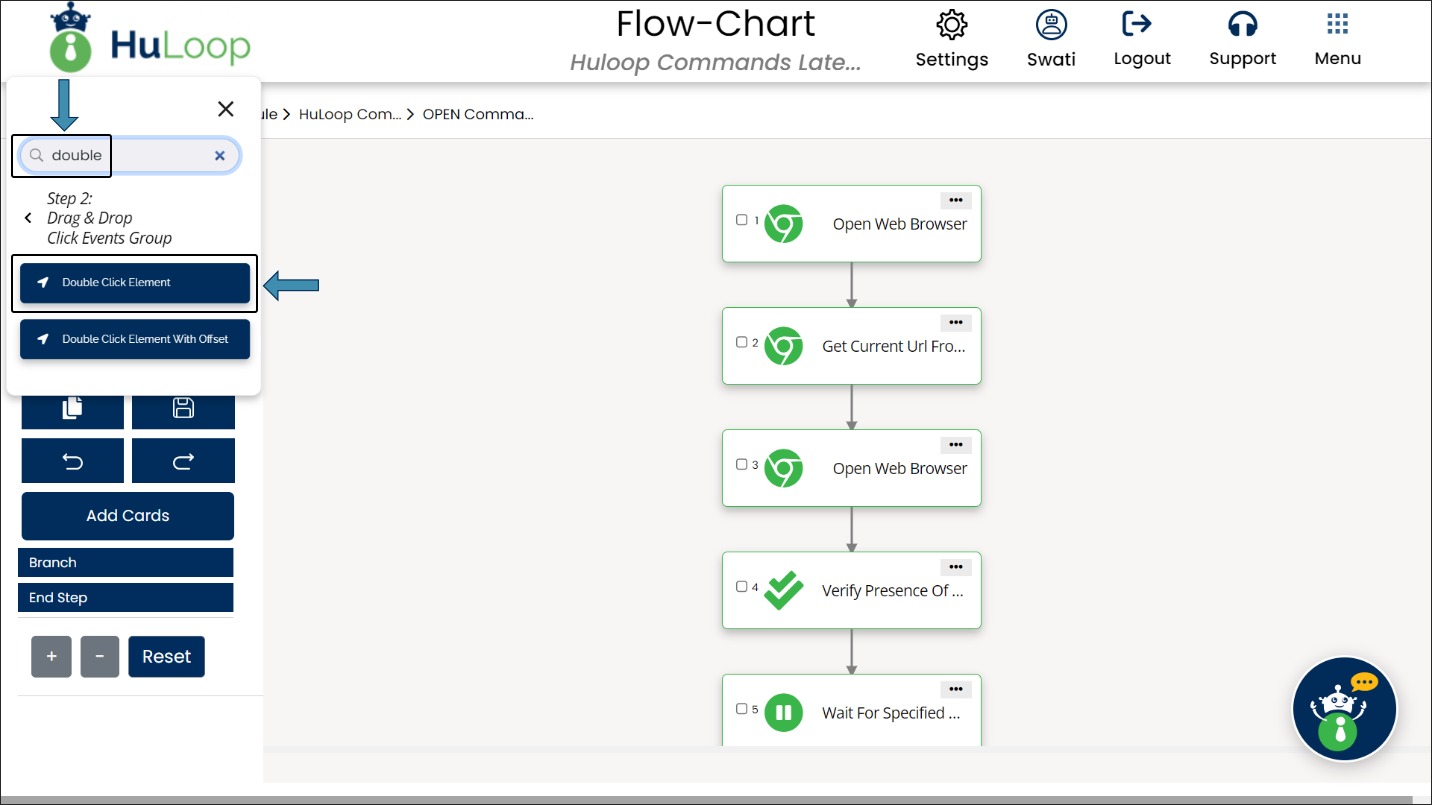
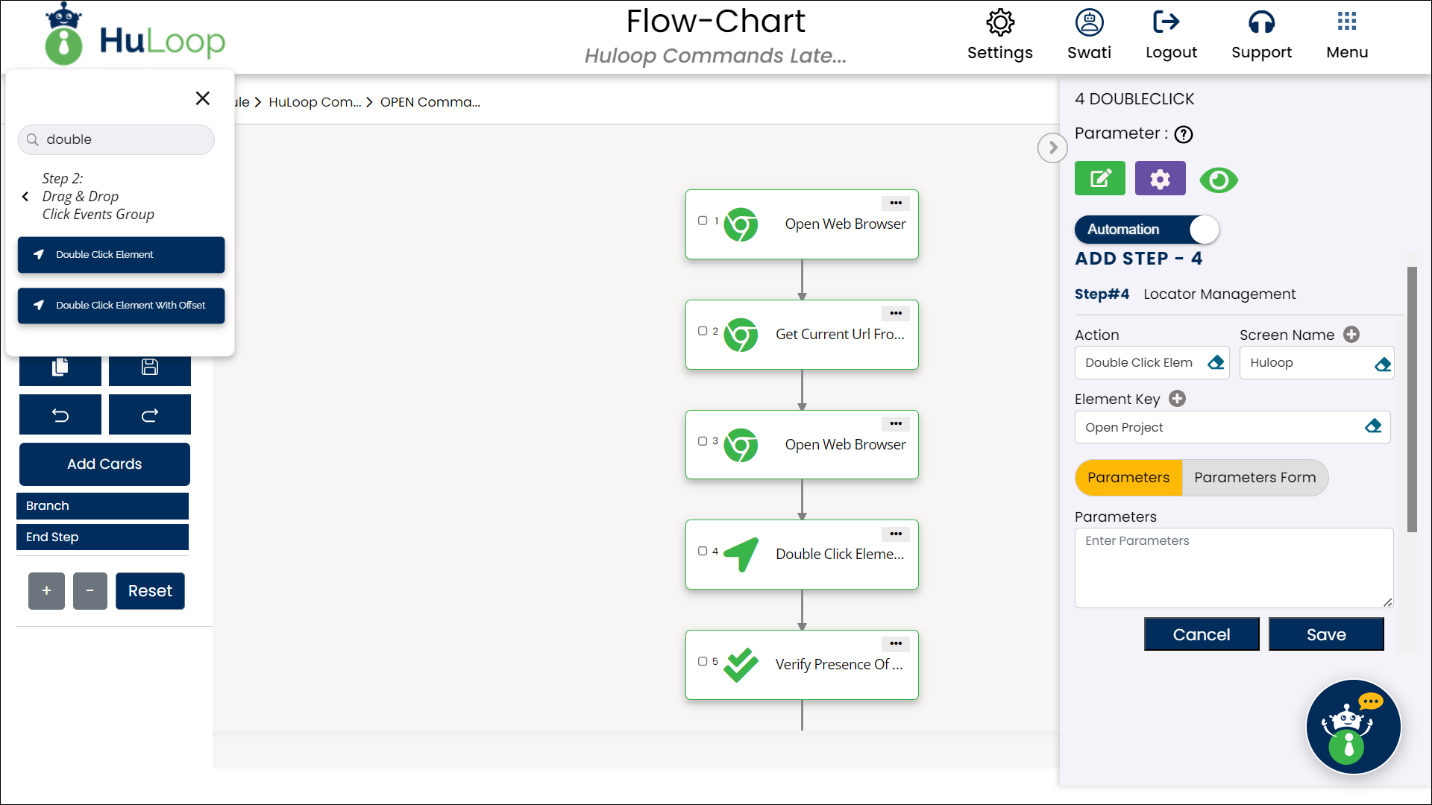
- Drag and drop the action onto the desired index (e.g., add Double Click Element at index 4).
- The Add New Step panel will open on the right side of the screen.

- If needed, fill in the Screen Name, Element Key, and define any Parameters.
- Click Save.
The Copy to Clipboard feature lets you quickly copy any step and reuse it across multiple use cases, suites, modules, or even different automations. This feature saves time, keeps your workflow consistent, and reduces repetitive configuration.
How to Use the Copy to Clipboard Feature
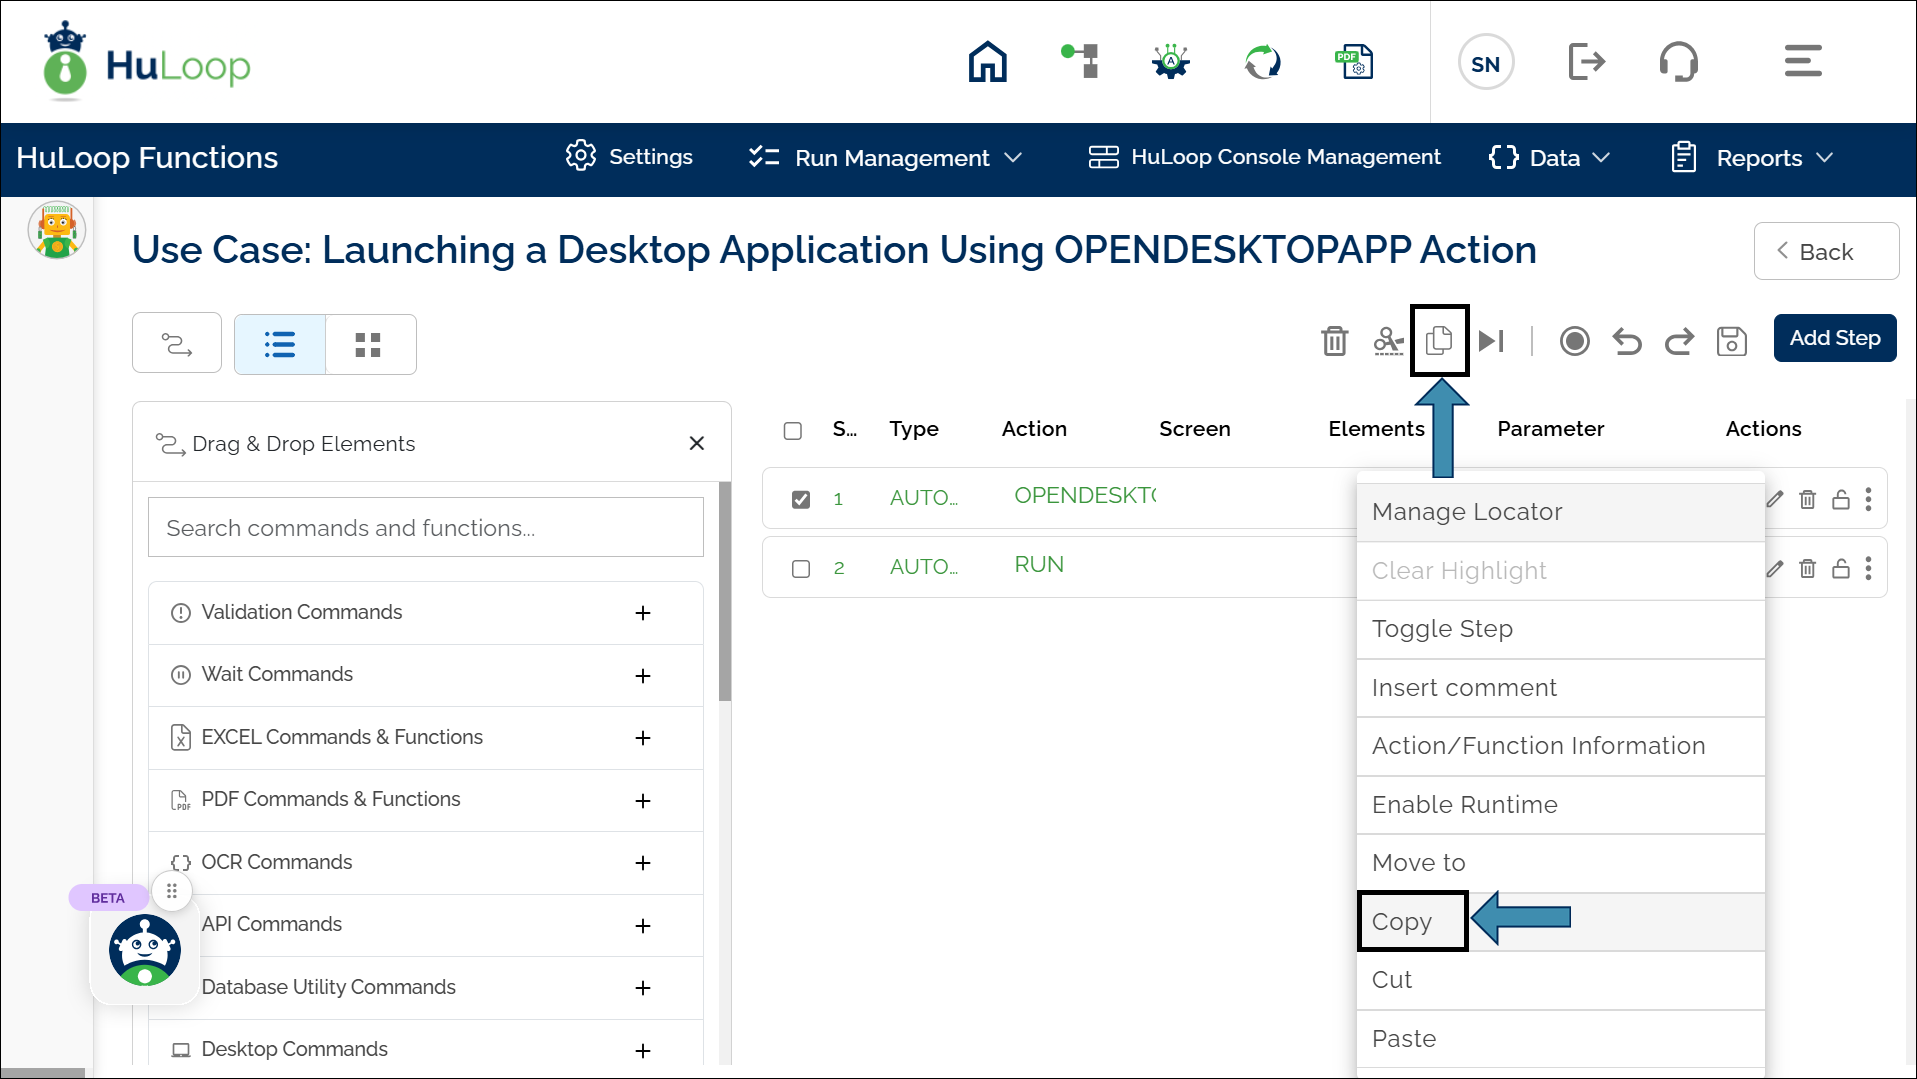
- Log in to HuLoop and open the use case that contains the step you want to copy.
- Select the step by clicking the checkbox next to it.
- Click the Copy icon
 on the toolbar, or click the three dots (⋮) next to the step and select Copy.
To copy multiple steps at once, select all the steps and use the Copy icon.
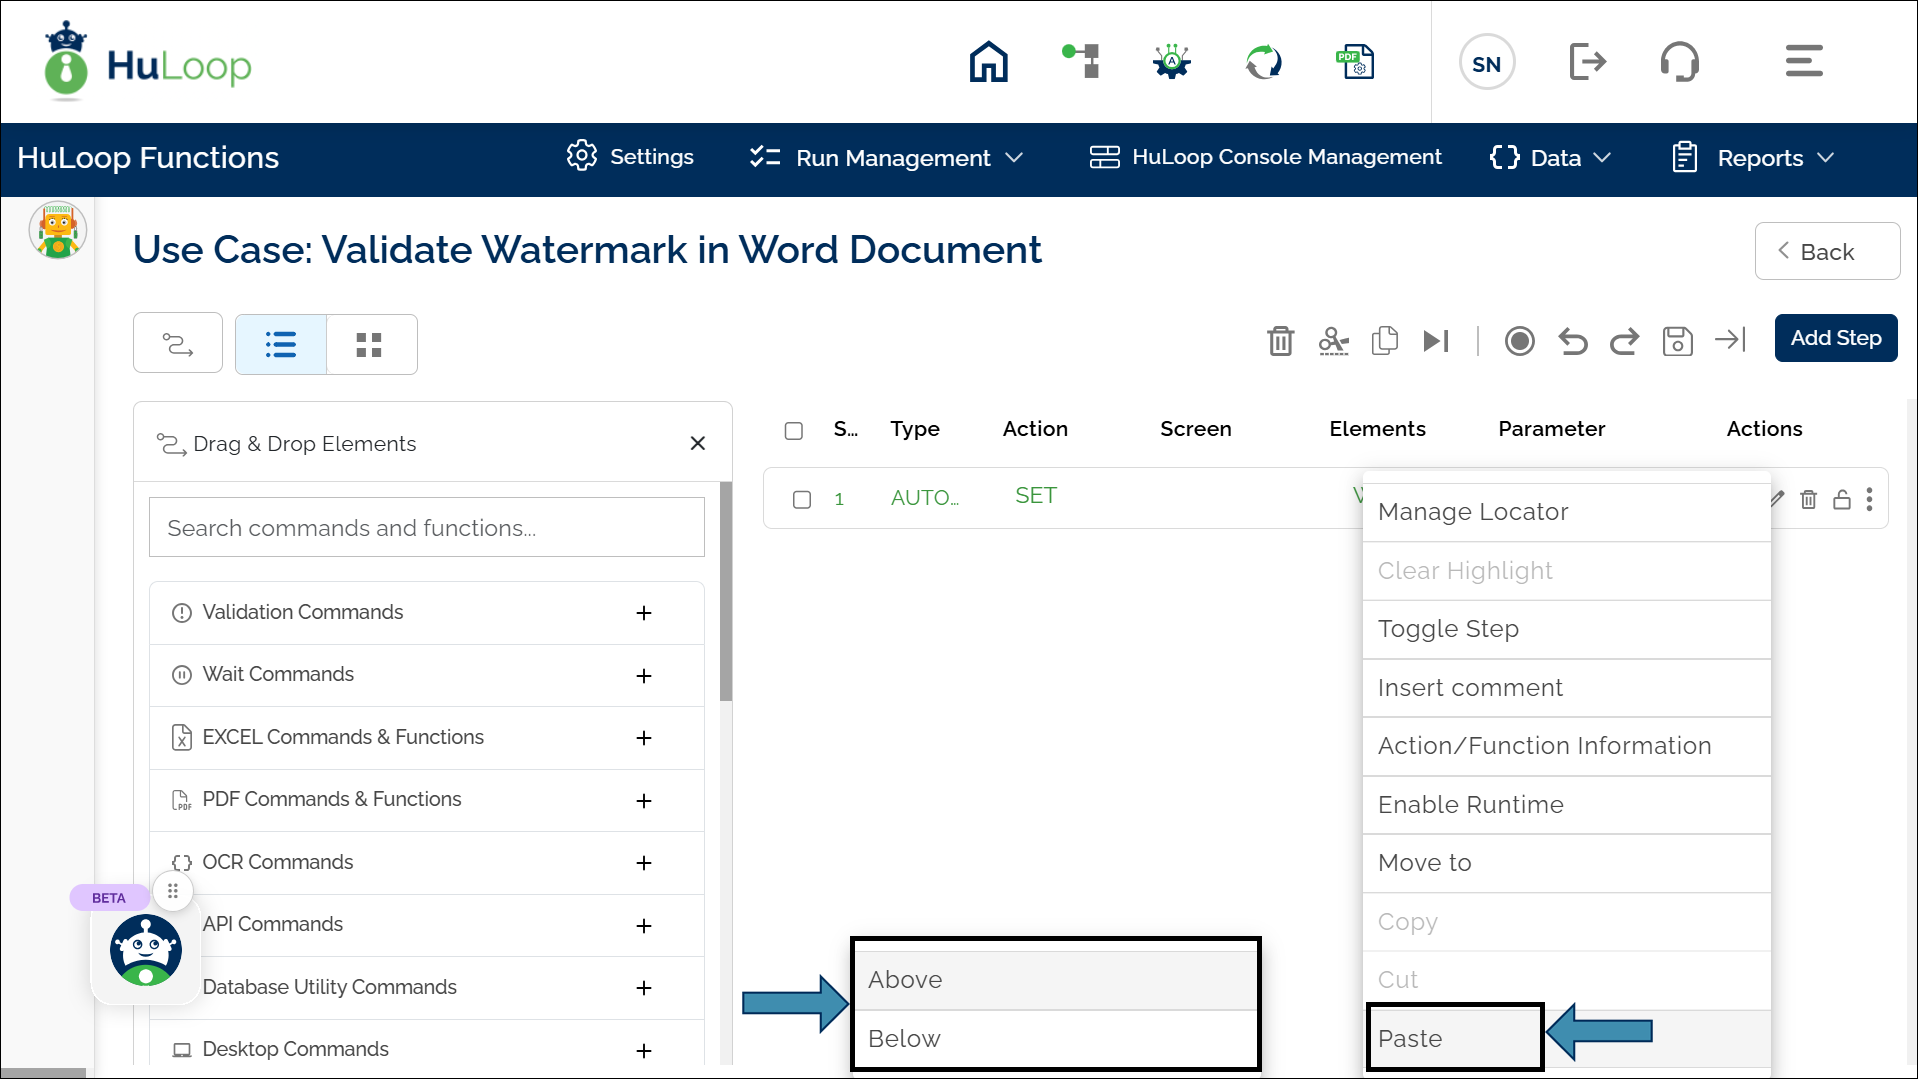
- Open the use case where you want to paste the copied step.
- Click the three dots (⋮) next to the step above or below which you want to paste the copied step.
- Hover over Paste, then choose Above or Below from the submenu.
You can see in the image below that the copied step has been pasted:
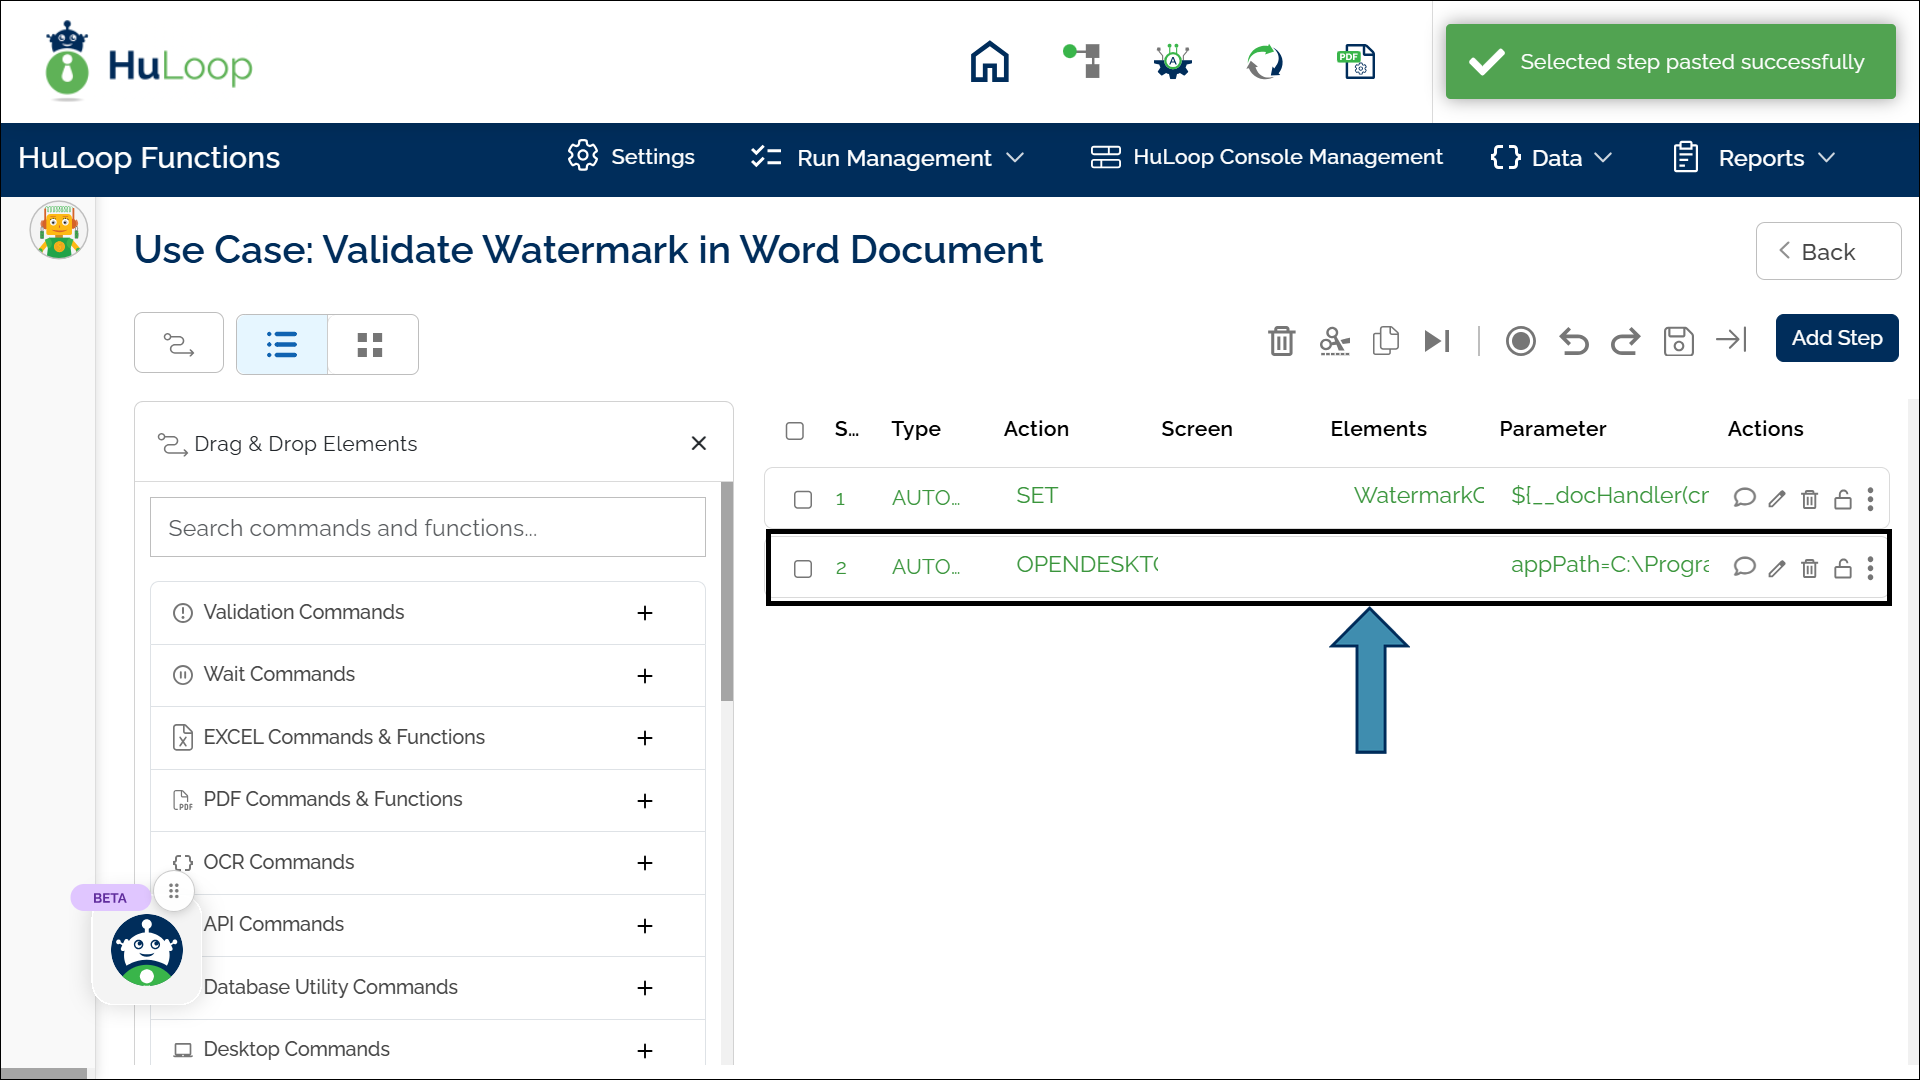
You can paste a copied step multiple times, and it is not restricted to a single project. You can copy a step from one automation and paste it into a use case in another suite, module, or even another automation.
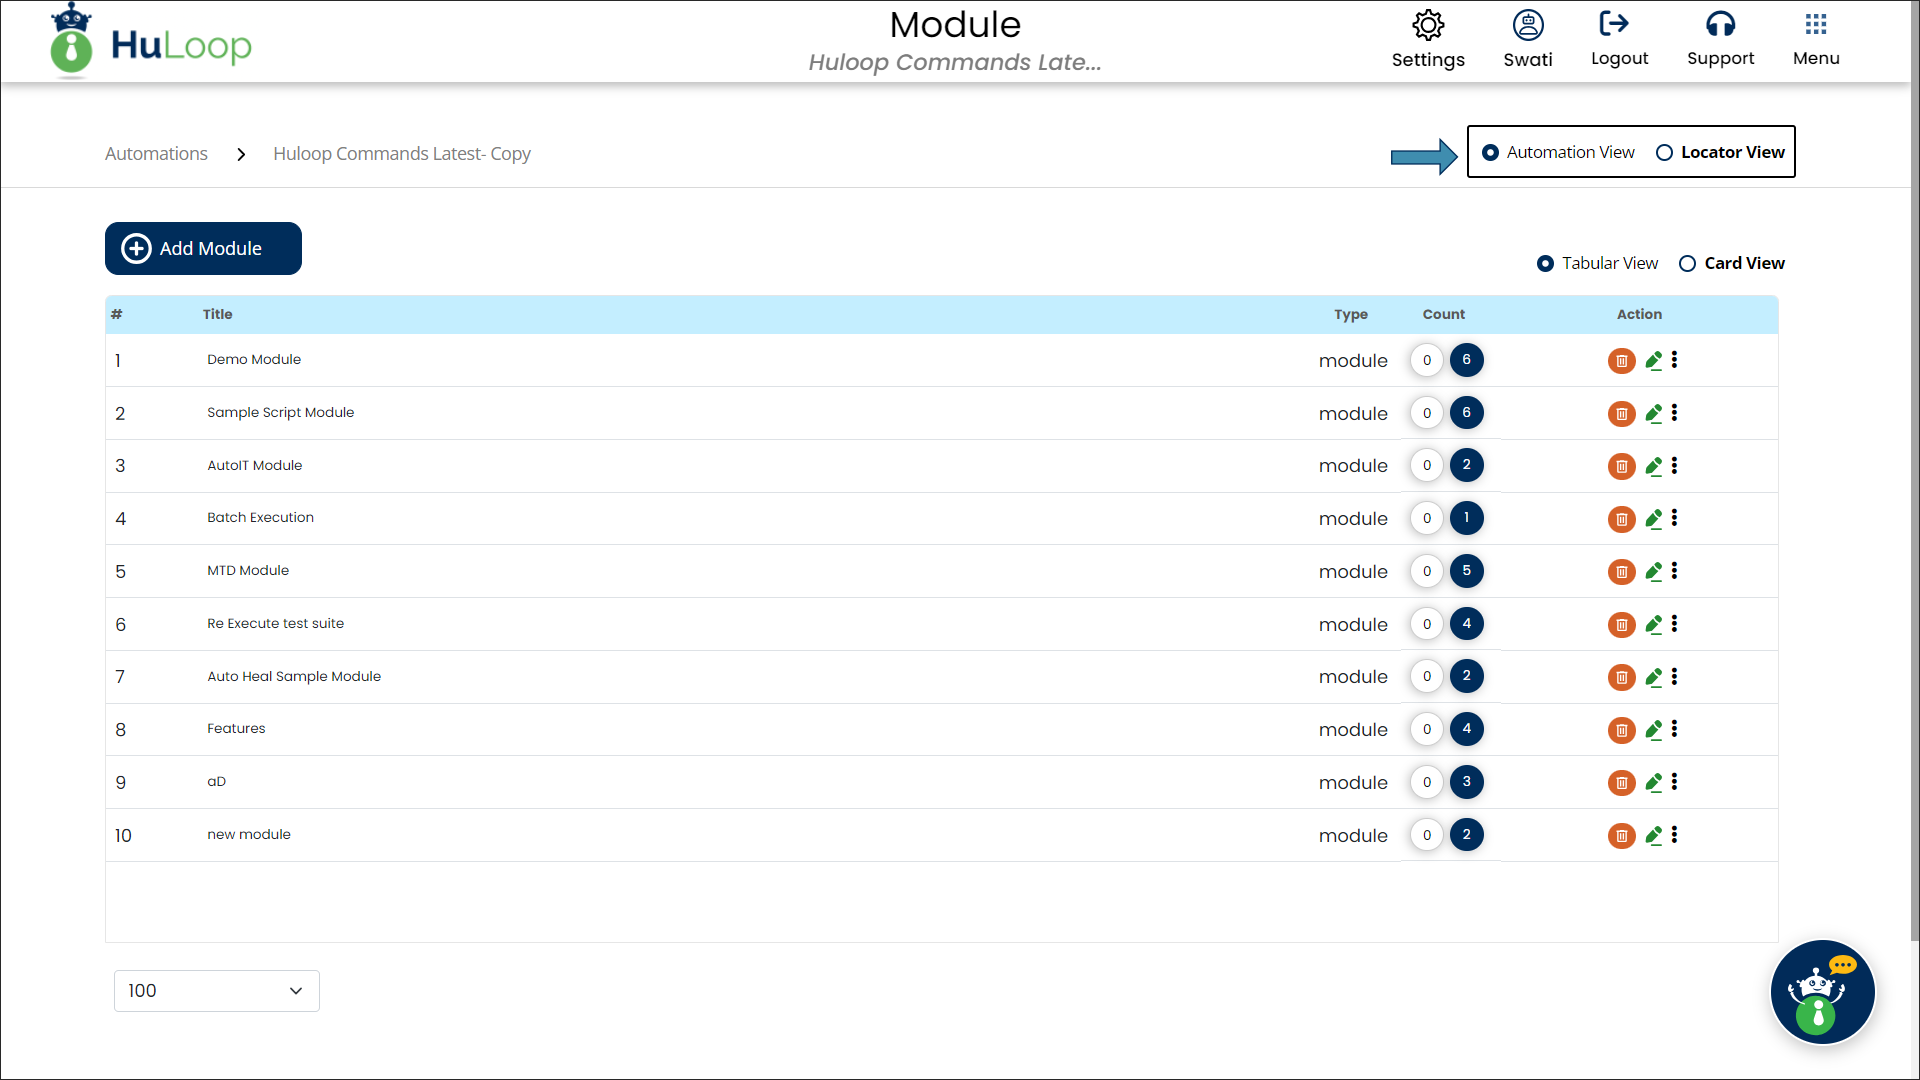
HuLoop offers two primary views to streamline the Case creation process: Automation View and Locator View. Each view serves a specific function, helping users seamlessly build and manage their automation tests.
- Automation View: This view is designed to define the steps and actions in a Case. It focuses on the sequence of automation tasks, making it easy to structure workflows and define actions like clicking buttons, entering data, or navigating pages.
- Locator View: This view is focused on managing the locators that identify elements within your application or website. It allows users to define and modify the locators that will be used in the automation steps, ensuring accurate interaction with web elements.
You can change views on any screen after opening an automation project. By default, the Automation View is selected, and you can easily switch to Locator View by selecting the radio button.
Refer to the provided screenshots for examples of each view:

A locator is a mechanism used to identify elements on a web page or within an application. In automation processes—whether for software testing or process automation—locators help find elements such as buttons, links, text fields, or other components, so that interactions like clicking, typing, or verifying content can be performed. Locators are basically used to identify the unique address of the elements to interact with them.
When you’re automating tasks, like filling out a form or clicking a button, you need to make sure the automation knows exactly what part of the page to interact with. A locator does this by pointing to the right element, making sure the automation works as expected. Without locators, the automation would not know which element to interact with, leading to failed actions.
For example, if you want to click a “Submit” button on a page, you must define a locator to ensure the automation can correctly identify that specific button.
HuLoop supports all Locator types. Few are listed below:
- ID: A unique identifier for an element. Like a name tag, each element has a unique ID that helps it stand out. (e.g., “submitButton”).
- Name: The element’s name attribute.
- Class Name: The class attribute of the element. It is a group label that elements might share (e.g., all buttons on a page).
- XPath: A path that describes how to find the element in the page structure.
- CSS Selector: A way to find elements based on their design or style. It targets the element based on its style selector.
- Link Text: It identifies a clickable link (hyperlink) by the words displayed on the page.
To automate desktop applications in HuLoop, you must define locators for the UI elements you want to interact with. Locators help identify these elements accurately during automation execution. The process of adding locators is consistent across different types of applications.
While you’re free to create any valid XPath, here are a few examples of locators:
| Type | Example | Description |
| By Name (Exact Match) | //*[@name=’Submit’] | Finds element by matching the Name property. |
| By ClassName | //*[@ClassName=’Button’] | Targets elements by their class type. |
| Starts-with | //*[starts-with(@AutomationId,’btn’)] | Matches elements whose attribute value starts with a specific string. |
| Multiple Attributes | //*[@Name=’Cancel’ and @ClassName=’Button’] | Narrows down the match using multiple attributes. |
| Text-based Match | //*[text()=’OK’] | Matches the visible text of an element. |
| Parent to Child Navigation | //*[@Name=’Login Form’]/*[@AutomationId=’txtUsername’] | Finds a child element under a specific parent node. |
Switching to Locator View
- Open your automation in HuLoop.
- Switch to Locator View by selecting the radio button.
- By default, Automation View is selected. Switching to Locator View allows you to manage locators.
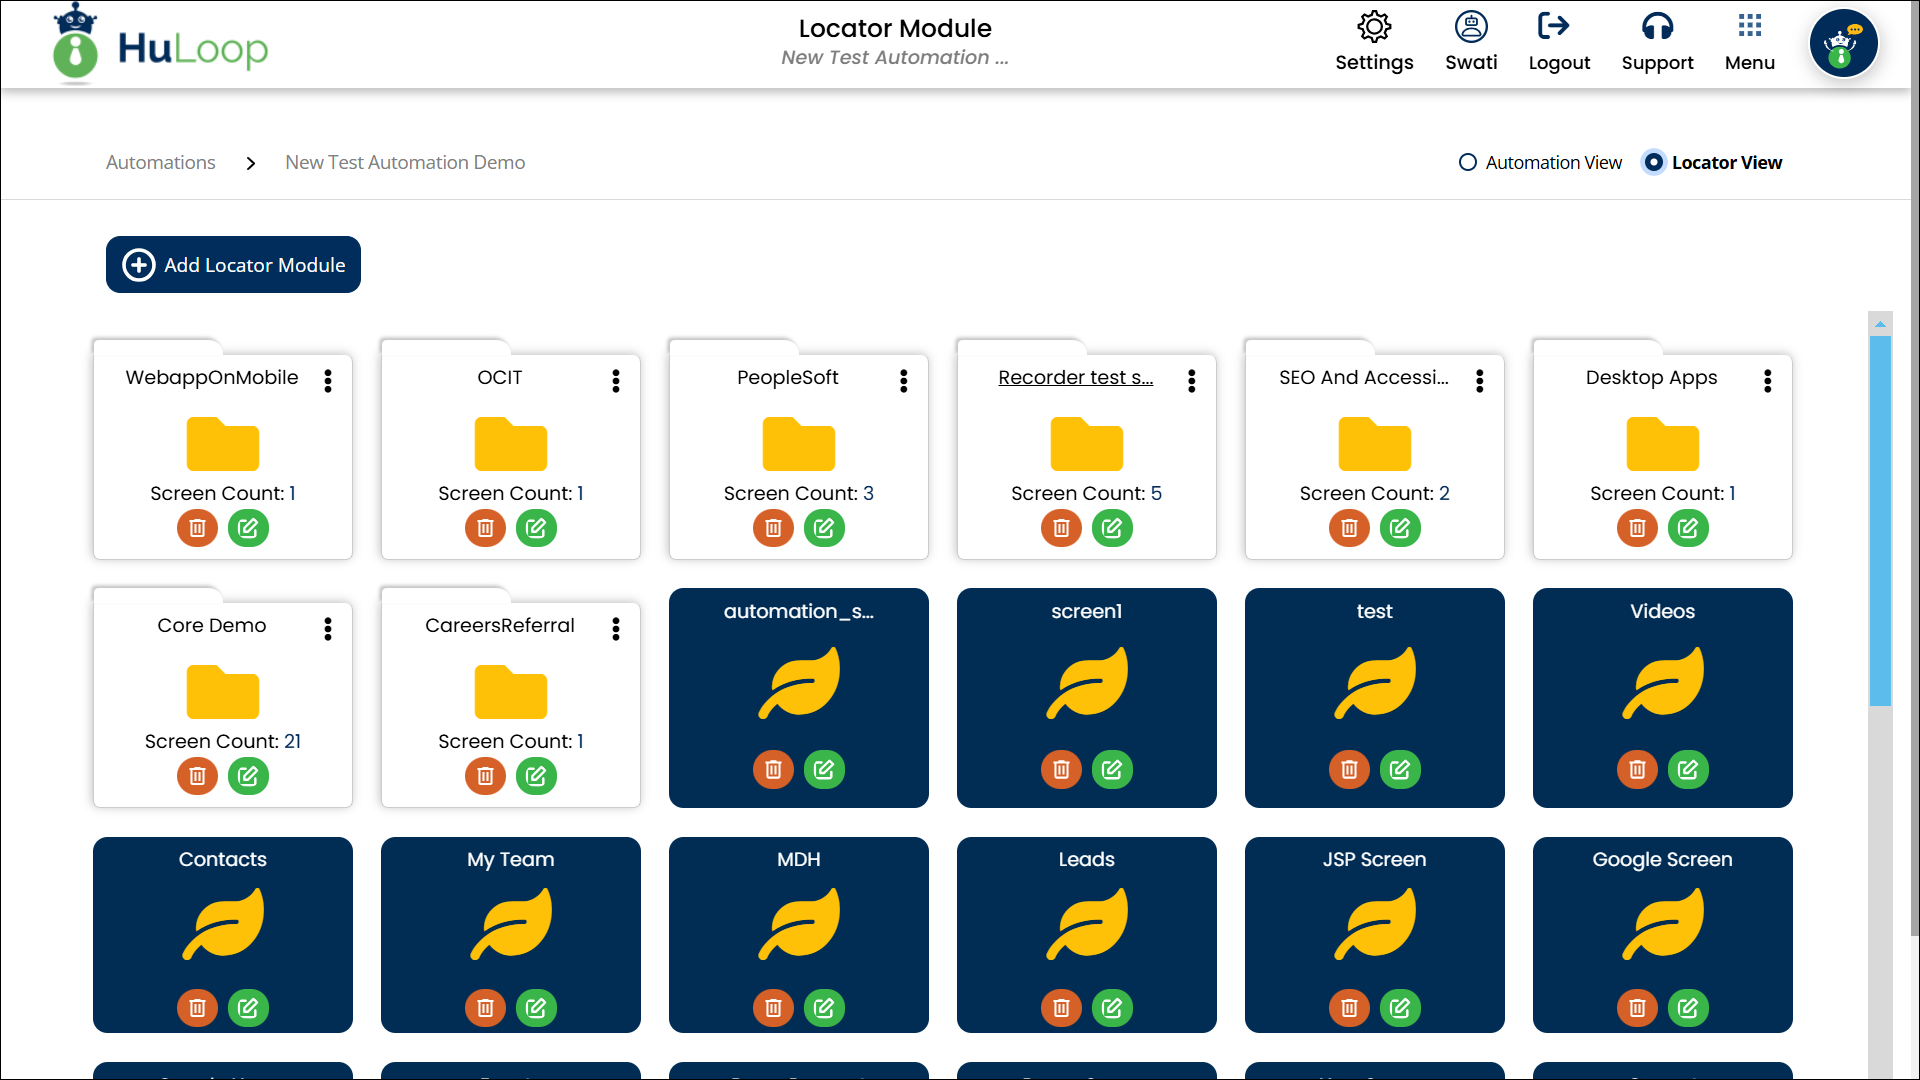
Working with Locator Modules
A Locator Module is a collection of locators categorized based on functionality or screen grouping. You can:
- Create a new Locator Module by clicking Add Locator Module button, or
- Open an existing Locator Module by clicking its title (e.g., Core Demo).
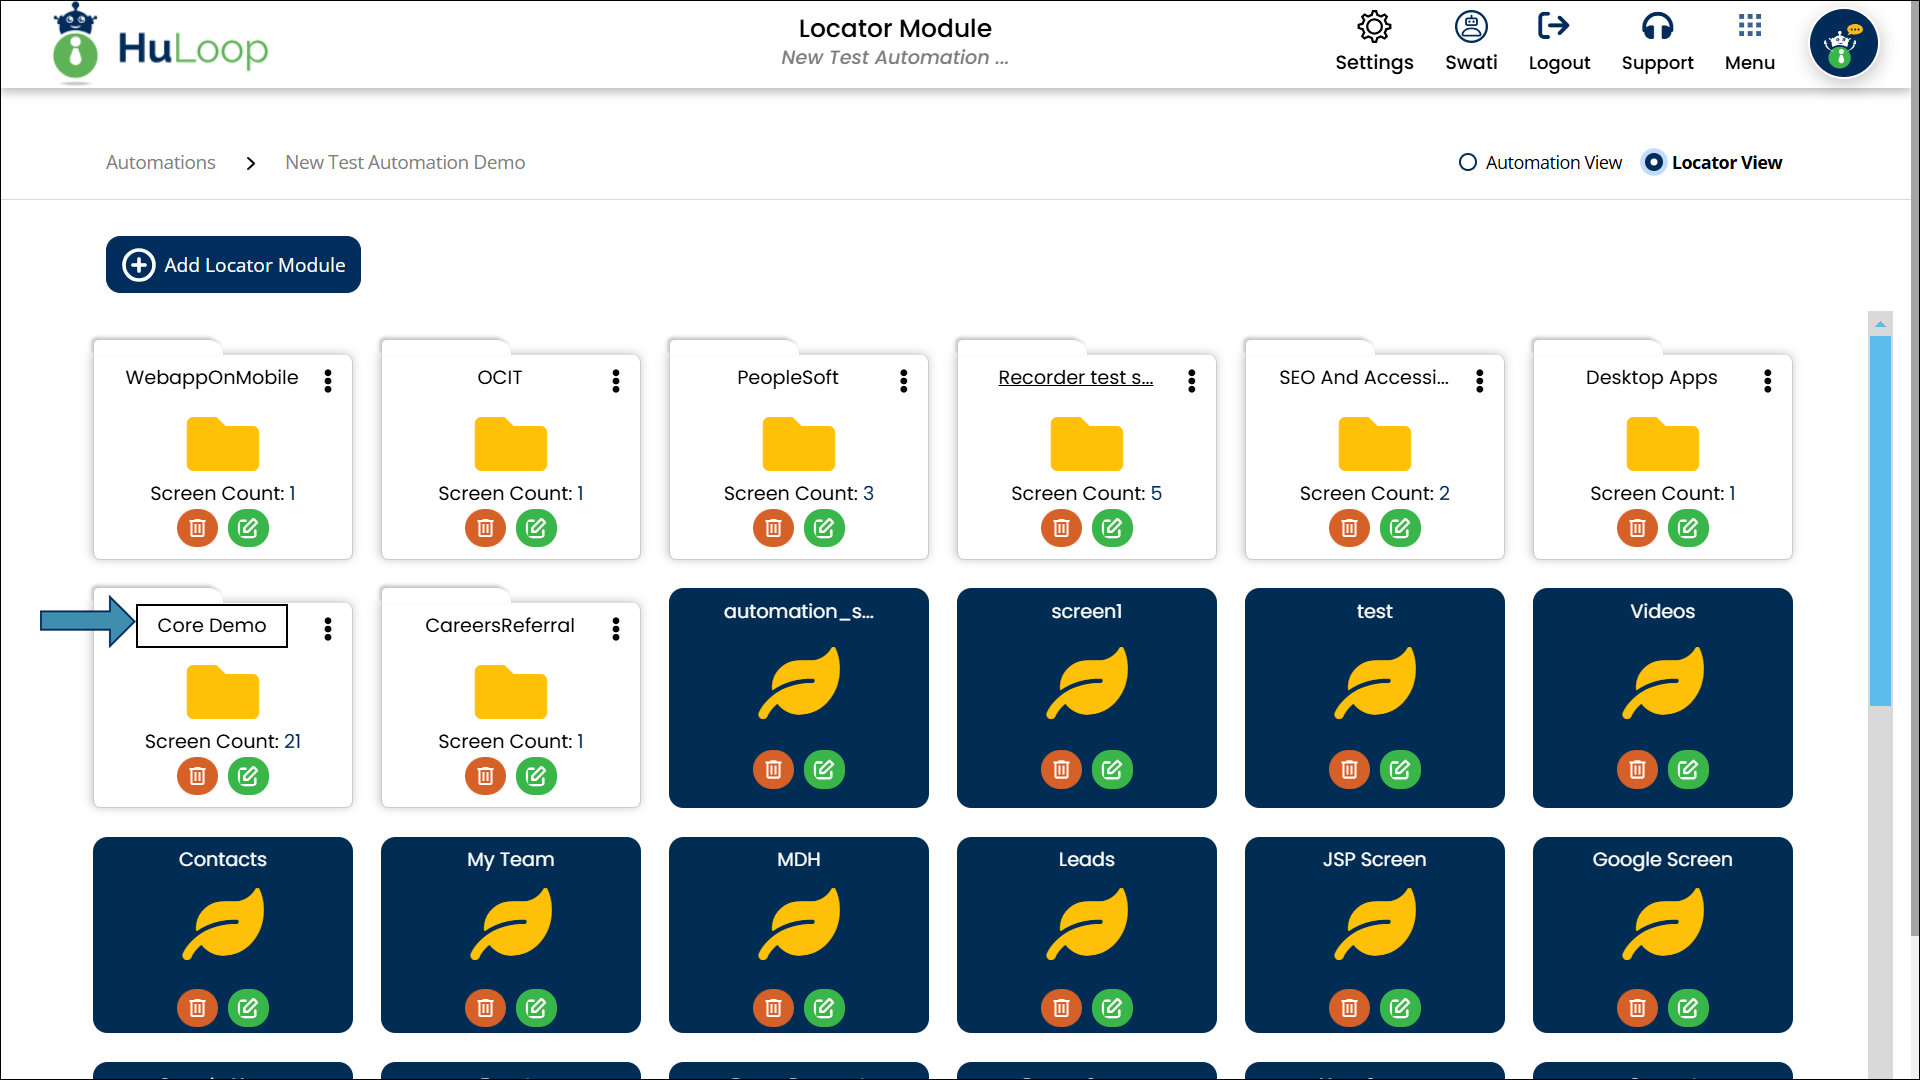
Each module contains screens, and each screen contains its elements (locators).
Defining Locators in a Screen
A Screen represents a specific window or UI section of the application.
- Inside a Locator Module, select a Screen or create a new one by clicking Add Screen button.
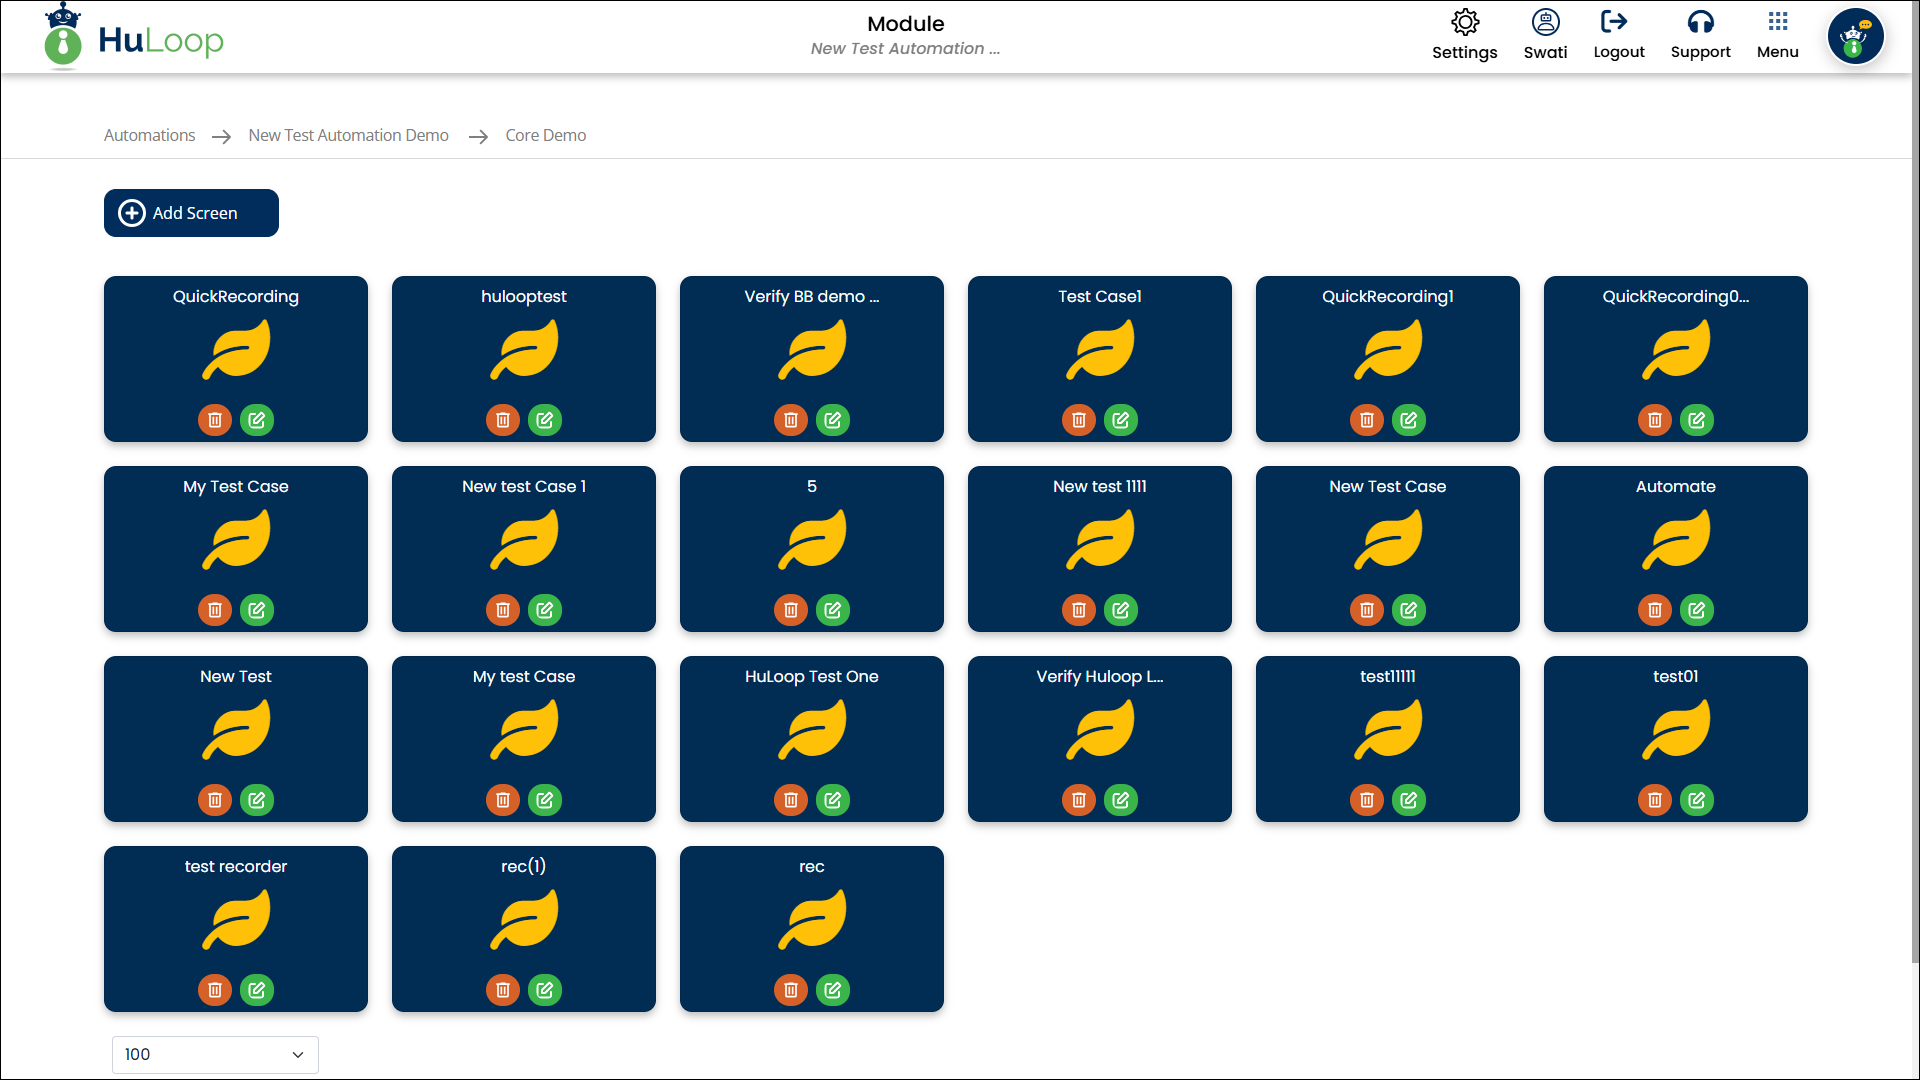
- Inside the Screen, define new locators for its elements.
- Click the + icon to add a new locator.
![]()
- When adding a locator, provide the following details:
- Element Key – A unique name for the element.
- Locator Value – The locator path generated using tools like UISpy or Inspect.
- Comment (Optional) – Additional information about the locator.
- Once the details are entered, click Add button.
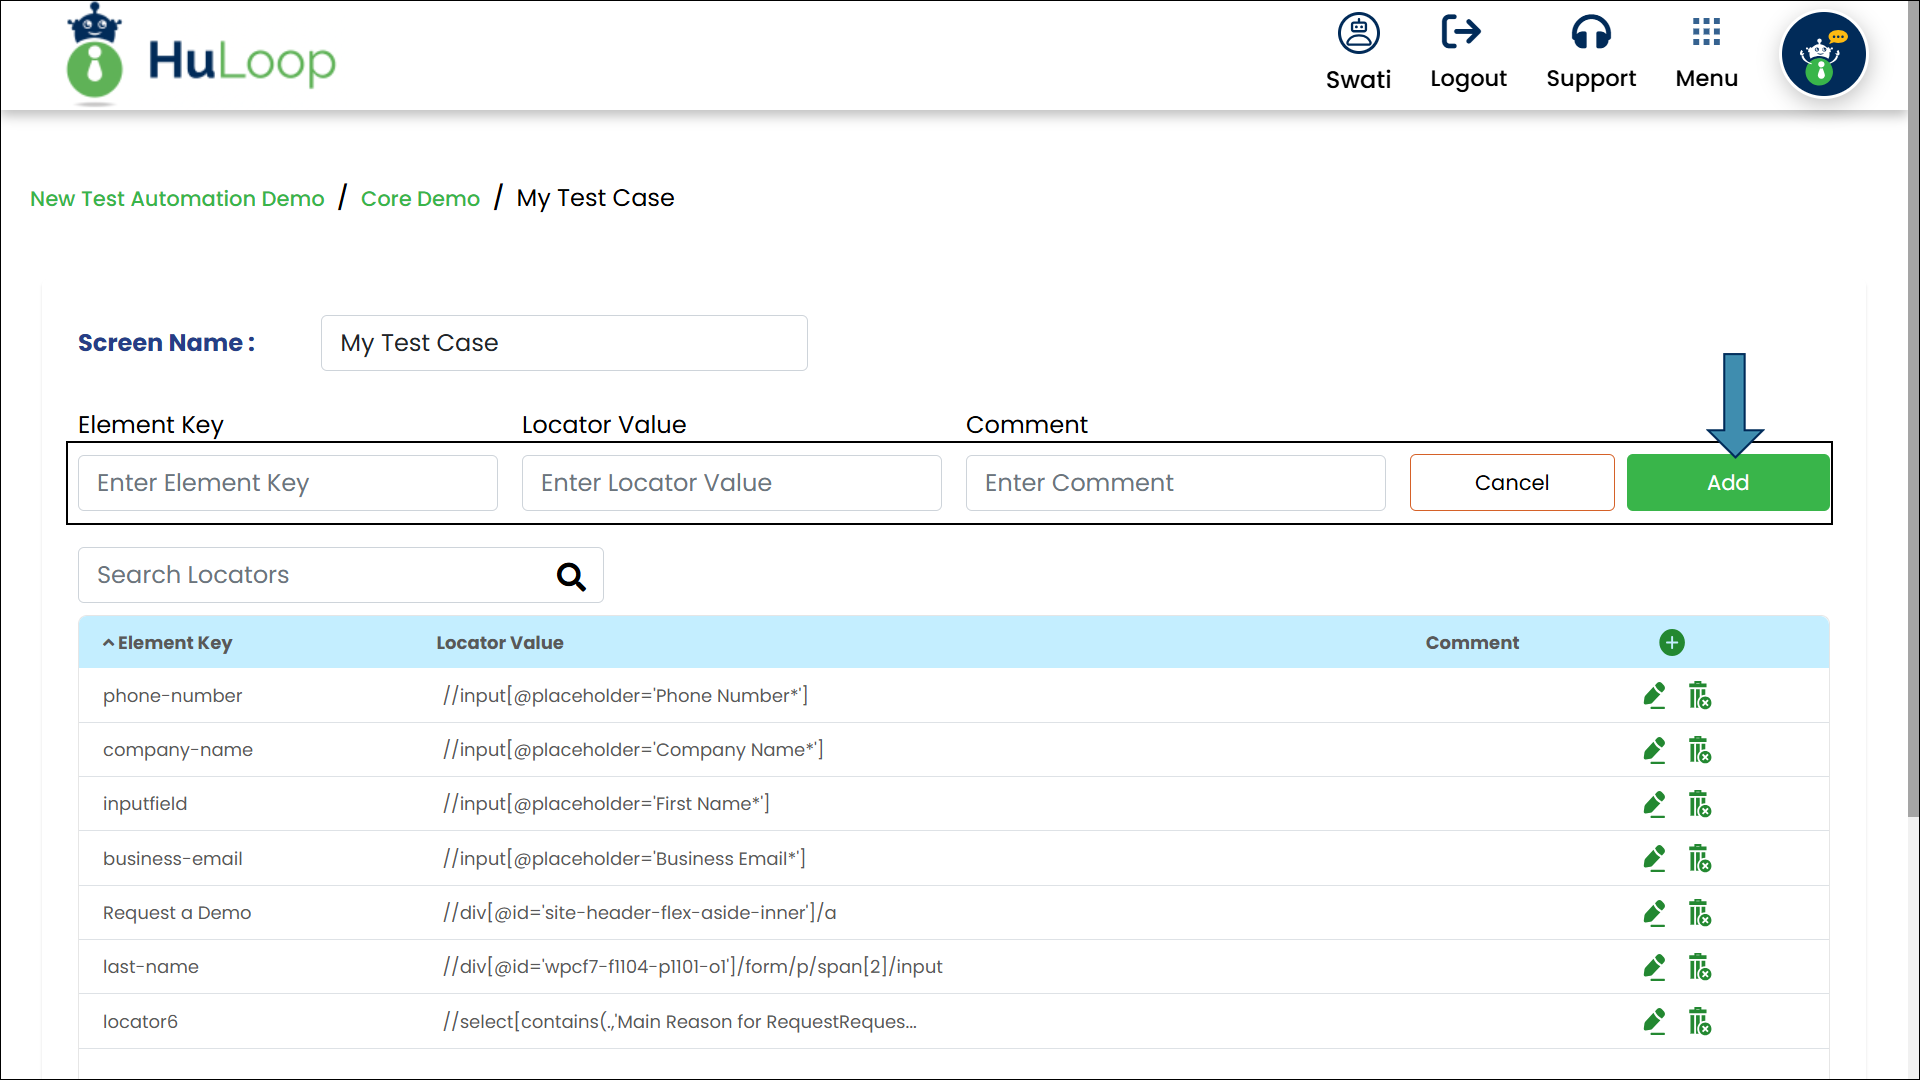
The newly created locator appears in the existing locators list and is now available for use in automation workflows.
HuLoop provides an audit trail for locators, allowing you to track changes made to locators over time. This helps you understand who made a change, when it was made, and what the current locator configuration looks like.
How to View Locator Audit Details
- Log in to HuLoop and open the automation project you are working on.
- Navigate to Locators.
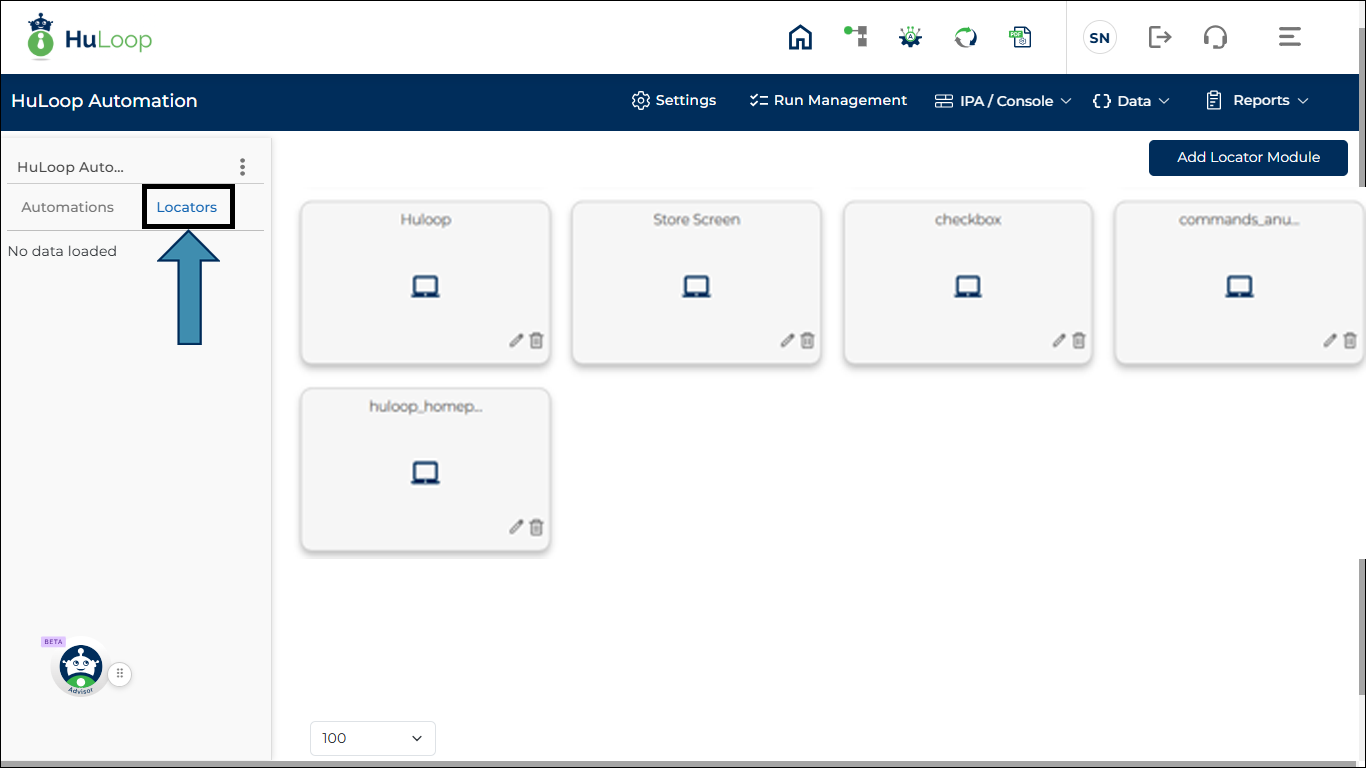
- Open an existing Locator Module by clicking its title to view the list of available locators.
- Locate the required locator and click the clock-shaped icon next to the locator name.
![]()
- A details pane opens on the right side of the screen, displaying the audit information.
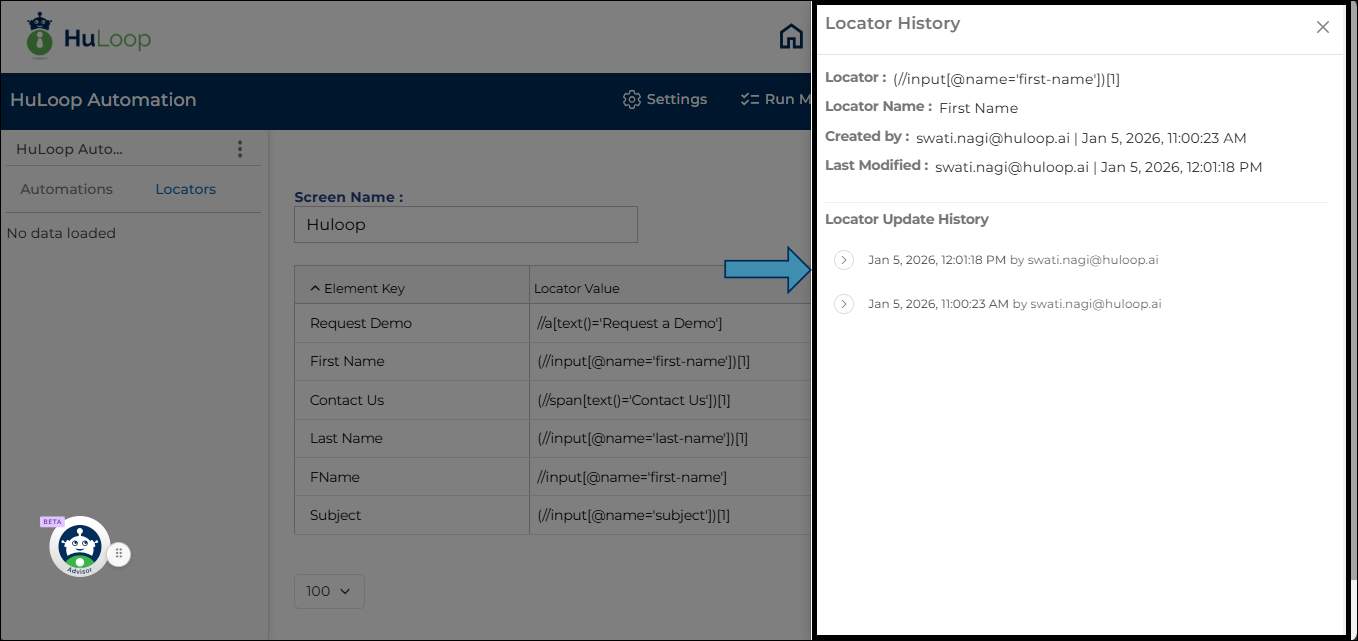
The audit trail pane provides the following details:
- Current Locator Value
Displays the active locator value being used.
Example:
Locator: //input[@name=’first-name’] - Current Locator Name
Shows the name assigned to the locator.
Example:
Locator Name: First Name - Created By
Displays the username, date, and time when the locator was originally created.
Example:
Created By: [email protected] | Jan 5, 2026, 11:00:23 AM - Last Modified
Displays the username, date, and time of the most recent update.
Example:
Last Modified: [email protected] | Jan 5, 2026, 11:00:23 AM
Locator Update History
The Locator Update History section shows a chronological list of changes made to the locator. For each update, it displays:
- Date and time of the update
- Username of the person who made the change
Example:
Jan 5, 2026, 11:00:23 AM by [email protected]
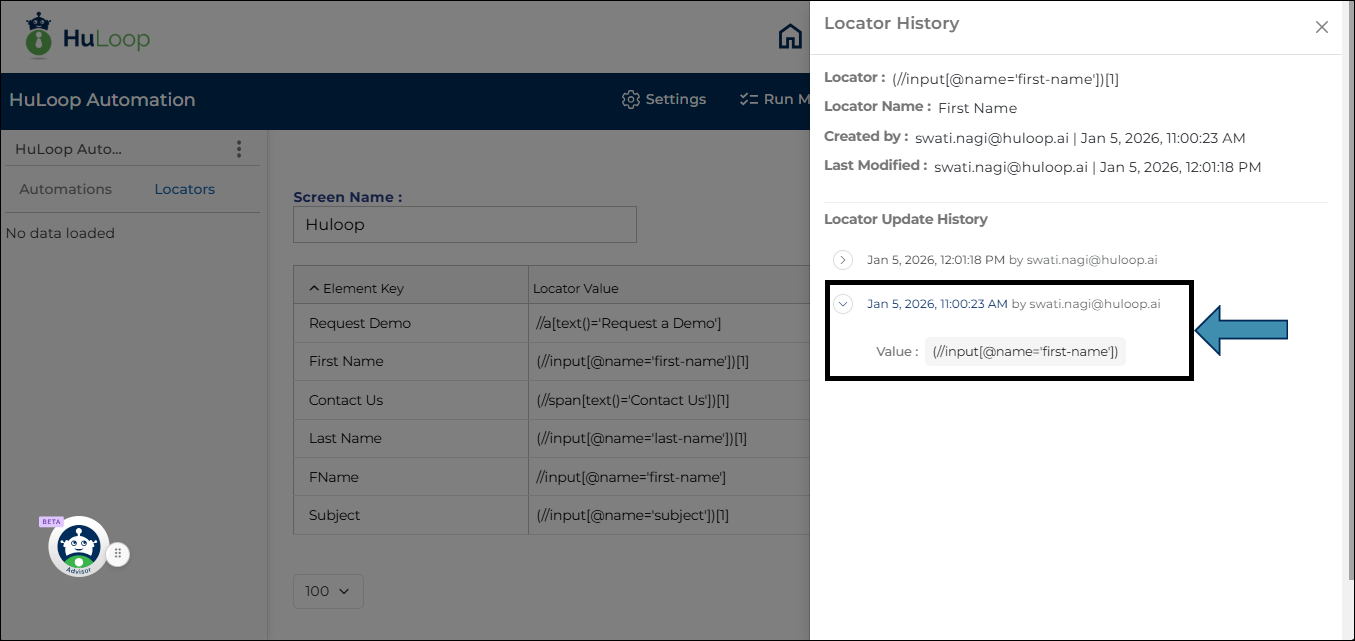
When you expand a specific entry in the Locator Update History, HuLoop displays the updated locator details associated with that change. This includes the specific updates that were made to the locator at that point in time.
To enable workflow execution for an automation in HuLoop, you must create or update an Intelligent Process Automation (IPA) with workflow enablement turned on. This allows the automation to be triggered automatically as part of a workflow.
Prerequisites:
Before enabling workflow for an automation, ensure that the following are in place:
- The HuLoop Windows Agent is installed on the required machine.
- Scheduler configuration is completed.
For detailed steps, see: HuLoop Scheduler Configuration - If you are editing an existing IPA, its Status is set to Active in IPA / Console Management.
Steps to Enable Workflow for an Automation
Step 1: Open Your Automation Project
- Log in to HuLoop.
- From the homepage, select Automation.
- Open the automation project where you want to enable workflow.
Step 2: Create a New IPA (or Edit an Existing One)
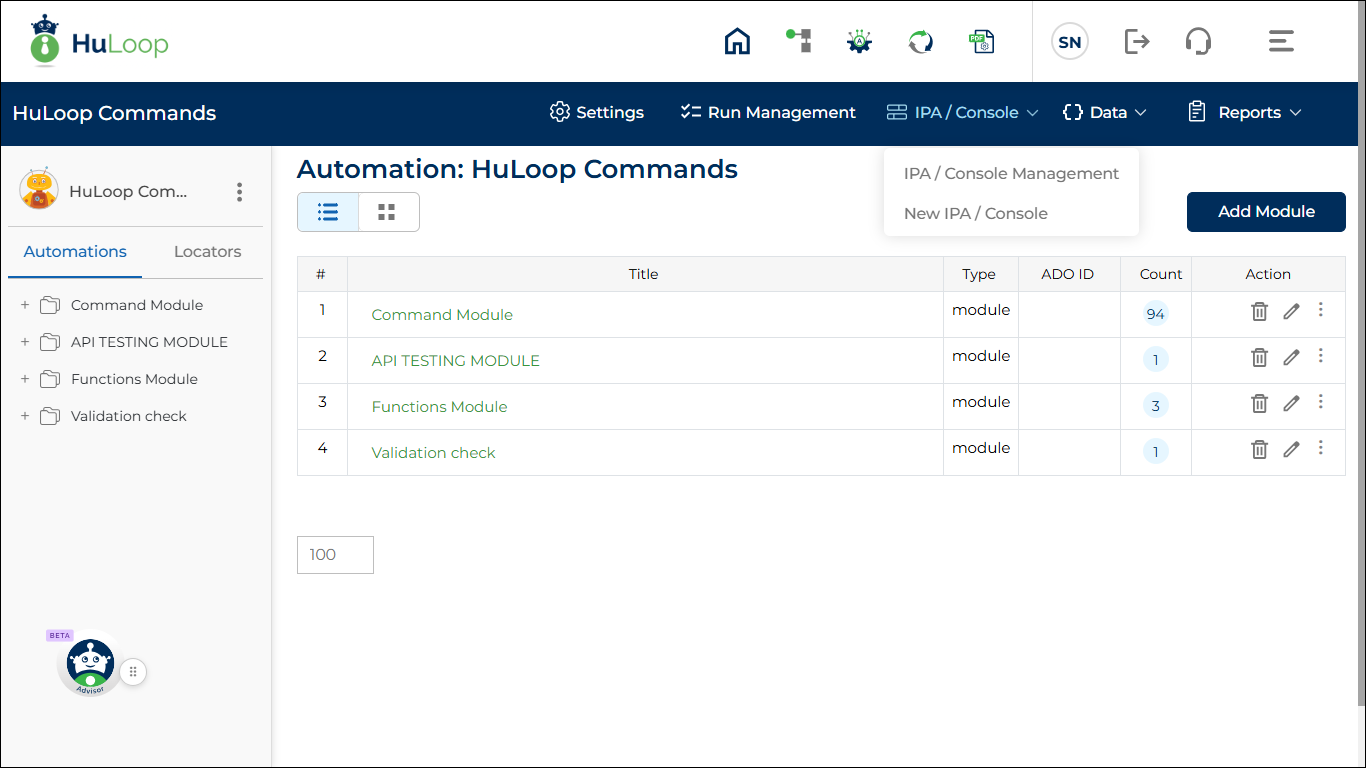
- Expand the IPA / Console menu.
- Select New IPA / Console to create a new IPA.
OR
Select IPA / Console Management, then click an existing IPA to edit it.
Step 3: Enable Workflow in IPA Configuration
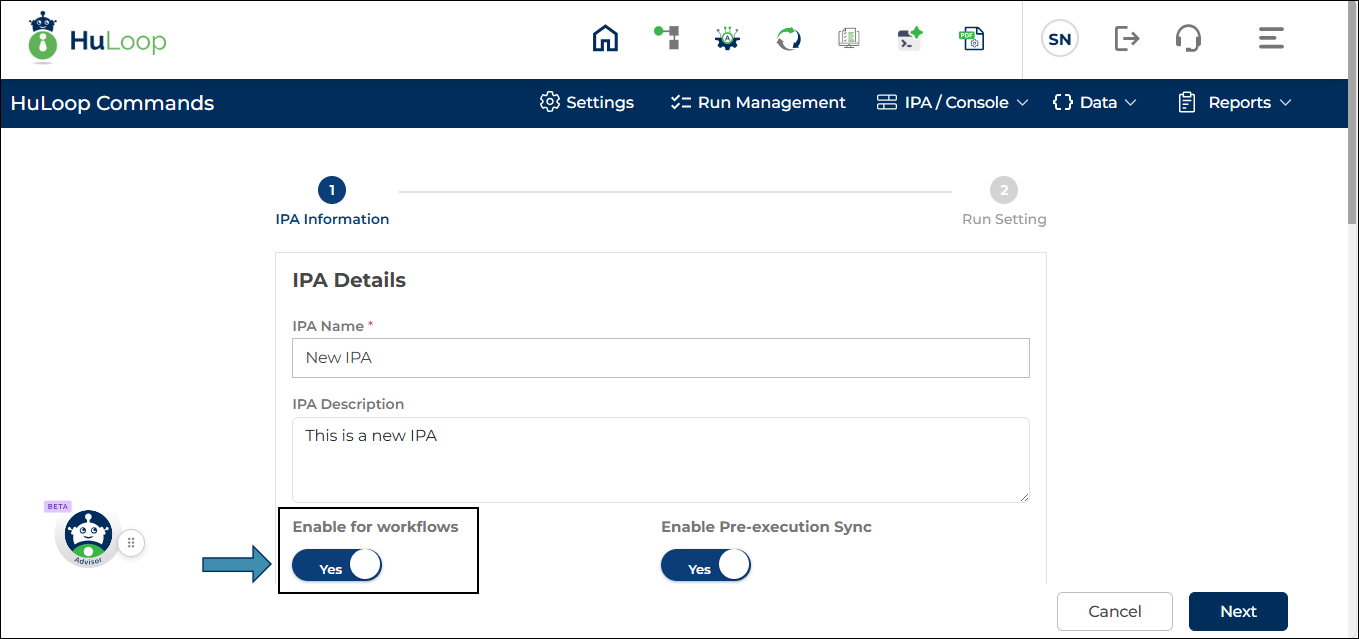
- In the IPA Information screen, provide the required details such as:
- IPA Name
- Description (optional)
- Under Run Setting, choose New or Existing, based on your requirement.
- Ensure the Is Workflow Enabled toggle is set to Yes.
Step 4: Complete IPA Setup
- Configure authentication, reports, email notifications, and other required settings.
- Click Next to configure or select a Run Setting.
- Click Create (or Update if editing an existing IPA).
The IPA status is set to Active.
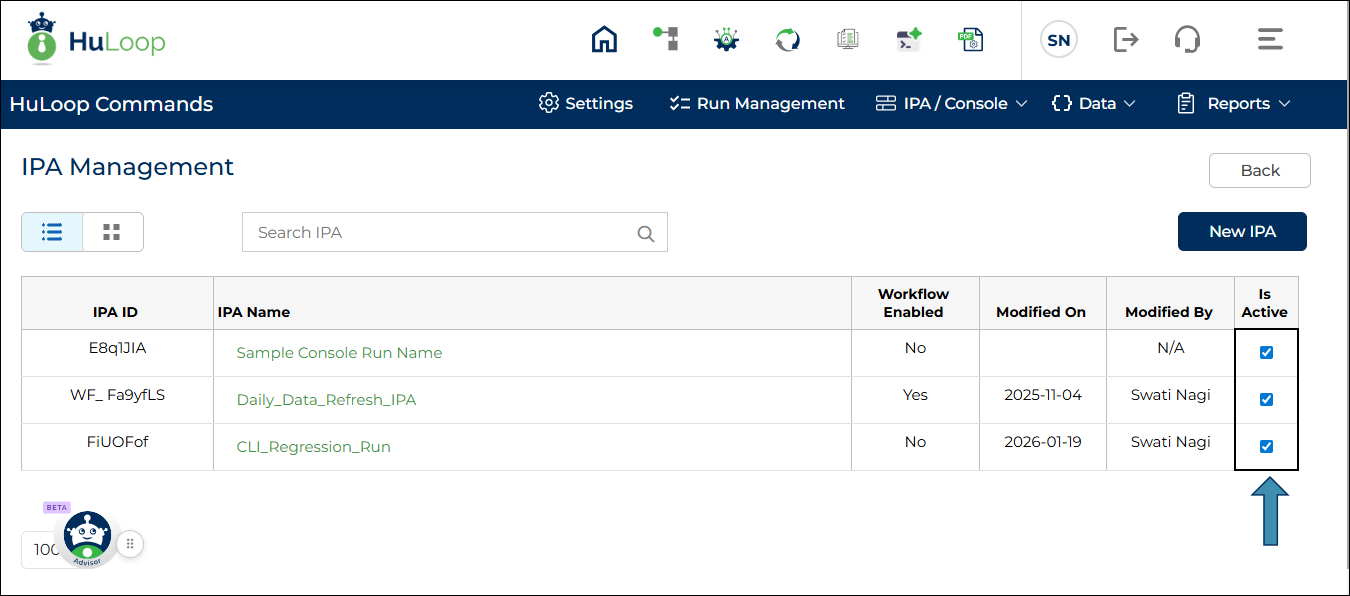
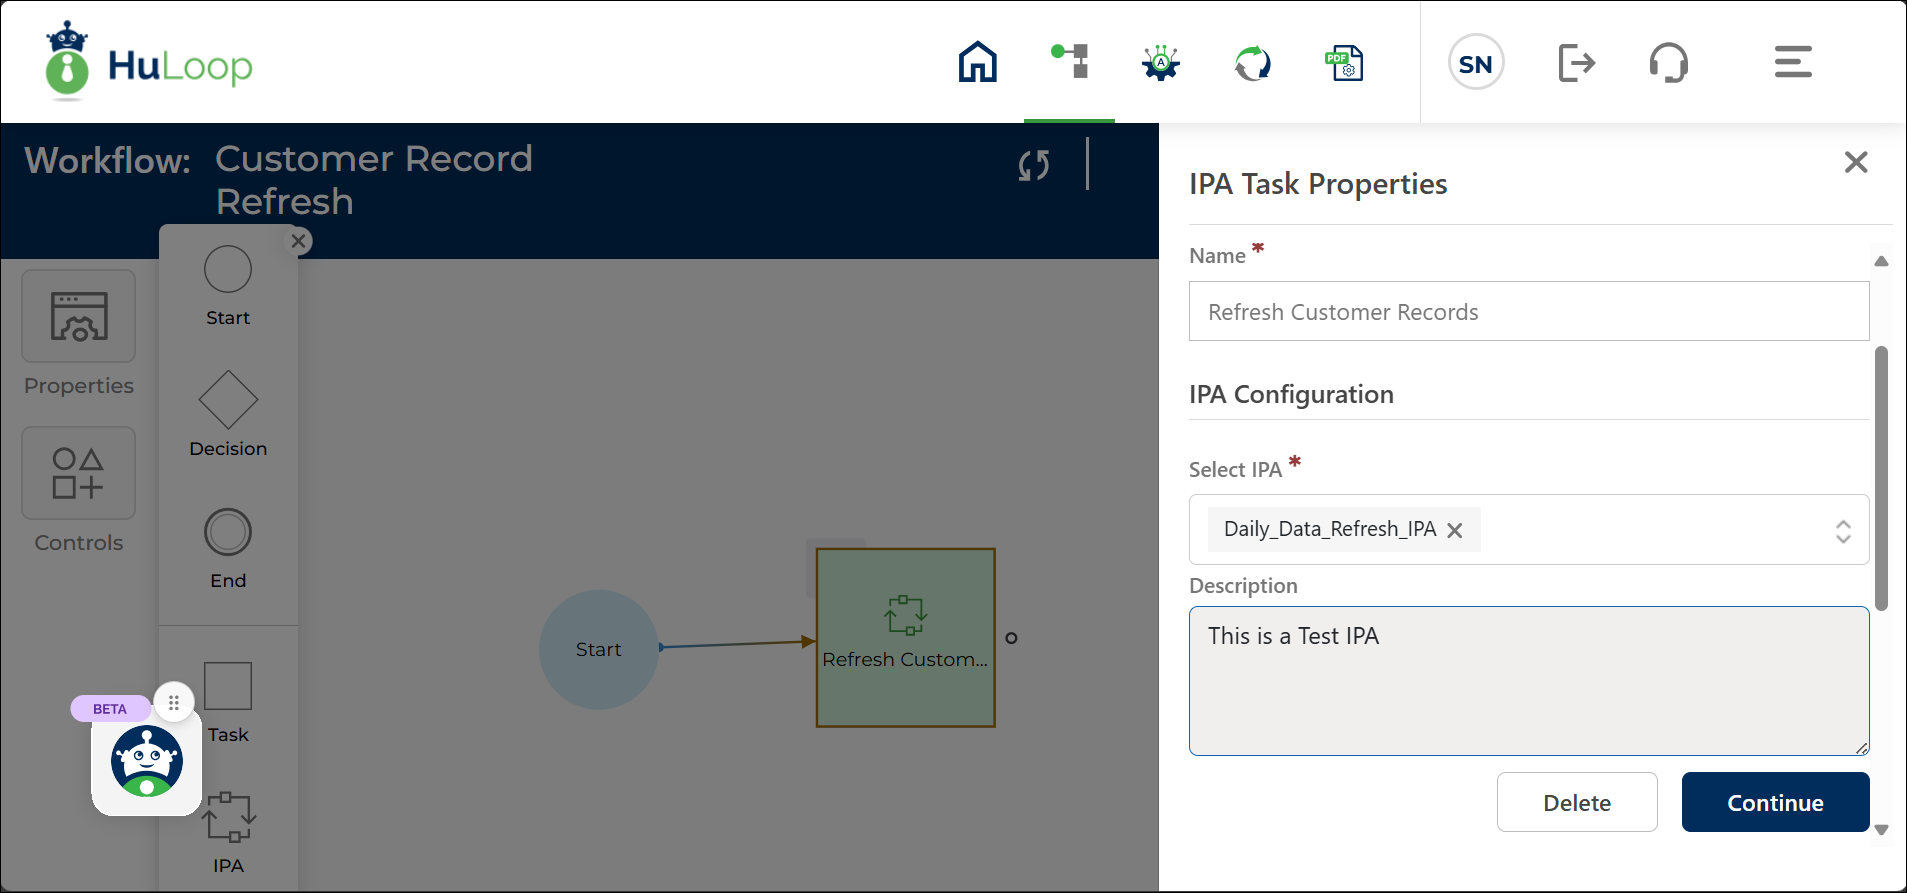
What Happens After Workflow Is Enabled?
- The IPA becomes available for selection in the Workflow Designer.
- Only IPAs with Workflow Enabled = Yes can be linked to workflows.
- When a workflow reaches the IPA node, execution is triggered automatically through the HuLoop Scheduler.
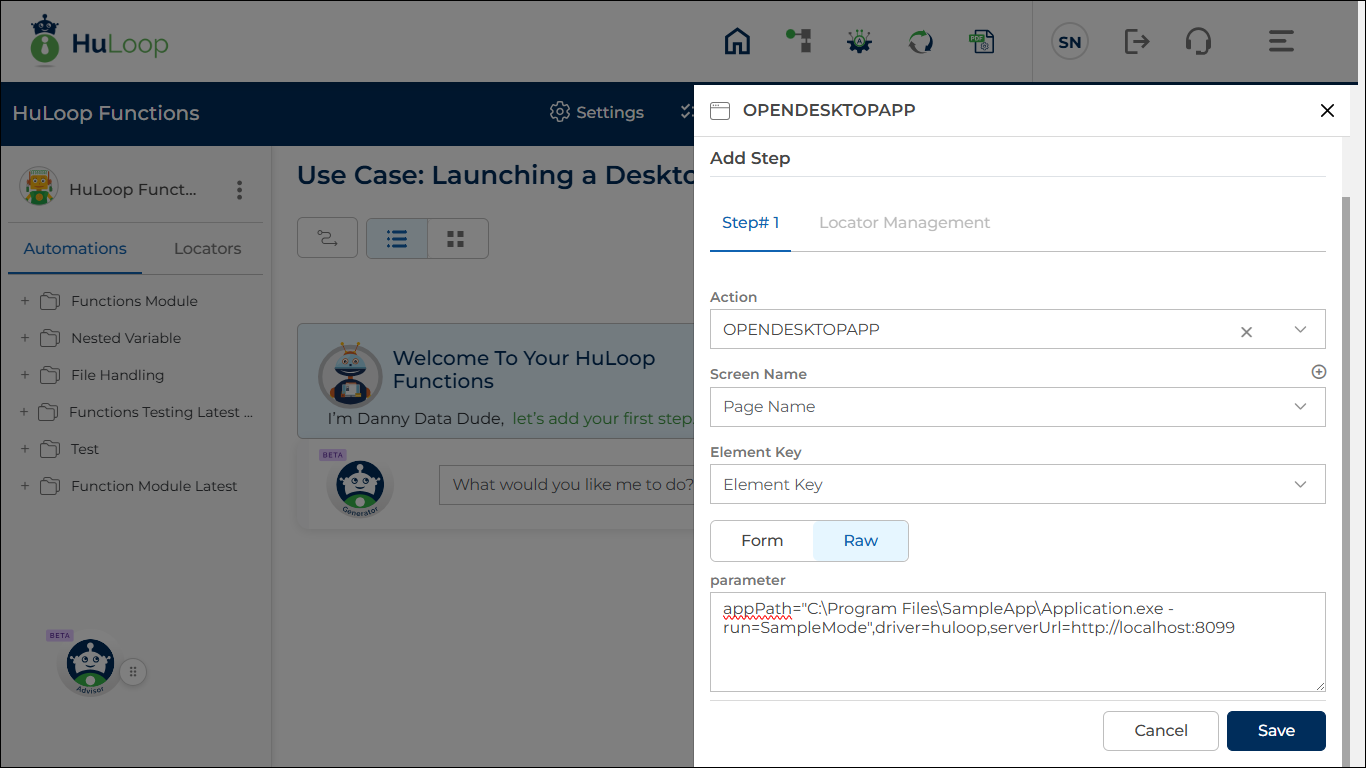
If the application’s EXE path contains a comma (for example, in the folder name), you must wrap the entire path value in double quotes (“”) when specifying the appPath parameter.
This ensures HuLoop correctly interprets the full path as a single value.
Example: appPath=”C:\Program Files\Sample Company\AppFolder\Application.exe”,driver=huloop,serverUrl=http://localhost:8099

Notes:
- Always provide the complete path, including the executable file name.
- Use double quotes only around the appPath value.
- This approach works for paths that contain commas, spaces, or special characters.
For more information, click here.
You can pass command-line parameters by appending them directly to the executable path in the appPath parameter.
When additional parameters are included, enclose the full path and parameter value in double quotes.
Example:
appPath=”C:\Program Files\SampleApp\Application.exe -run=SampleMode”,driver=huloop,serverUrl=http://localhost:8099
In this example:
- -run=SampleMode is passed as a startup parameter to the application.
- The application launches with the specified argument applied.
For more information, click here.
- Keep the executable path and parameters within the same quoted value.
- Make sure the target application supports the parameters you provide.
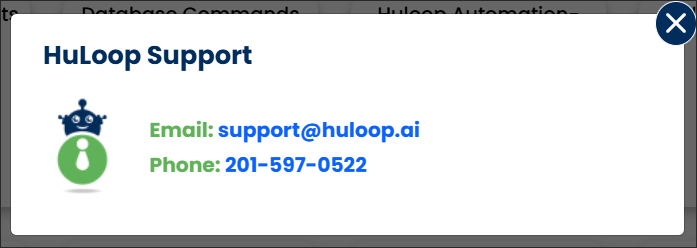
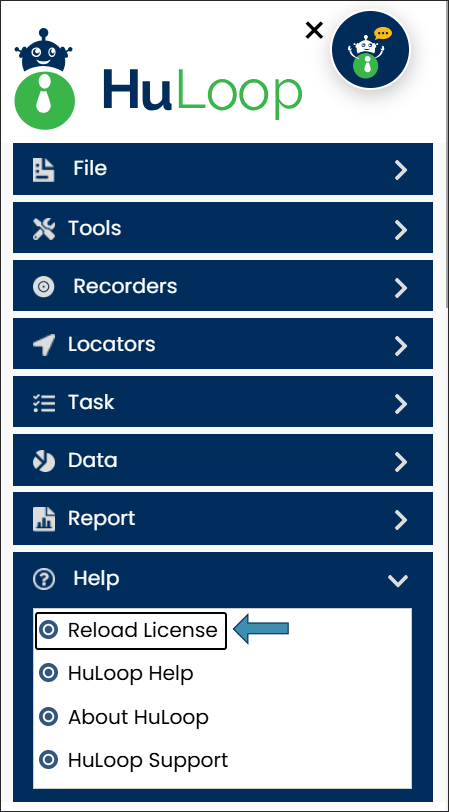
- Sign in to your HuLoop account.
- Click Menu in the top-right corner.
- In the menu, expand the Help section by selecting the icon and choose Huloop Support.
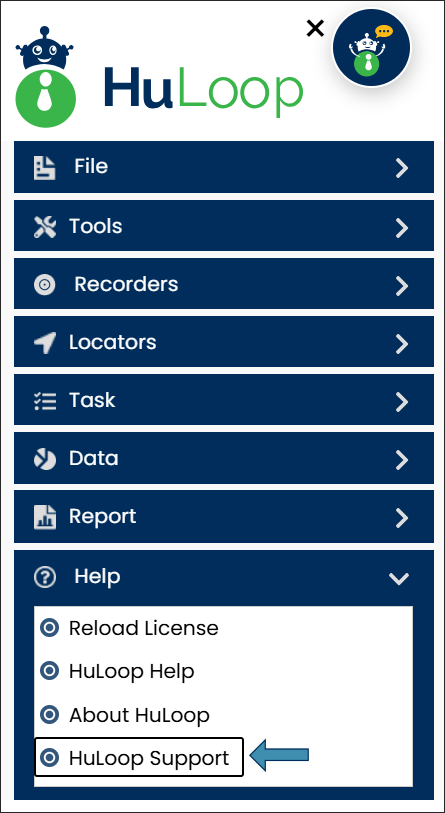
- You will see the HuLoop support email address and contact number.
- Sign in to your HuLoop account.
- Click Menu in the top-right corner.
- In the menu, expand the Help section by selecting the icon, then choose Huloop Help.
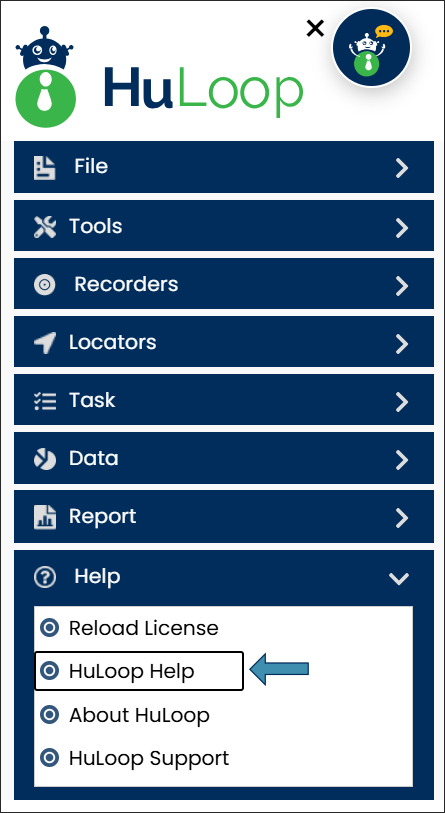
- A new tab will open with links to various HuLoop help documents.
- Sign in to your HuLoop account.
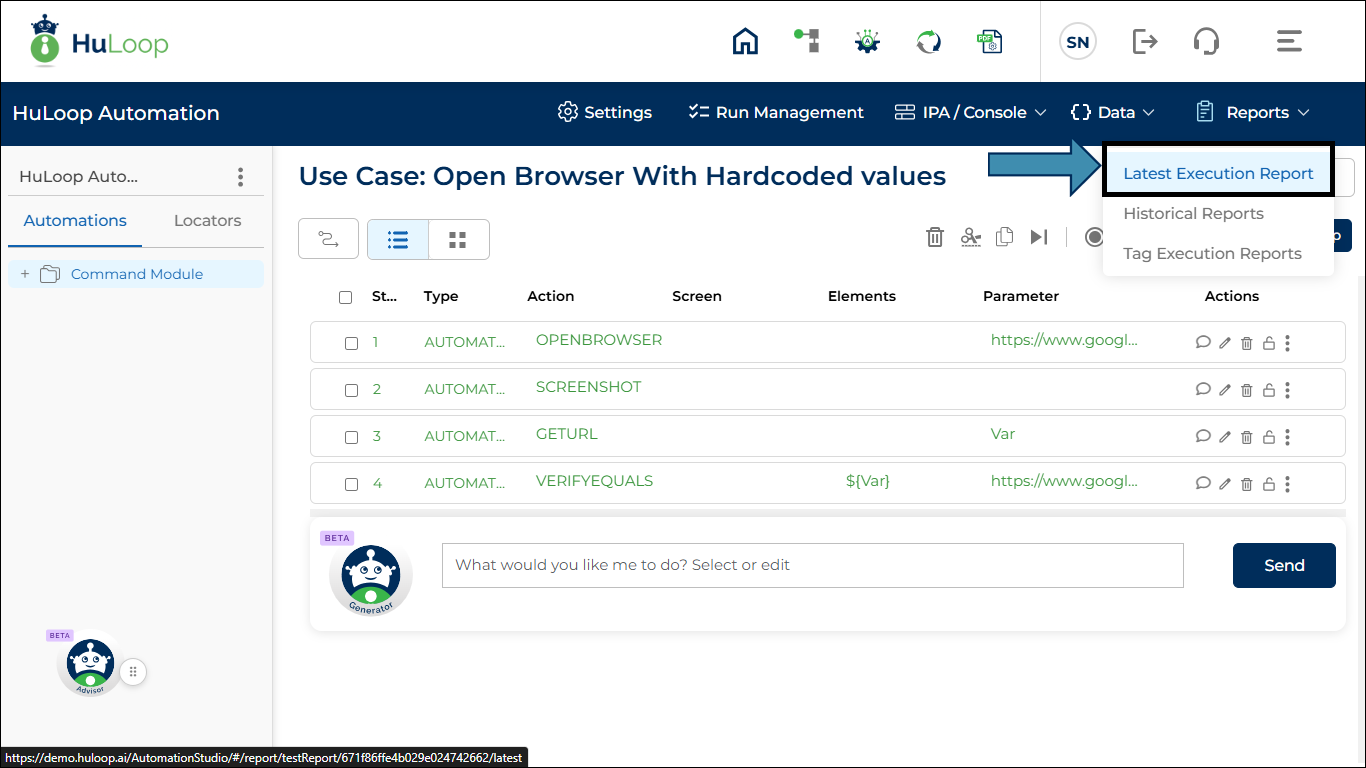
- Execute your case to generate a report.
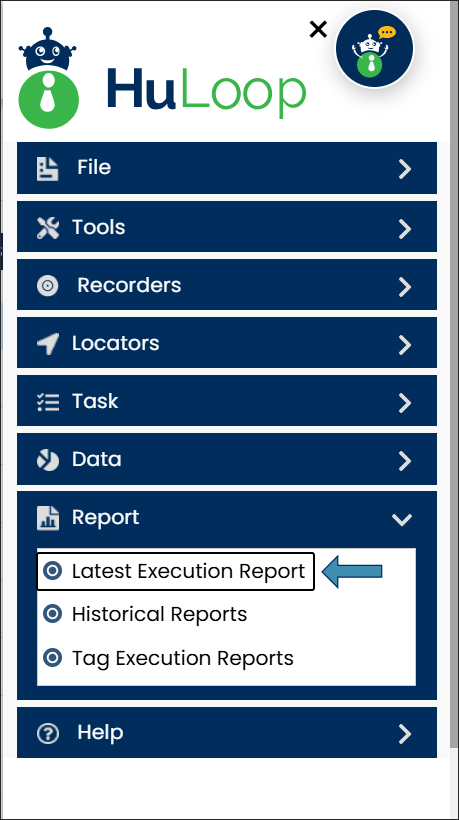
- Go back to the case page and expand the Reports option and select Latest Execution Report.

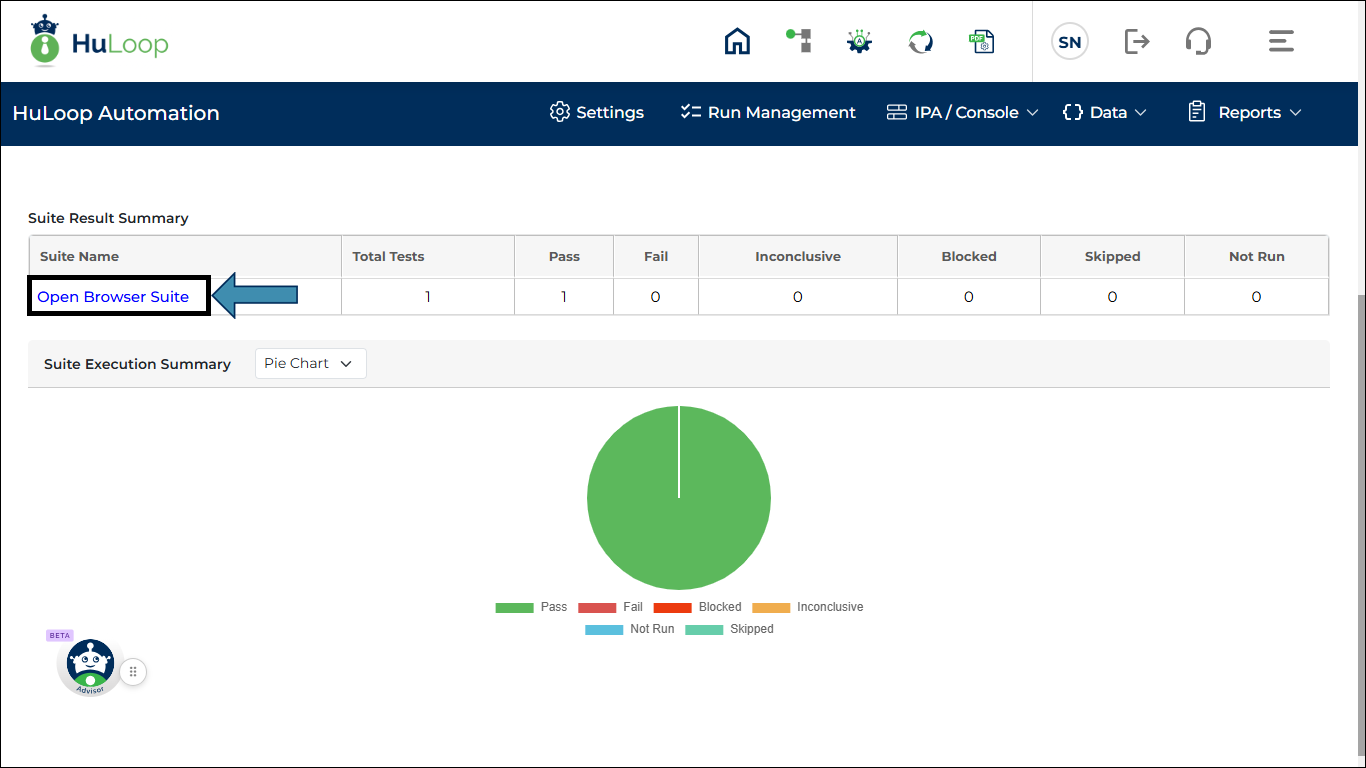
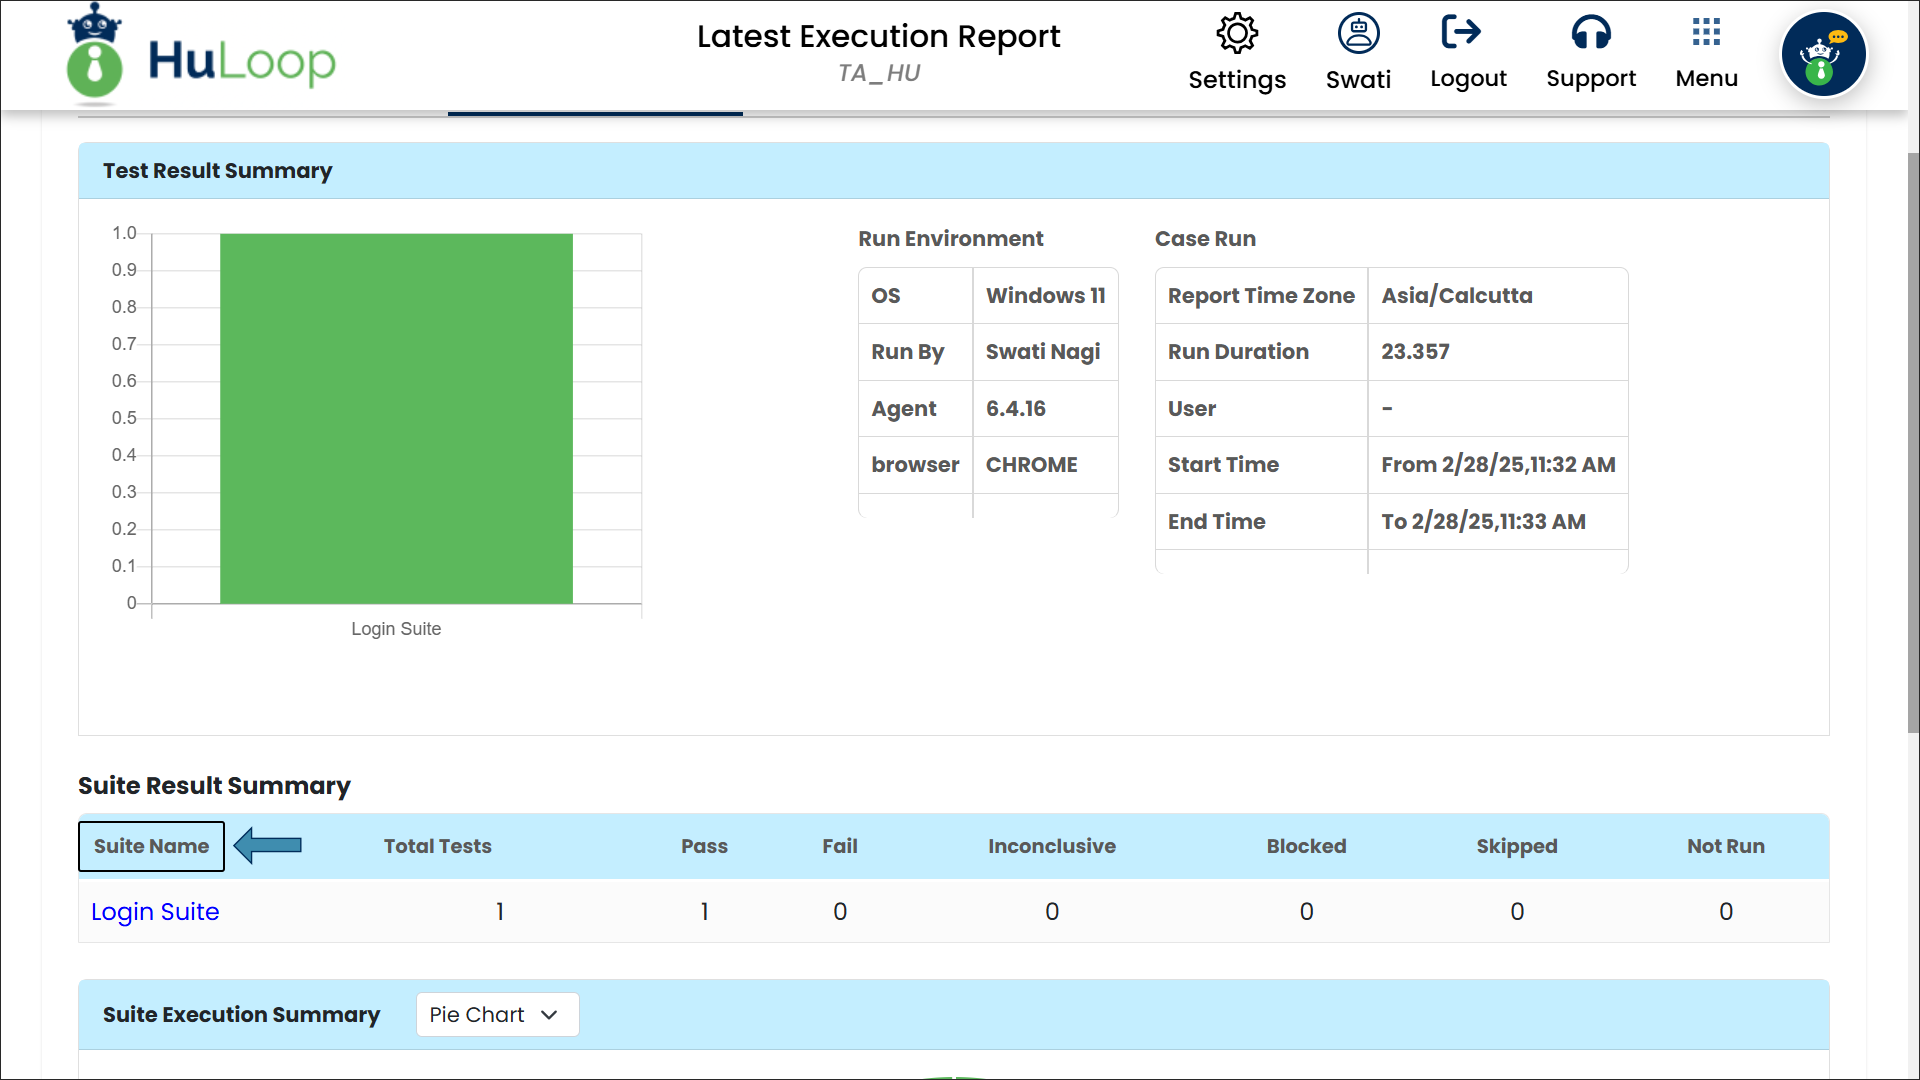
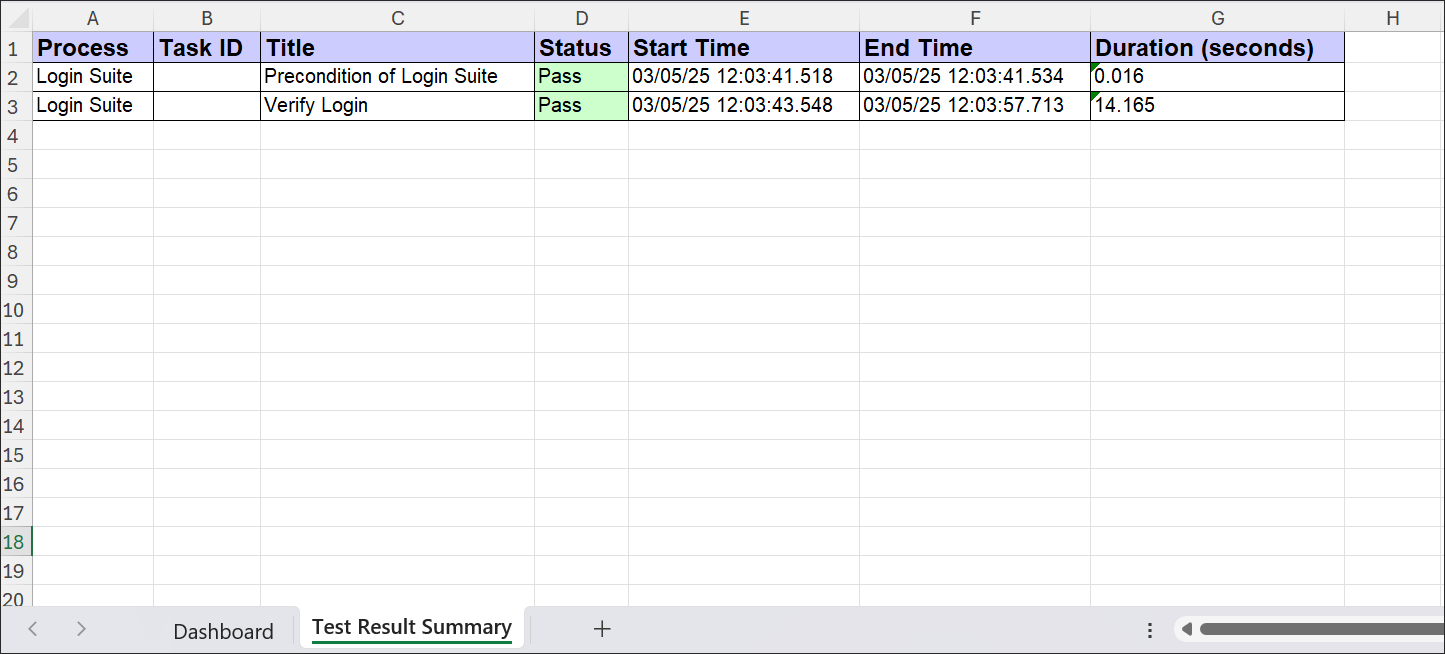
- You will be taken to Latest Execution Report page that shows the Test Result Summary and Suite Result Summary for the project.
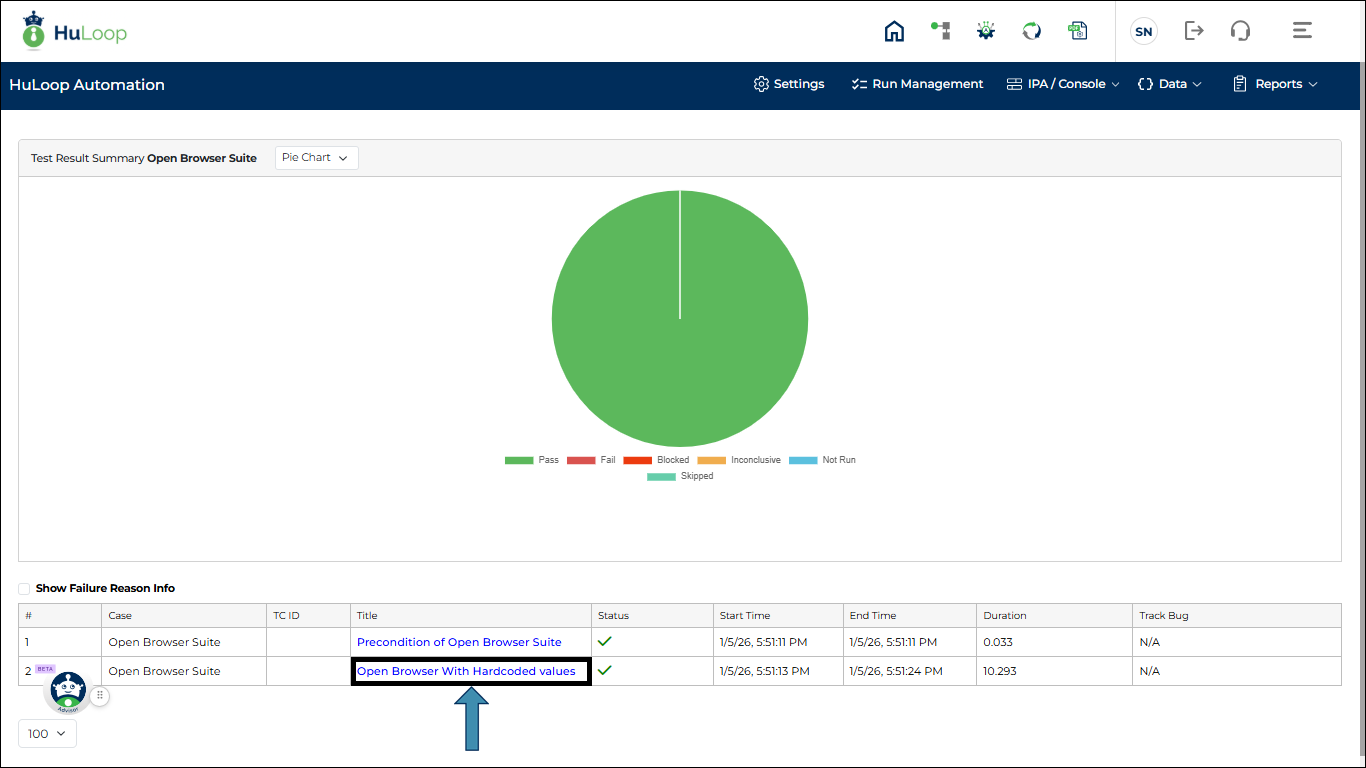
- Scroll down and click the Suite Name under the Suite Result Summary (e.g., Open Browser Suite).
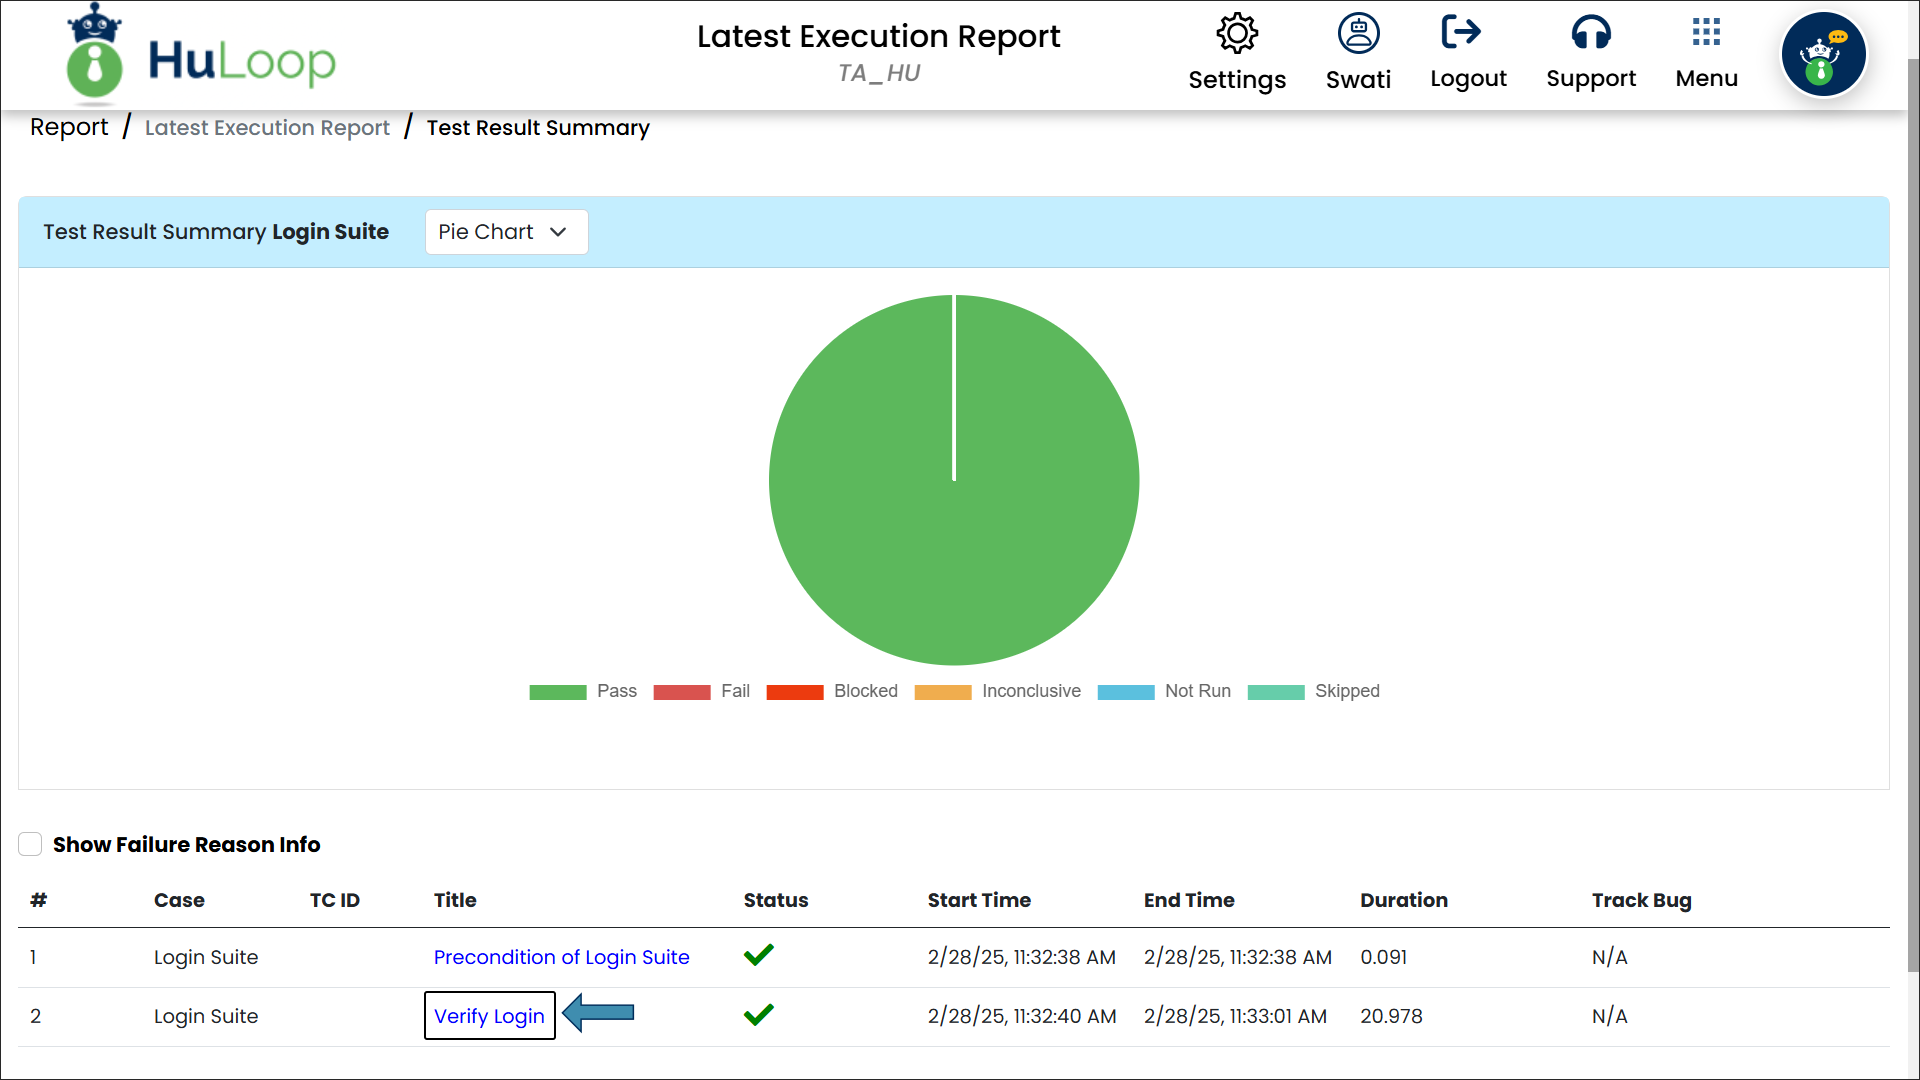
- Click on the Case Title to open execution details (e.g., Open Browser With Hardcoded values).
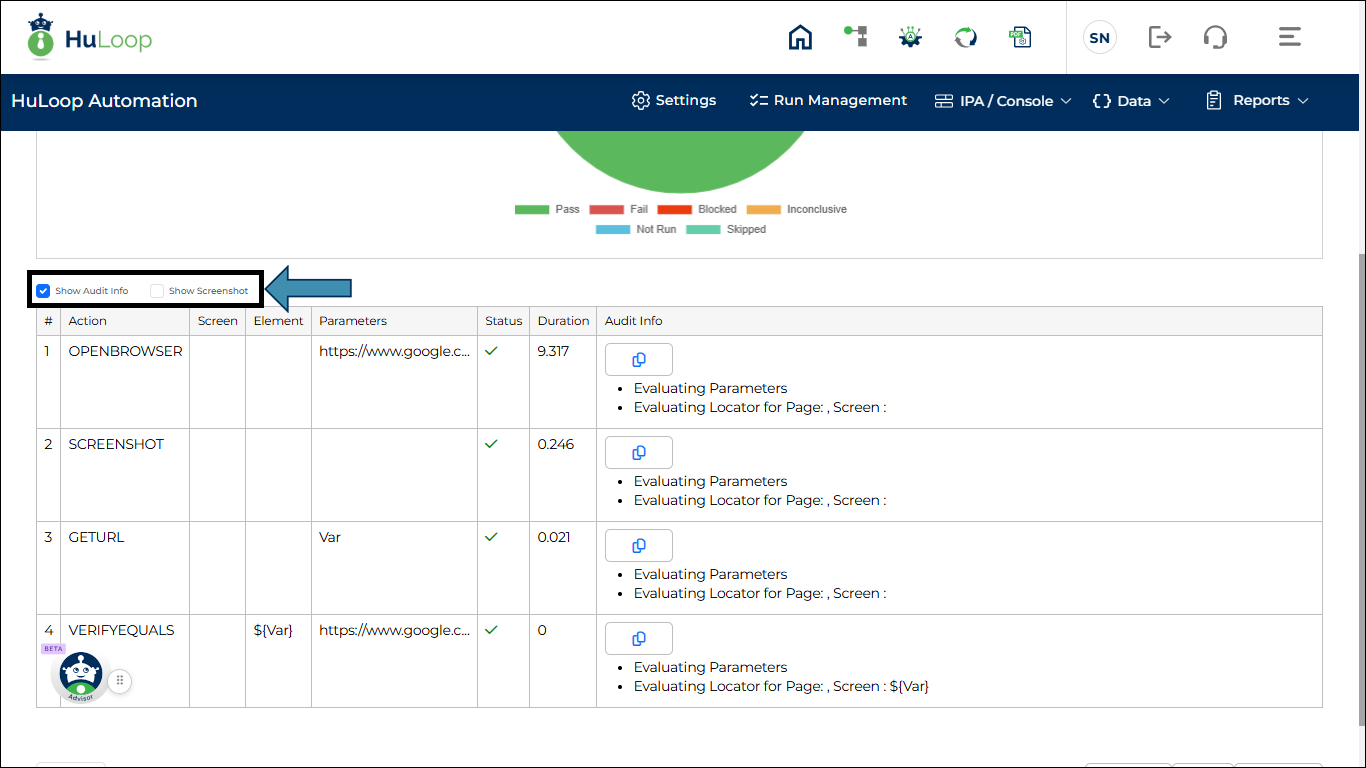
- In the Test Run Details page, select Show Audit Info to view audit details or Show Screenshot to display screenshots.
After a test run completes, HuLoop assigns a status to each test to help you quickly understand the outcome. Each status reflects what happened during execution and whether any action is needed.
- Passed: The test executed successfully and all steps completed as expected.
When it happens: All validations pass and no errors are encountered during execution. - Failed: The test started execution but failed due to an error or an unmet validation.
When it happens: A step fails, a validation does not meet the expected result, or an error occurs during execution. - Inconclusive: The test executed but did not produce a clear pass or fail result.
When it happens: Execution completes, but the outcome cannot be determined due to incomplete data or unexpected behavior. - Blocked: The test could not be executed because one or more required preconditions were not met.
When it happens: A dependent setup, prerequisite step, or required condition fails, preventing the test from running. - Skipped: The test was intentionally skipped and not executed.
When it happens: The test is excluded due to configuration, conditional logic, or execution rules. - Not Run: The test was not executed at all.
When it happens: The execution did not start, was stopped before reaching the test, or the test was not included in the run.
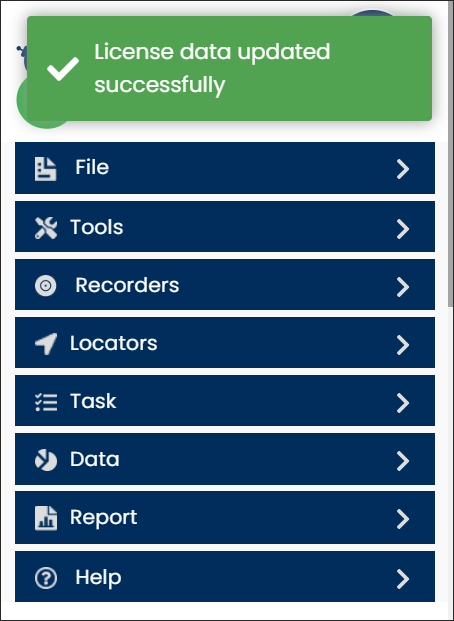
- Sign in to your HuLoop account.
- Click Menu in the top-right corner.
- In the menu, expand the Help section by selecting the
 icon and choose Reload License.
- A message will confirm your license has been updated.
In HuLoop automation workflows, sensitive data such as passwords, API keys, database credentials, and personal information can be protected to ensure security and compliance. HuLoop provides built-in encryption mechanisms that prevent unauthorized access, secure data in logs and reports, and help meet compliance standards.
By encrypting data, users can ensure that sensitive values remain hidden across automation cases, logs, and reports.
HuLoop allows you to protect sensitive parameters in automation workflows using three methods:
- At the Step Level (Case-Specific Encryption)
- At the Global Settings Level (Automation-Wide Encryption)
- By Hiding Step-Level Details in Reports: Hiding step-level details in Web and Excel Reports prevents sensitive information from being displayed in reports, ensuring compliance and data security.
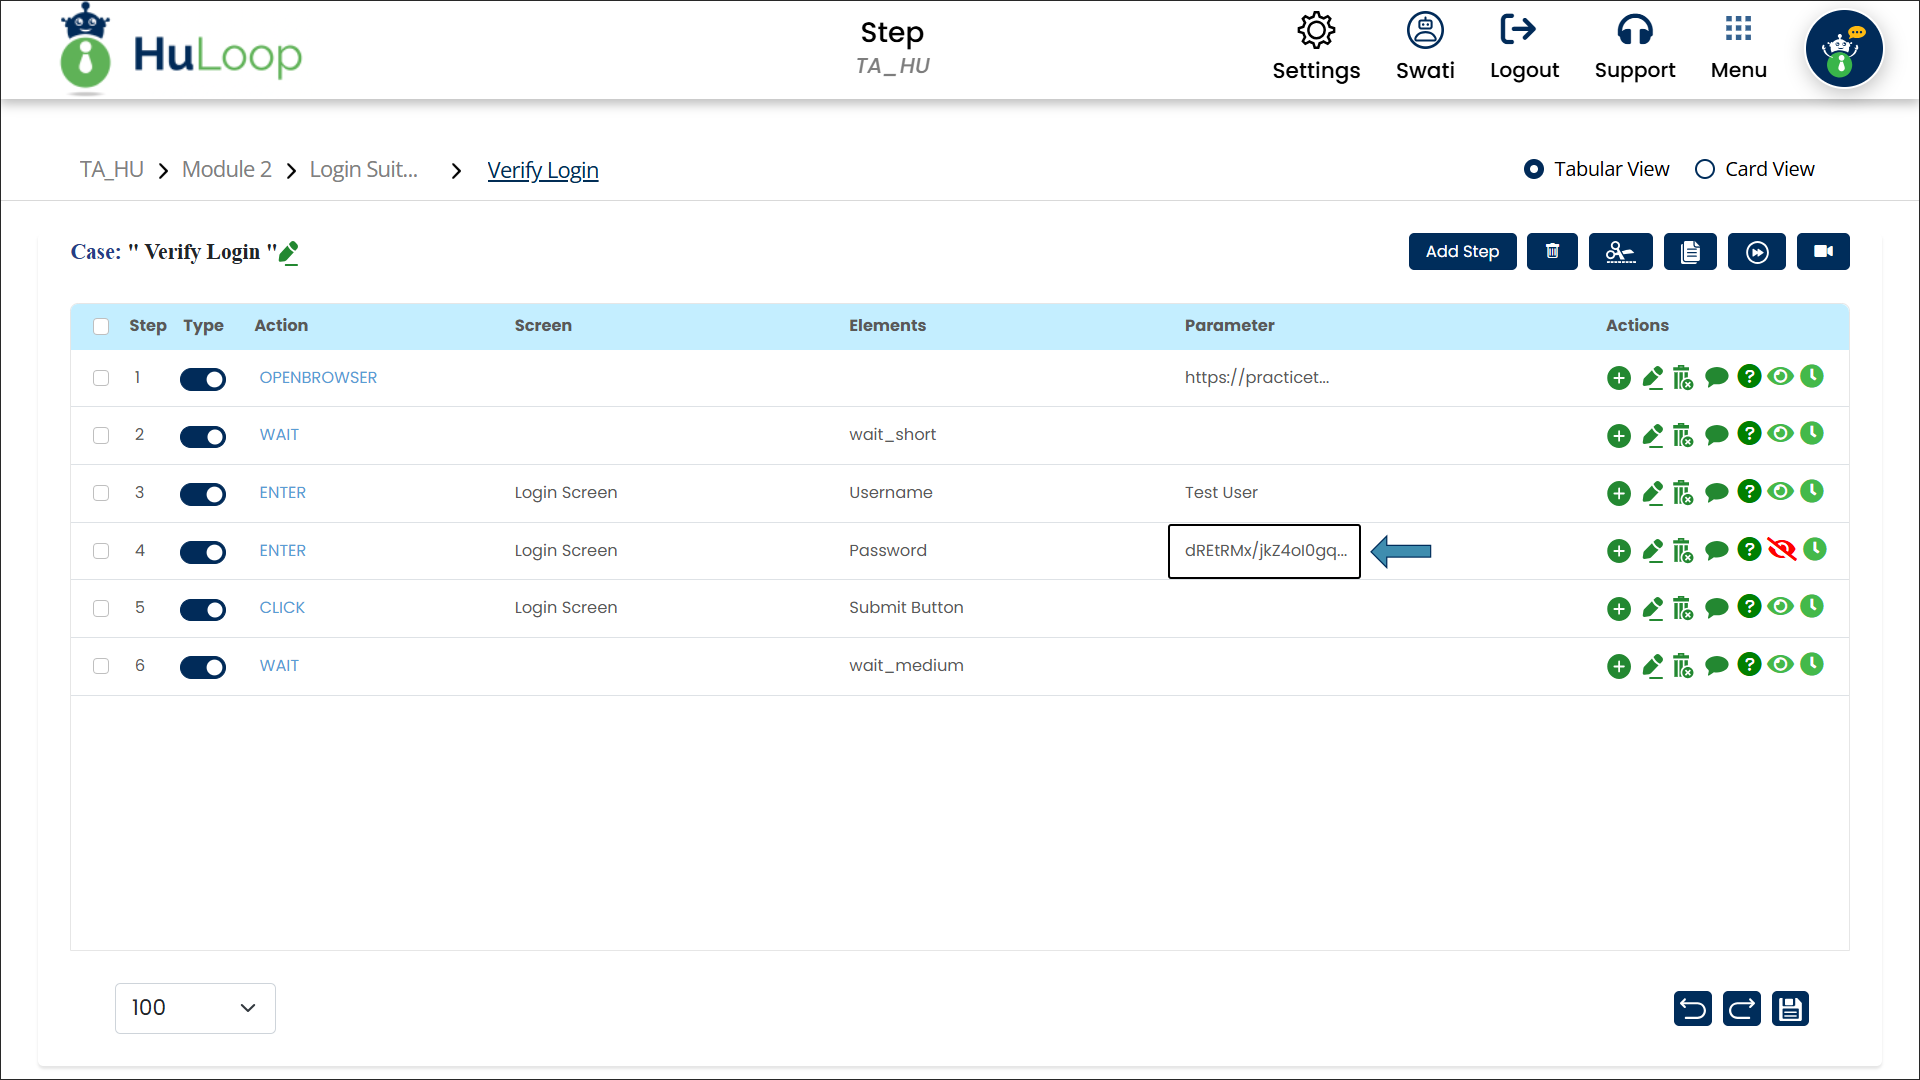
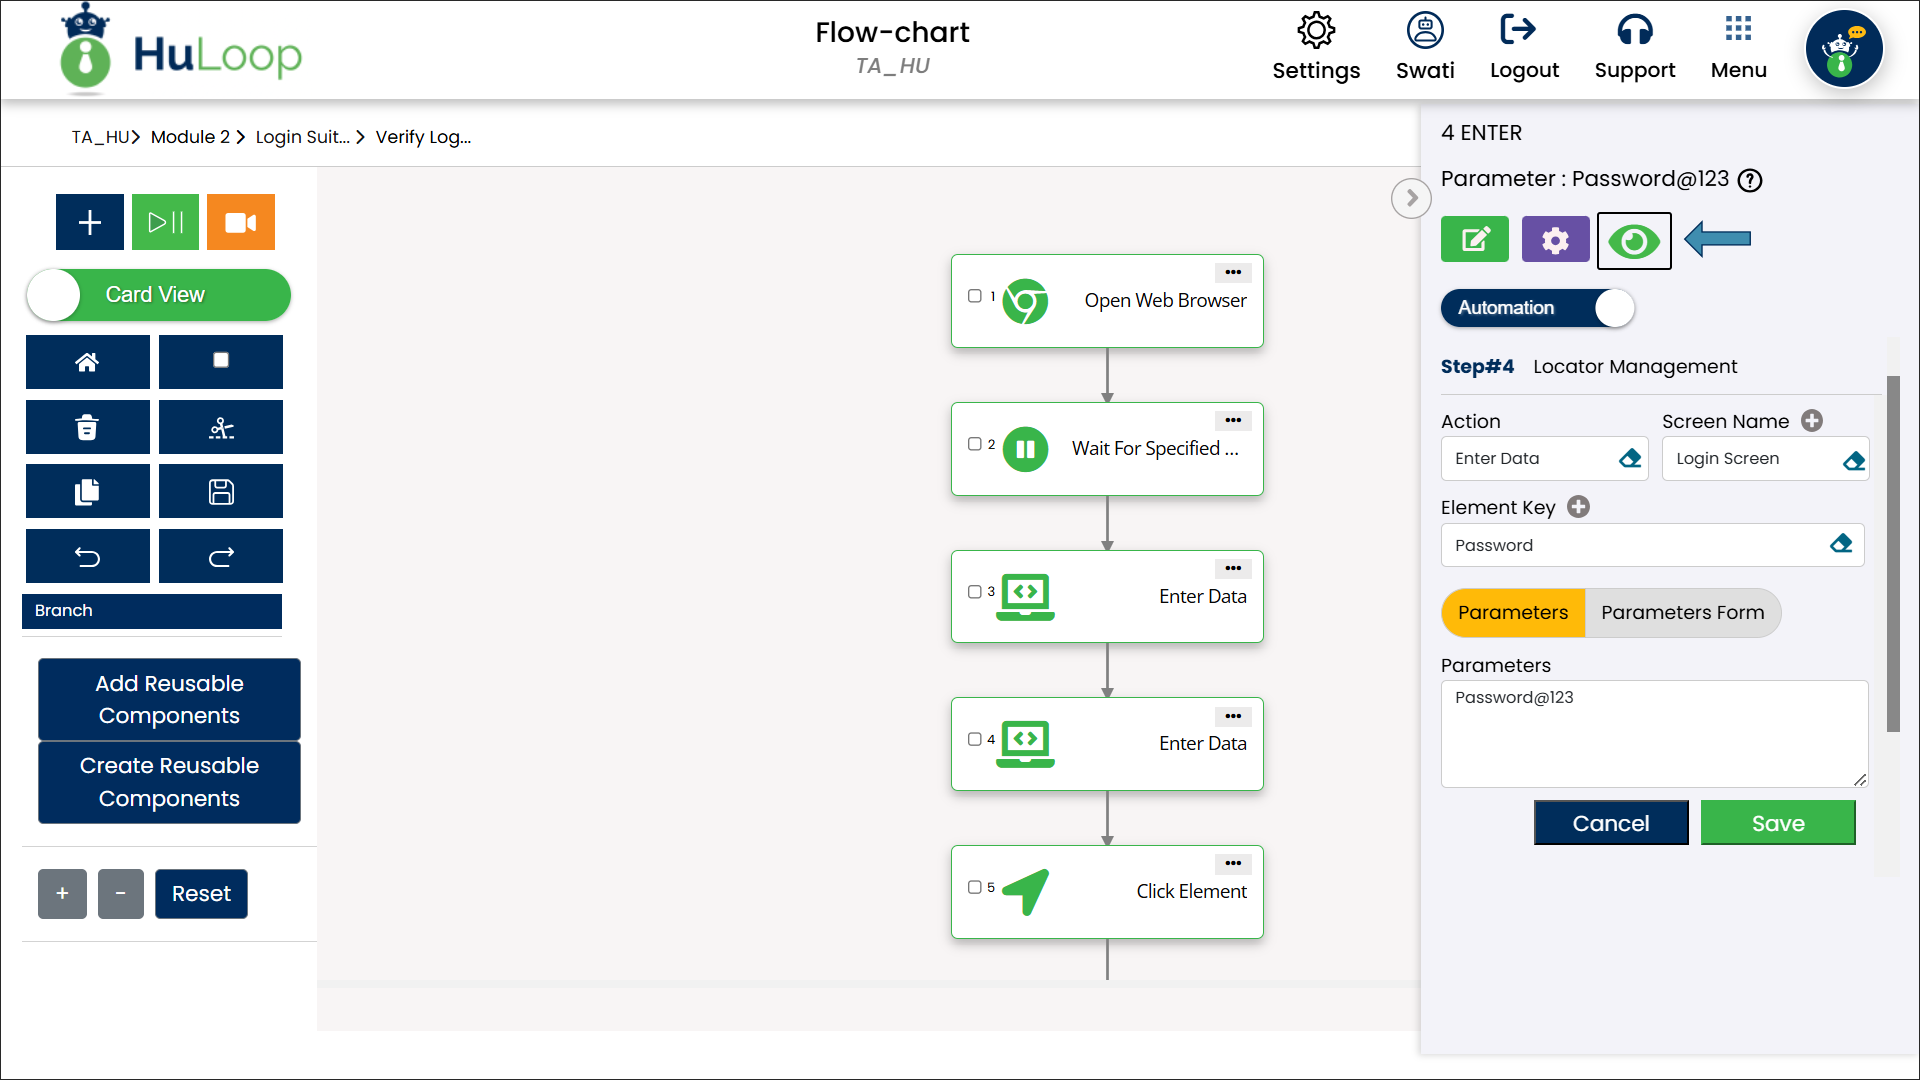
HuLoop allows users to encrypt sensitive data directly within a case step to prevent unauthorized access. This ensures that the confidential values remain secure throughout the automation process. The encryption process slightly differs between Tabular View and Card View.
Encrypting Data in Tabular View
- Log in to your HuLoop account.
- Open the case that contains the step with sensitive data.
- Suppose you want to hide the password value, as shown in Step 4 of the case (refer to the screenshot).
- Click the eye-shaped icon for this step.
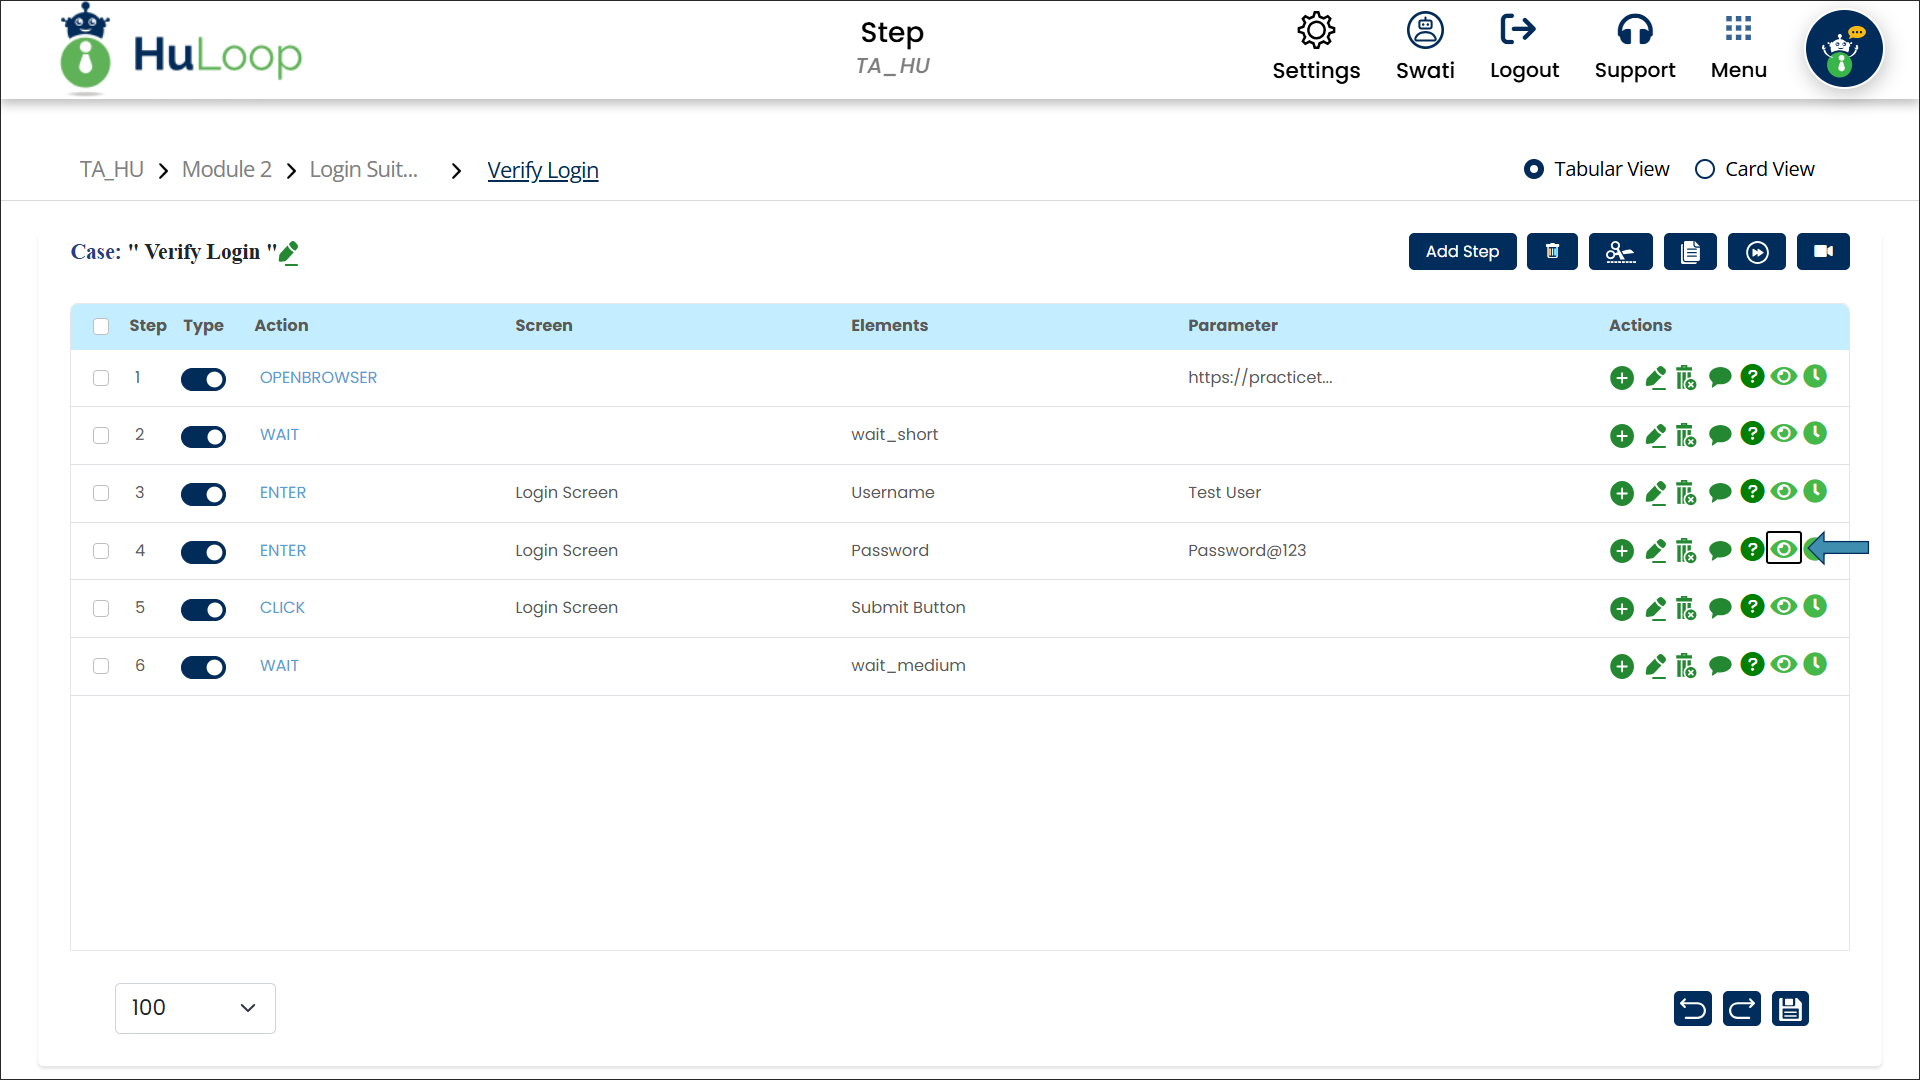
- The data is automatically encrypted and will appear as a secure string, such as: dREtRMx/jkZ4oI0gq2xoD1o/034VulAA9W16h57FR9vtE=
Notes:
- Once a step contains encrypted data, it cannot be edited. If changes are needed, you must decrypt the data first.
- You can decrypt the data, if required, by clicking the eye-shaped icon again.
- Only the user who encrypted the data can decrypt the value.
Encrypting Data in Card View
- Log in to your HuLoop account.
- Open the case and click on the step containing the sensitive data.
- In the right-side panel, Click the eye-shaped icon.
- Suppose you want to hide the password value, as shown in Step 4 of the case (refer to the above screenshot).
- The value will be automatically encrypted and converted into a secure string.
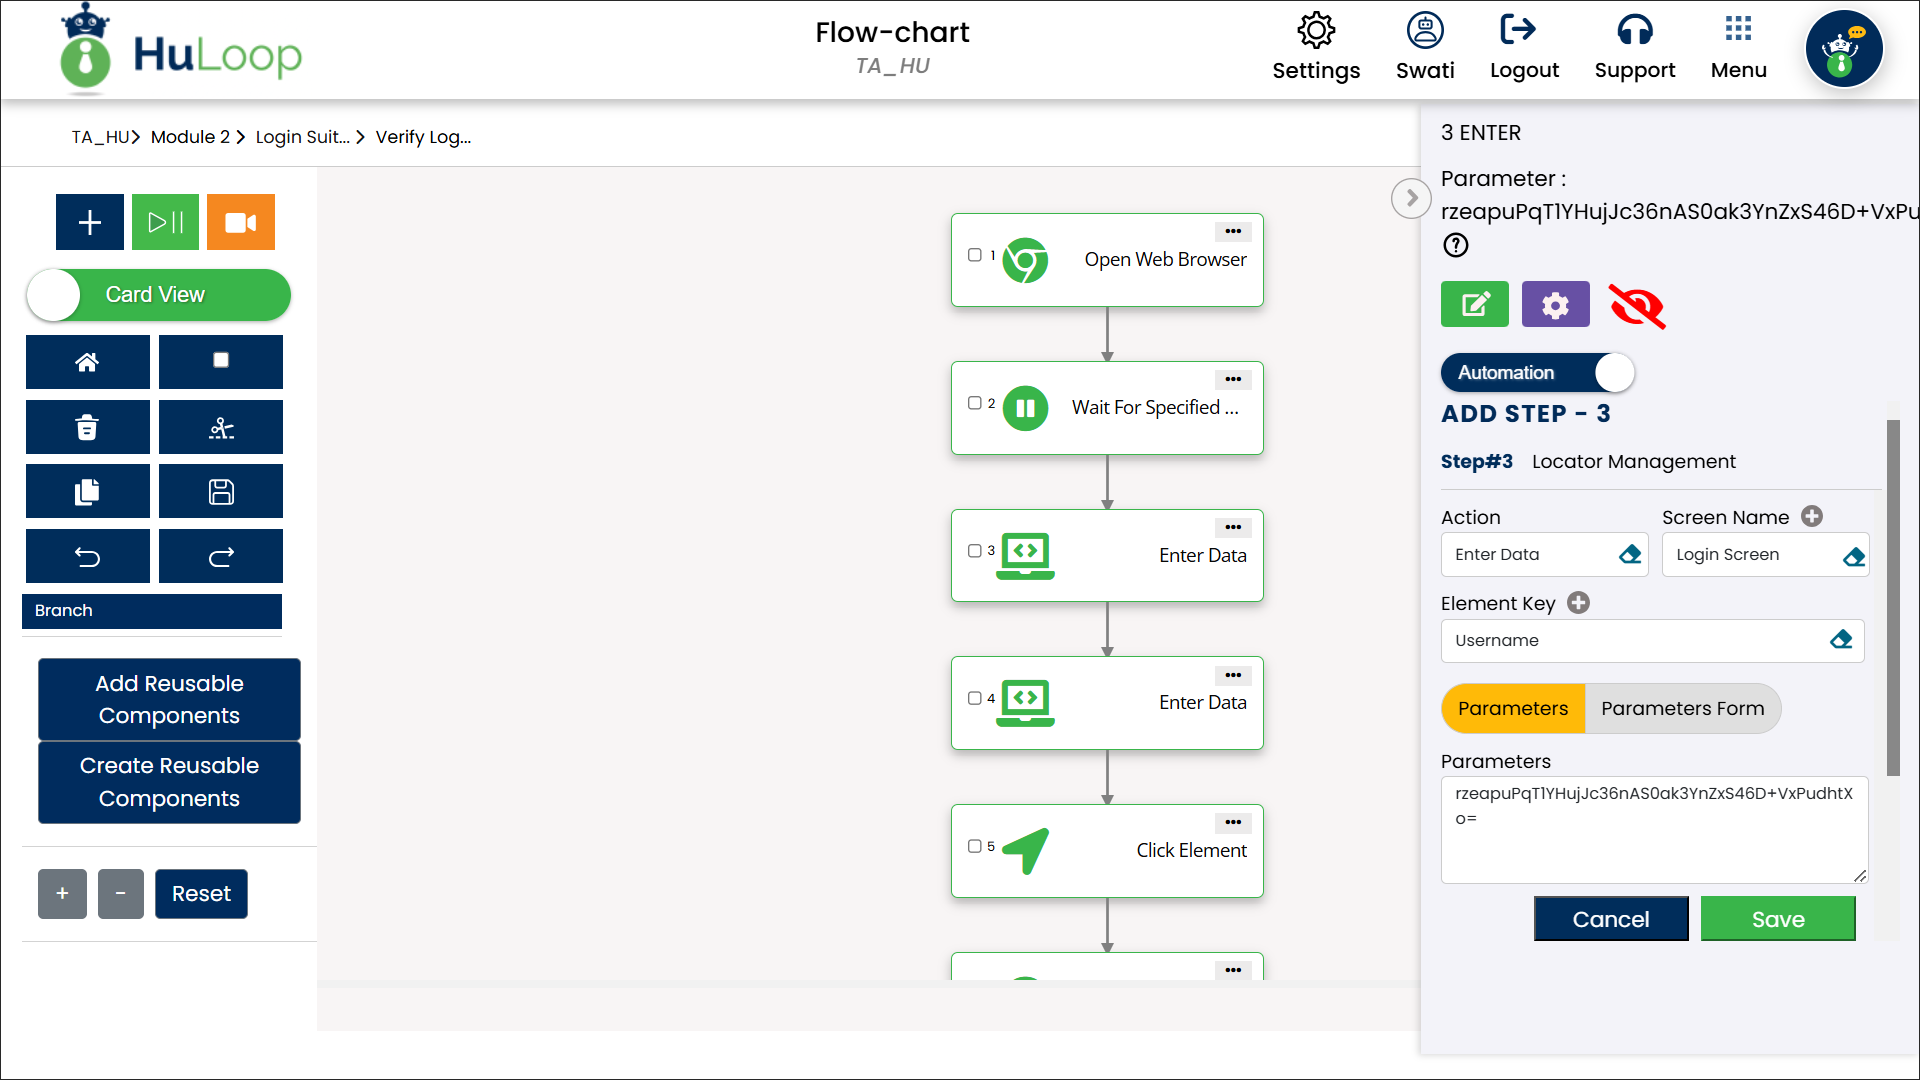
Notes:
- Once a step contains encrypted data, it cannot be edited. If changes are needed, you must decrypt the data first before making any modifications.
- You can decrypt the data, if required, by clicking the eye icon again.
- Only the user who encrypted the data can decrypt the value.
HuLoop allows users to encrypt data globally through Custom Settings. This is useful when sensitive data, needs to be accessed across multiple cases without manually encrypting it in each step. Encrypting data at the global level ensures consistent security while allowing users to reference encrypted values wherever needed.
The following steps explain how to encrypt sensitive data in Global Settings and securely use it in automation workflows.
Steps to encrypt sensitive data globally:
- Log in to your HuLoop account.
- Open the automation containing the case you want to encrypt the data in.
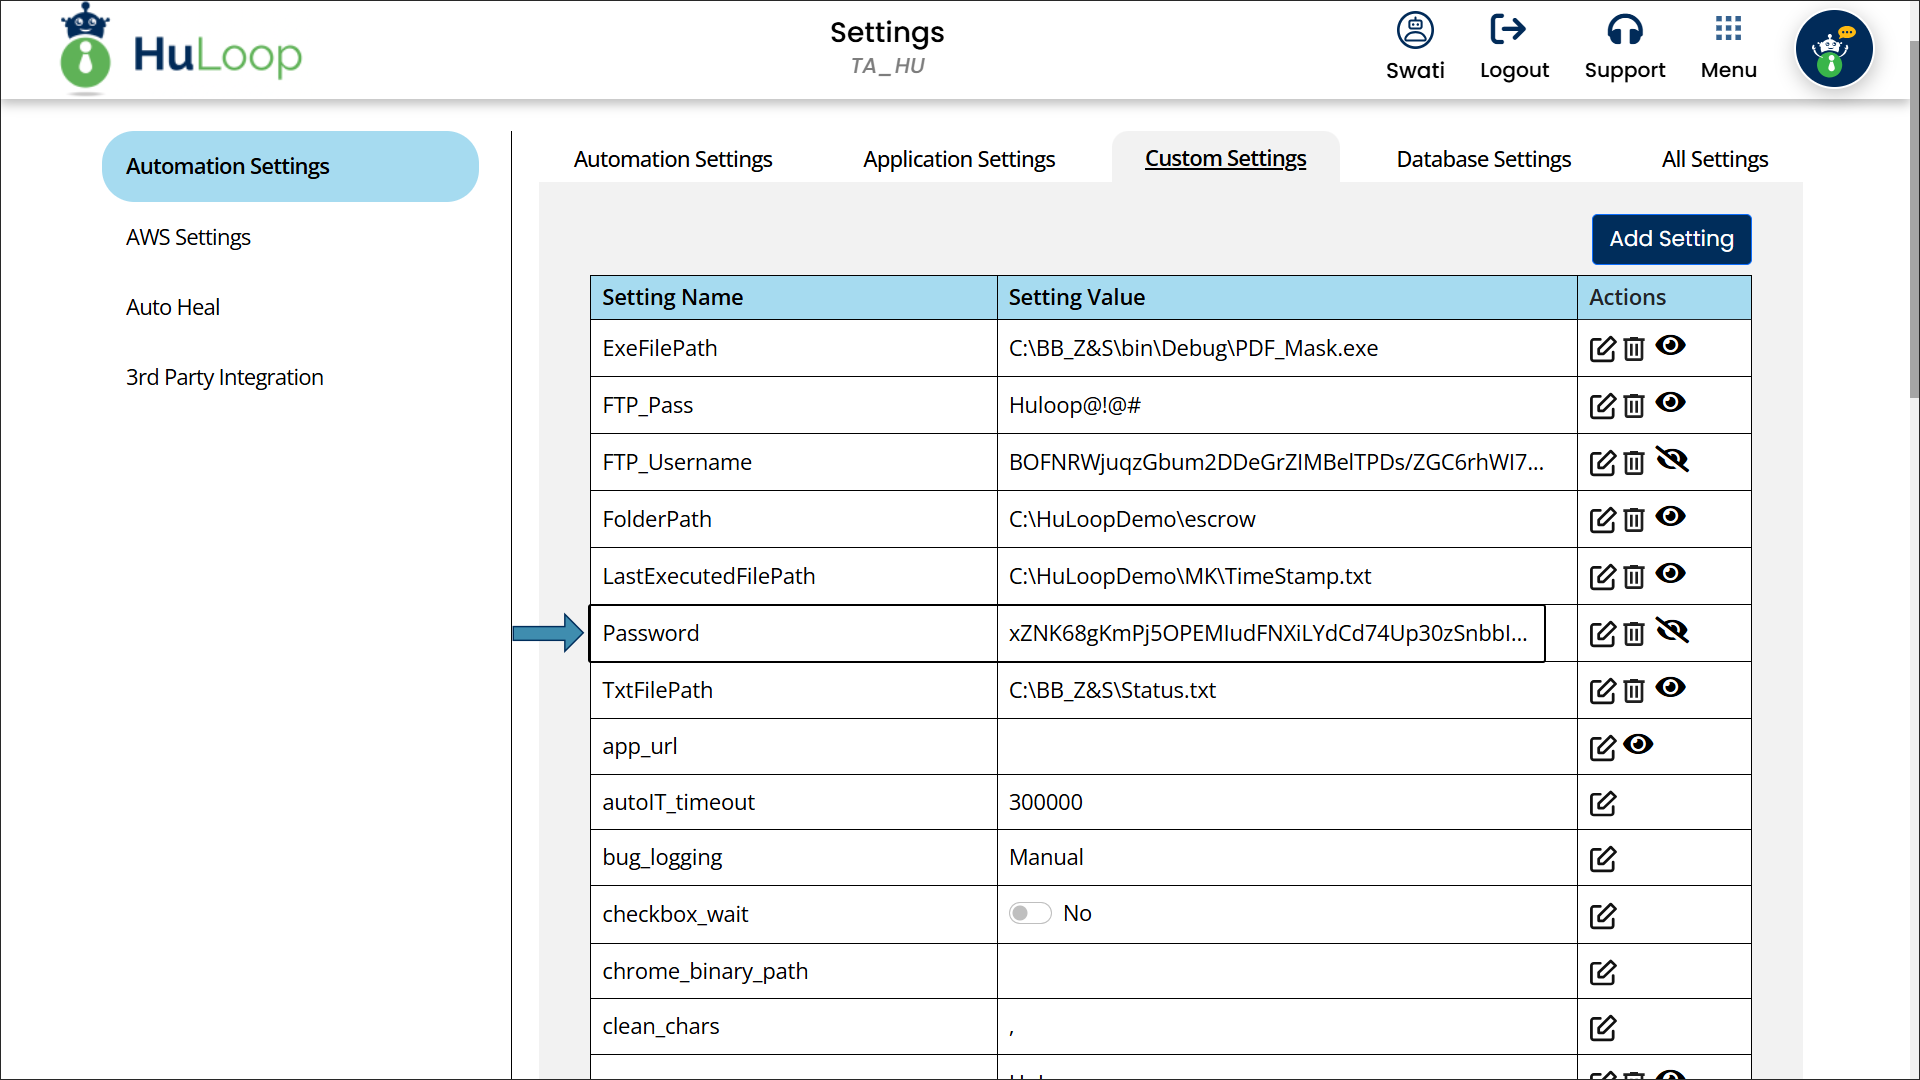
- Navigate to Settings > Custom Settings.
- Click Add Setting button to create a new global variable for the sensitive data.
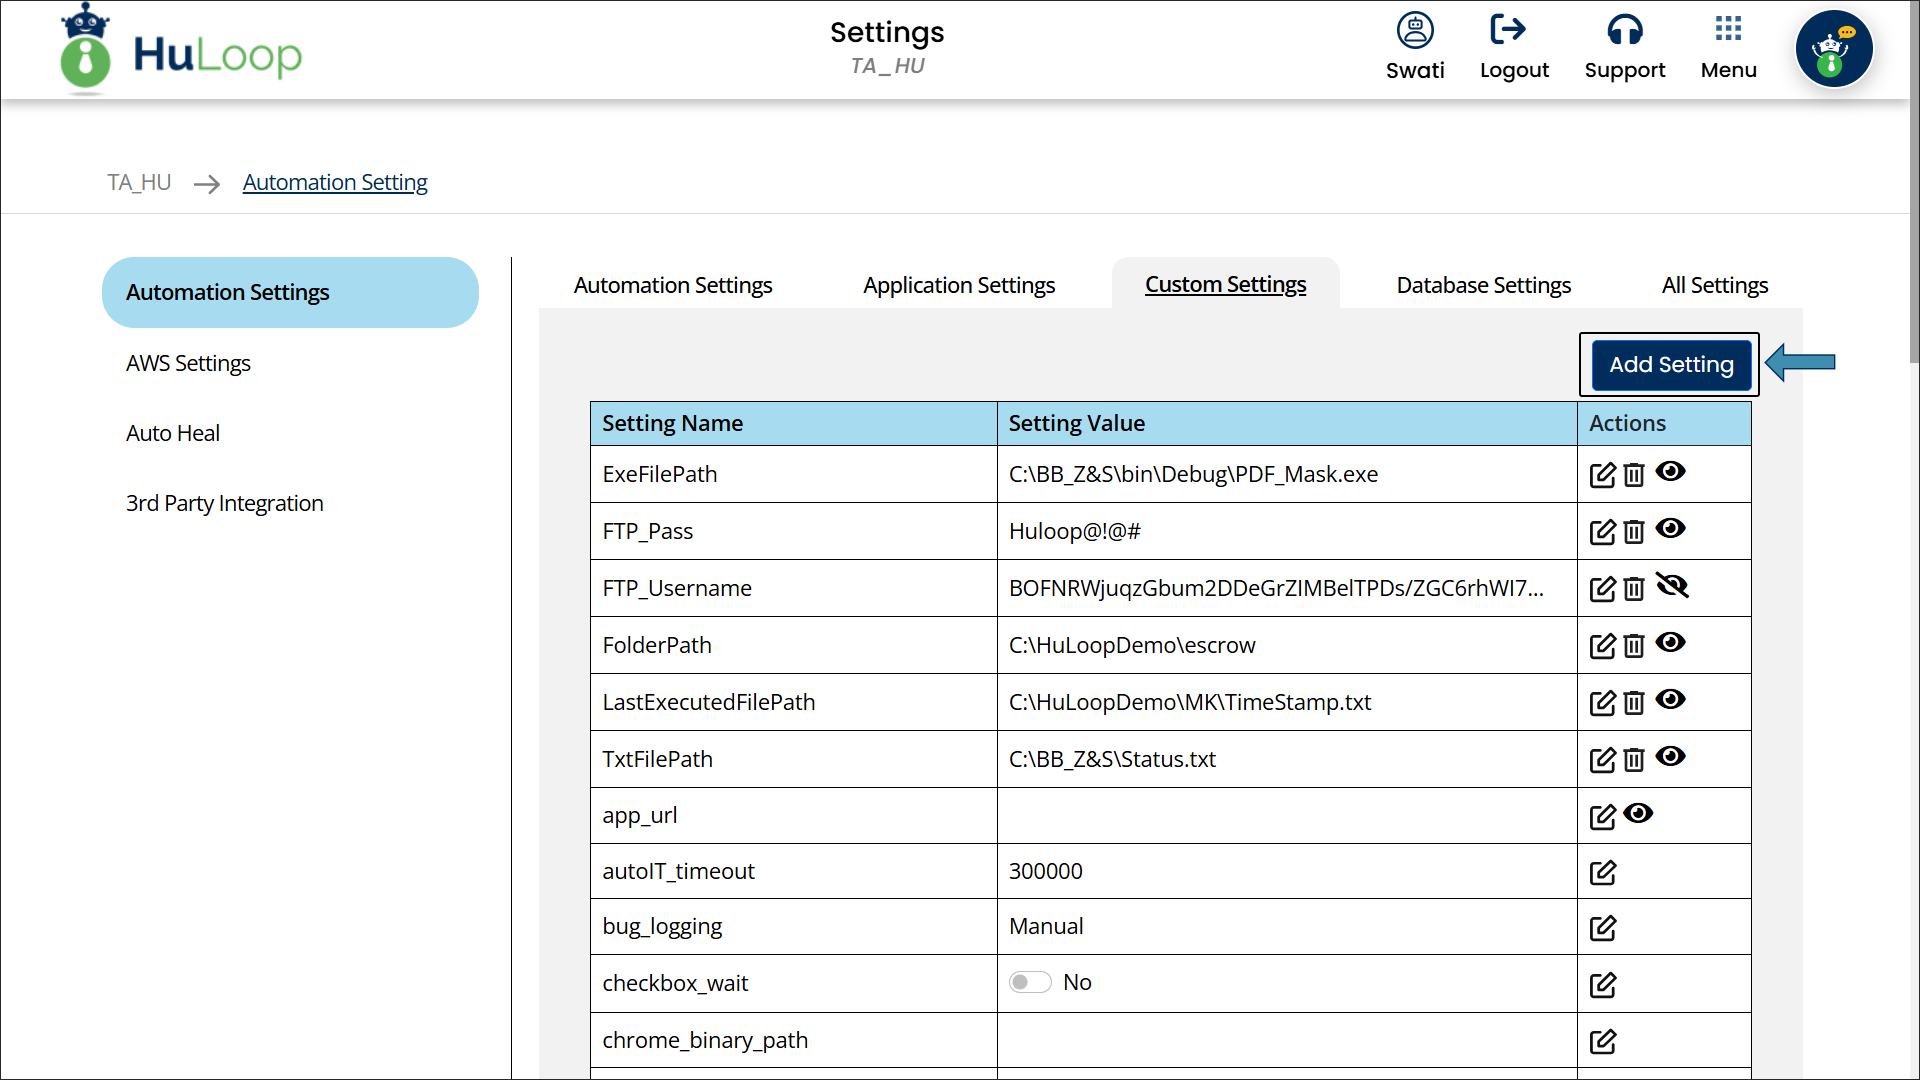
- In the pop-up window, provide:
- Setting Name: An identifier for the encrypted data (e.g, Password).
- Setting Value: The data you want to encrypt (e.g., Password@123)
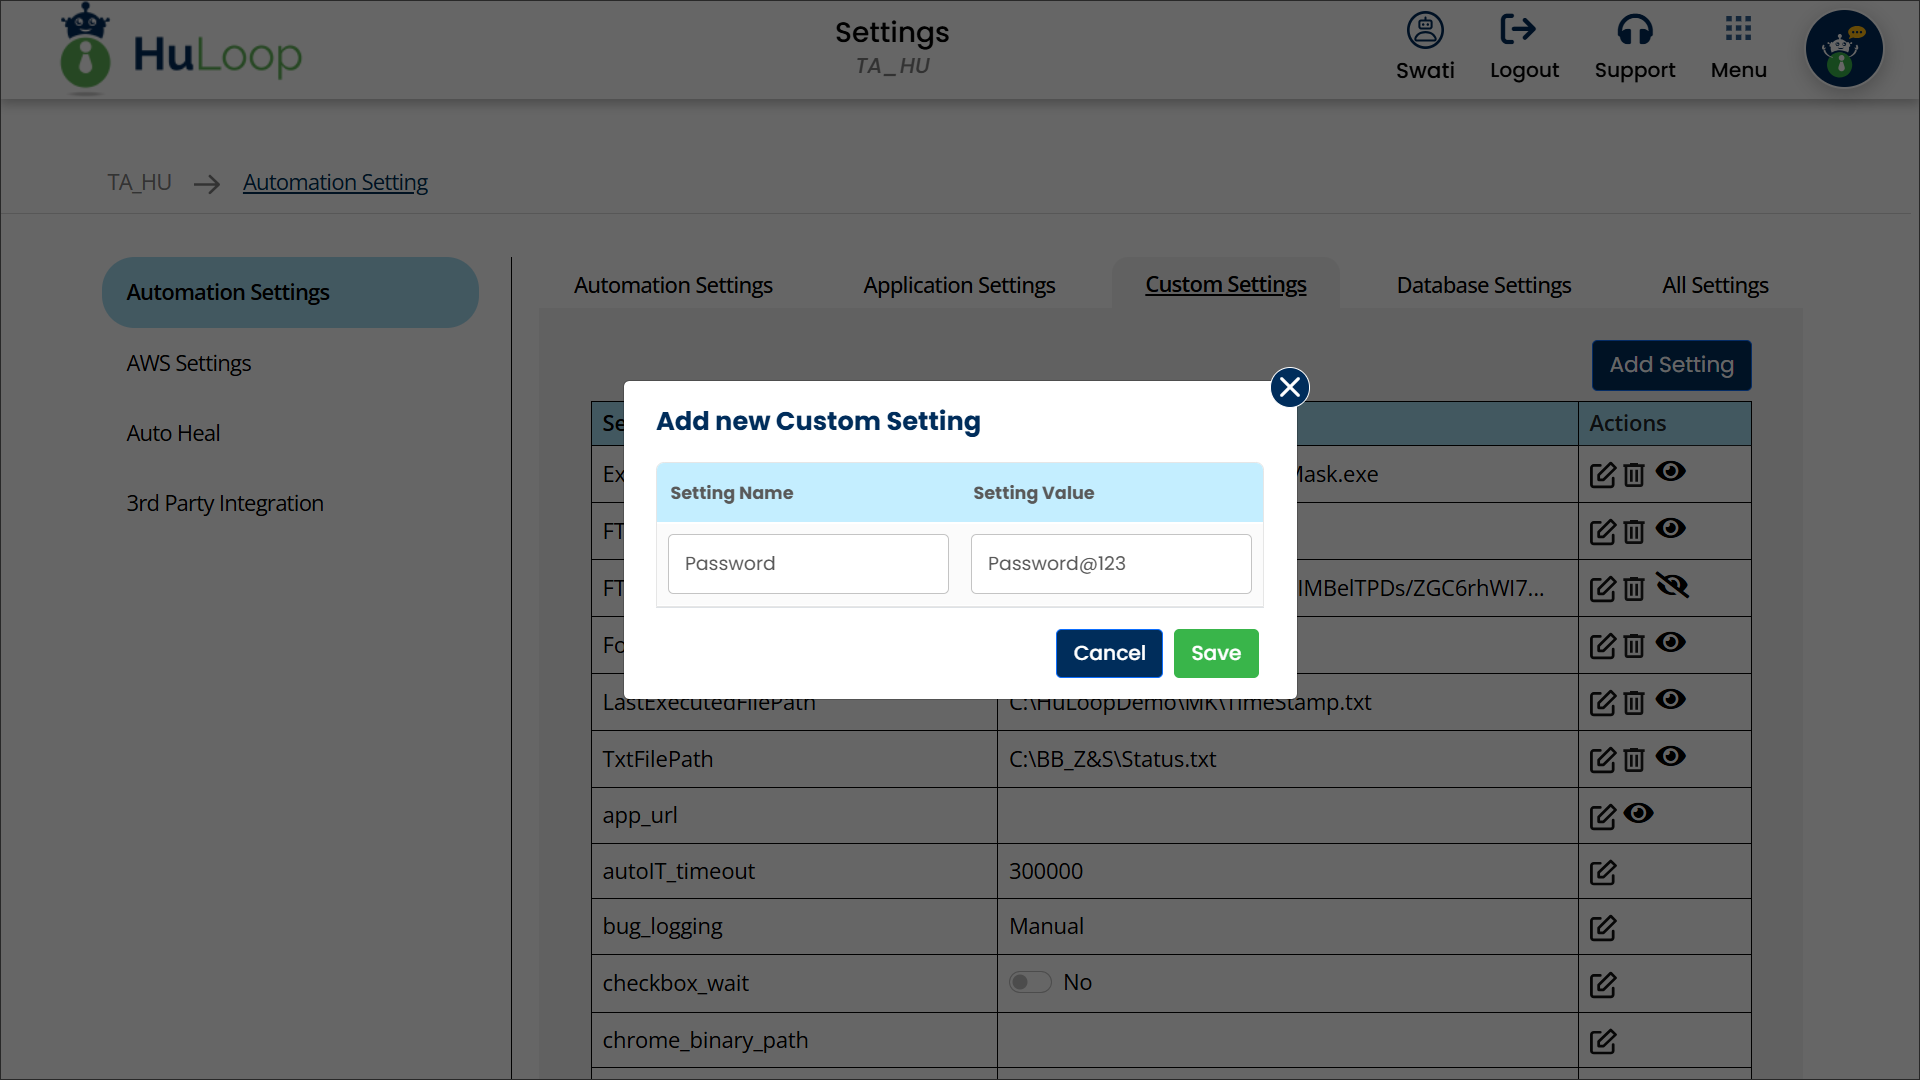
- Click Save.
- Scroll down, find the setting you just created, and click the eye-shaped icon next to it to encrypt the value.
![]()
![]()
Notes:
- The encrypted data will remain secure across all cases and steps where the global variable is used.
- You can decrypt the data, if required, by clicking the eye icon again.
- Only the user who encrypted the data can decrypt the value.
HuLoop ensures that encrypted data remains secure in reports, preventing unauthorized access. This applies to both Web Reports and Excel Reports, ensuring that sensitive values are never exposed in logs or reports.
Once a case is executed, you can generate reports to review execution details while maintaining data security.
Verifying Encrypted Data in Web Reports
- Execute your case to generate a report.
- Go back to the case page and click the Menu
 option.
 - Expand the Report section and click on Latest Execution Report.
- On the Latest Execution Report page, click the Suite Name under the Suite Result Summary (e.g., Login Suite).
- Click on the Case Title to open execution details (e.g., Verify Login).
- In the Test Run Details page, click Show Audit Info checkbox.

- Here, you can verify that the sensitive values remain encrypted in the Audit Info section.
Scroll up or down in the Audit Info section to view the full details.
Verifying Encrypted Data in Excel Reports
When exporting reports to Excel, encrypted values remain secure and are displayed as encrypted strings, ensuring sensitive information is protected.
Steps to Access the Excel Report:
- Open File Explorer and navigate to:
C:\Users\YourUsername\HuLoop\YourAutomationName\reports (e.g., C:\Users\swati.nagi\HuLoop\TA_HU\reports)
- Locate and open the Excel report for your executed case.
- In the Excel file, go to the Test Run Detail tab.
- Scroll down to find the parameter values and confirm that the sensitive data remains encrypted.
By enforcing encryption across both Web Reports and Excel Reports, HuLoop ensures that sensitive information is never exposed, maintaining security throughout the automation workflow.
HuLoop allows you to customize reports to hide step-level execution details, enabling you to focus on high-level test results. This is useful when you need summary-based reporting without displaying detailed step-by-step execution logs.
HuLoop provides two separate settings to achieve this:
- For Web Reports – You can configure a custom setting to exclude step details.
- For Excel Reports – You can modify an application setting to remove step-level execution data.
The following sections explain how to configure these settings for both Web and Excel Reports.
Hiding Step Details in Web Reports
To remove step-level details from the Web Report, follow these steps:
- Open your Automation in HuLoop.
- Navigate to Settings > Custom Settings.
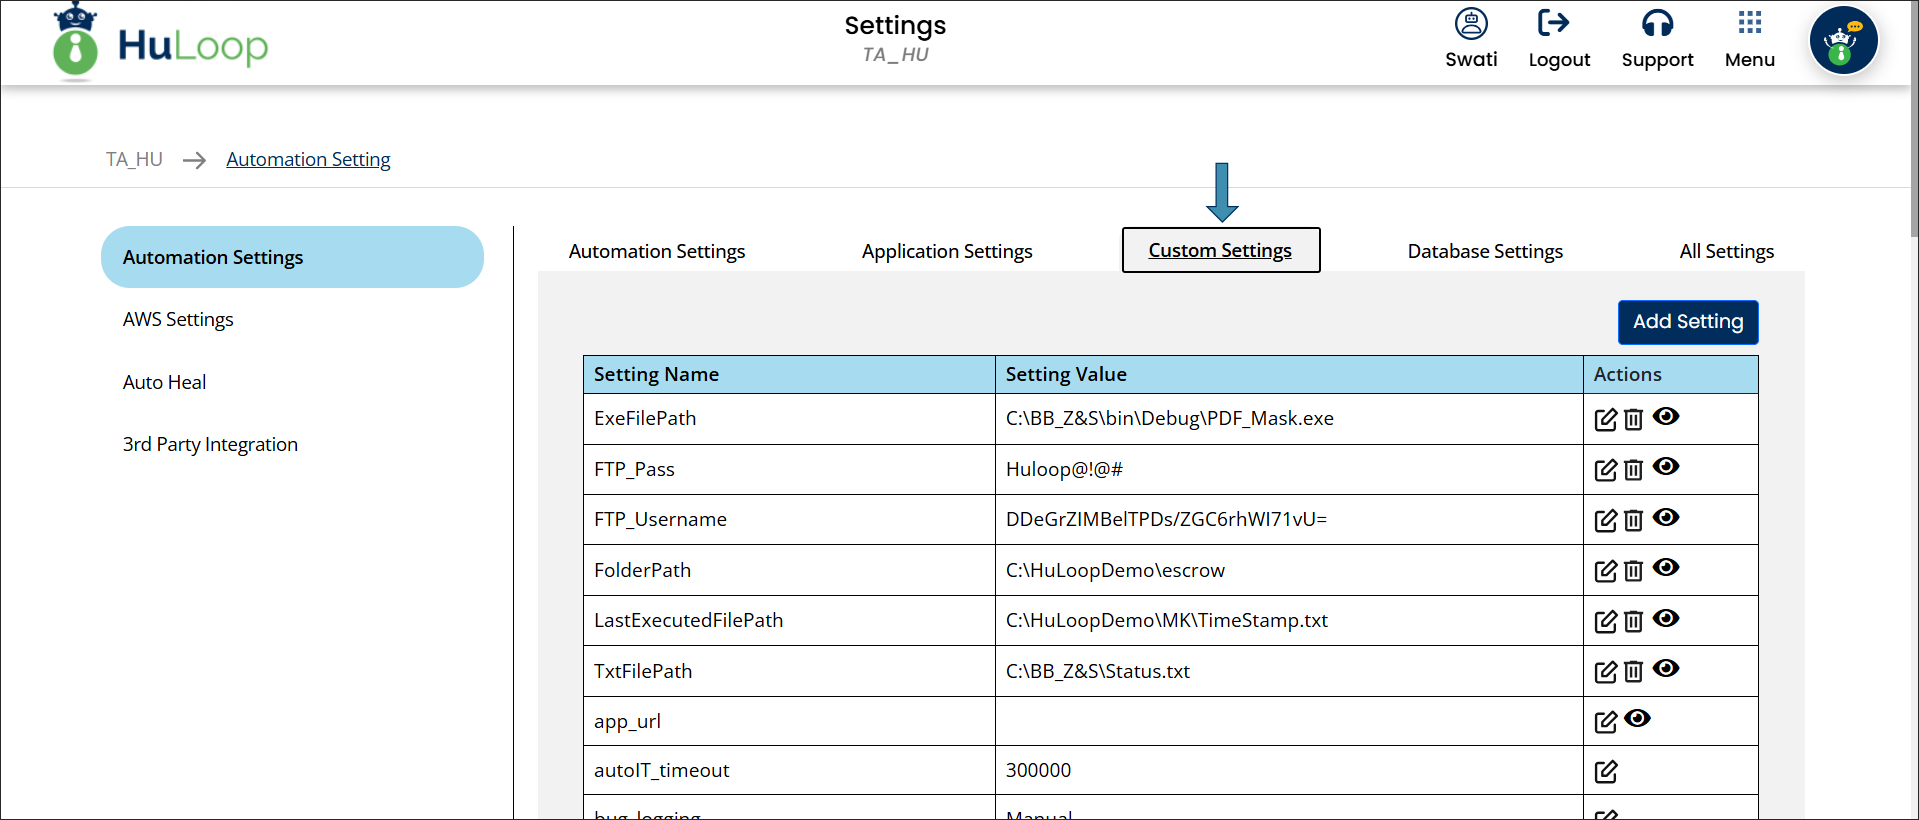
- Click Add Setting button to create a new custom setting.
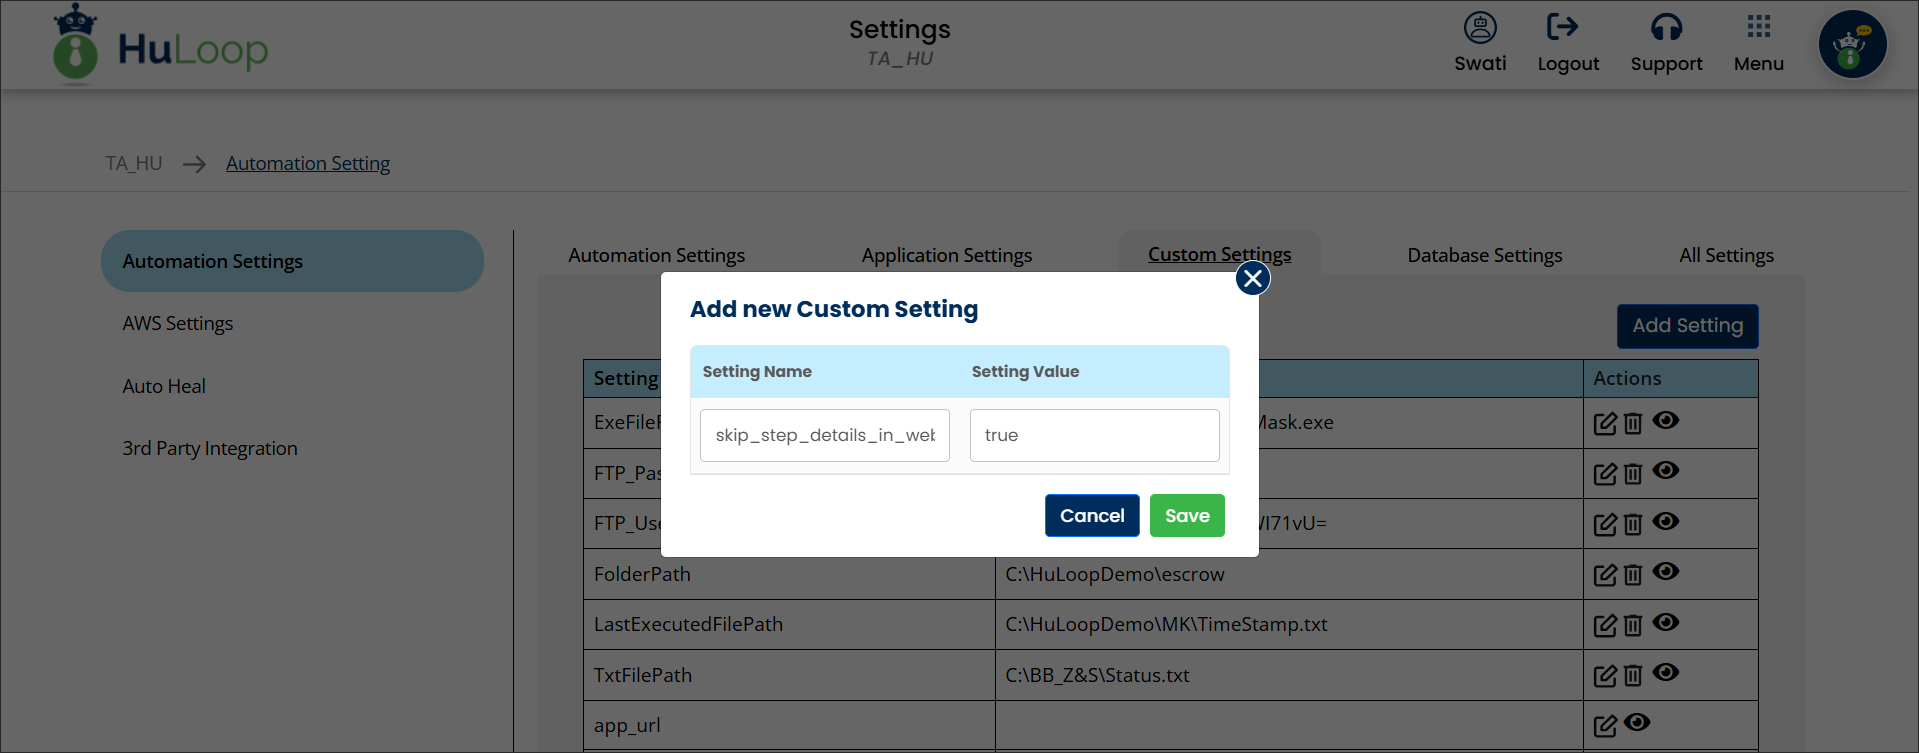
- In the Setting Name field, enter skip_step_details_in_web_report
- Set its value to “true“.
- Click Save.
Outcome on execution: When enabled, the Web Report will no longer display individual step-level details. Refer to the following screenshot:
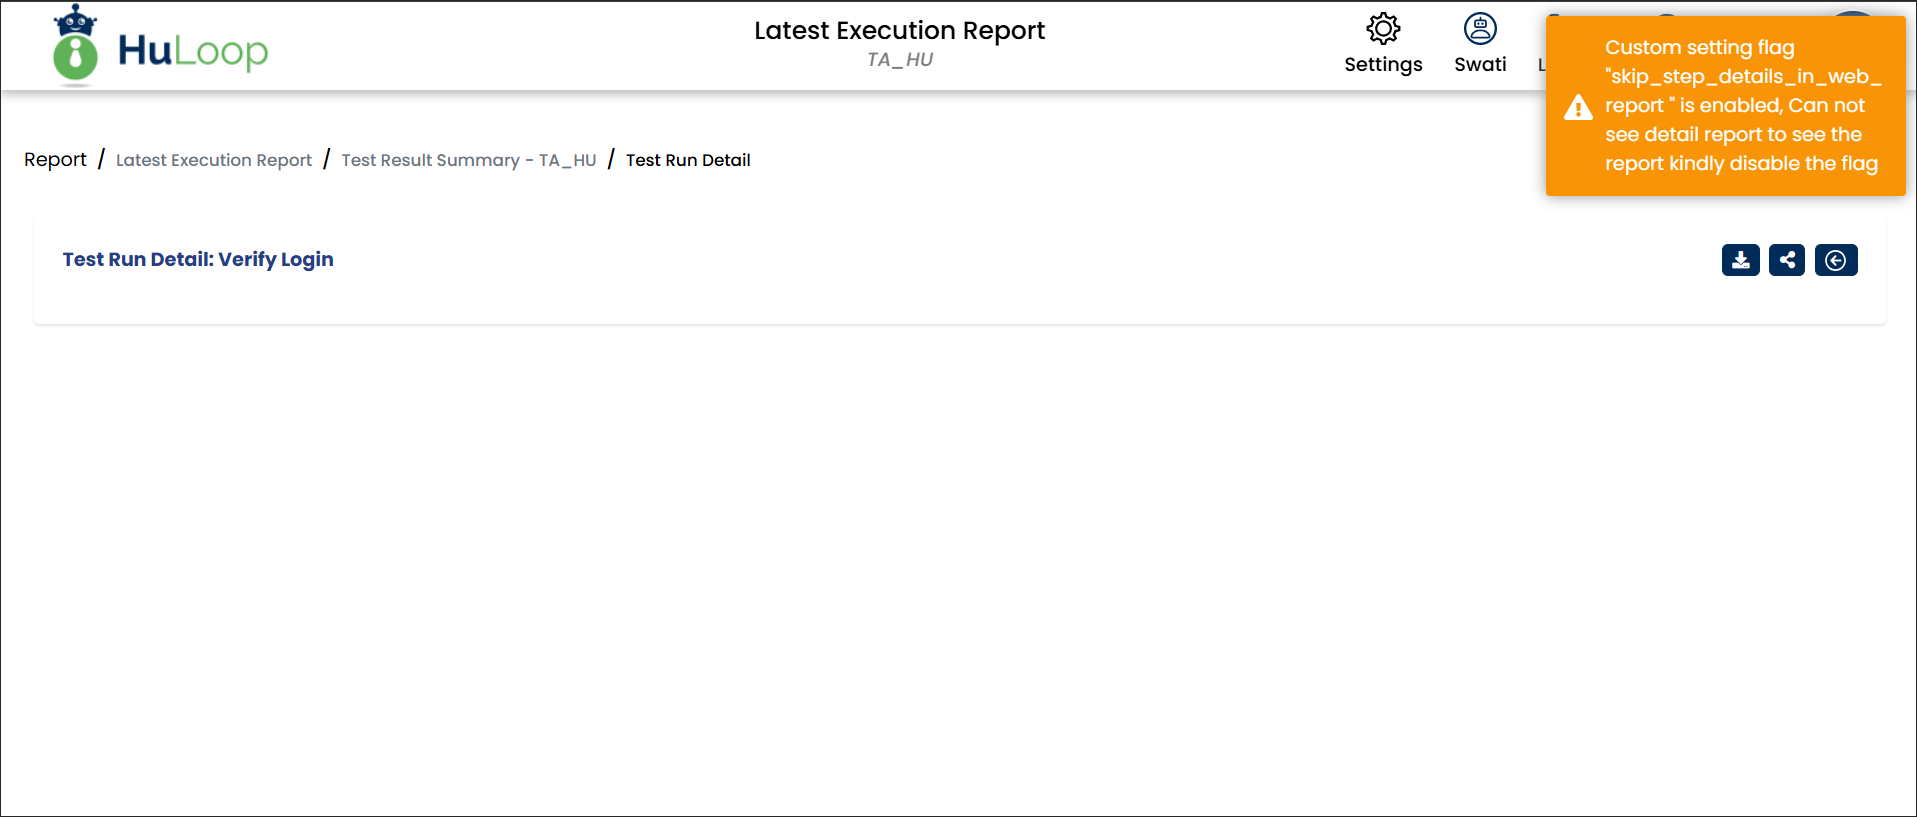
Note: This is an automation-level setting, meaning it will apply to all test cases and reports within the automation. Once enabled, step-level details will be hidden across all executions for the selected automation.
Hiding Step Details in Excel Reports
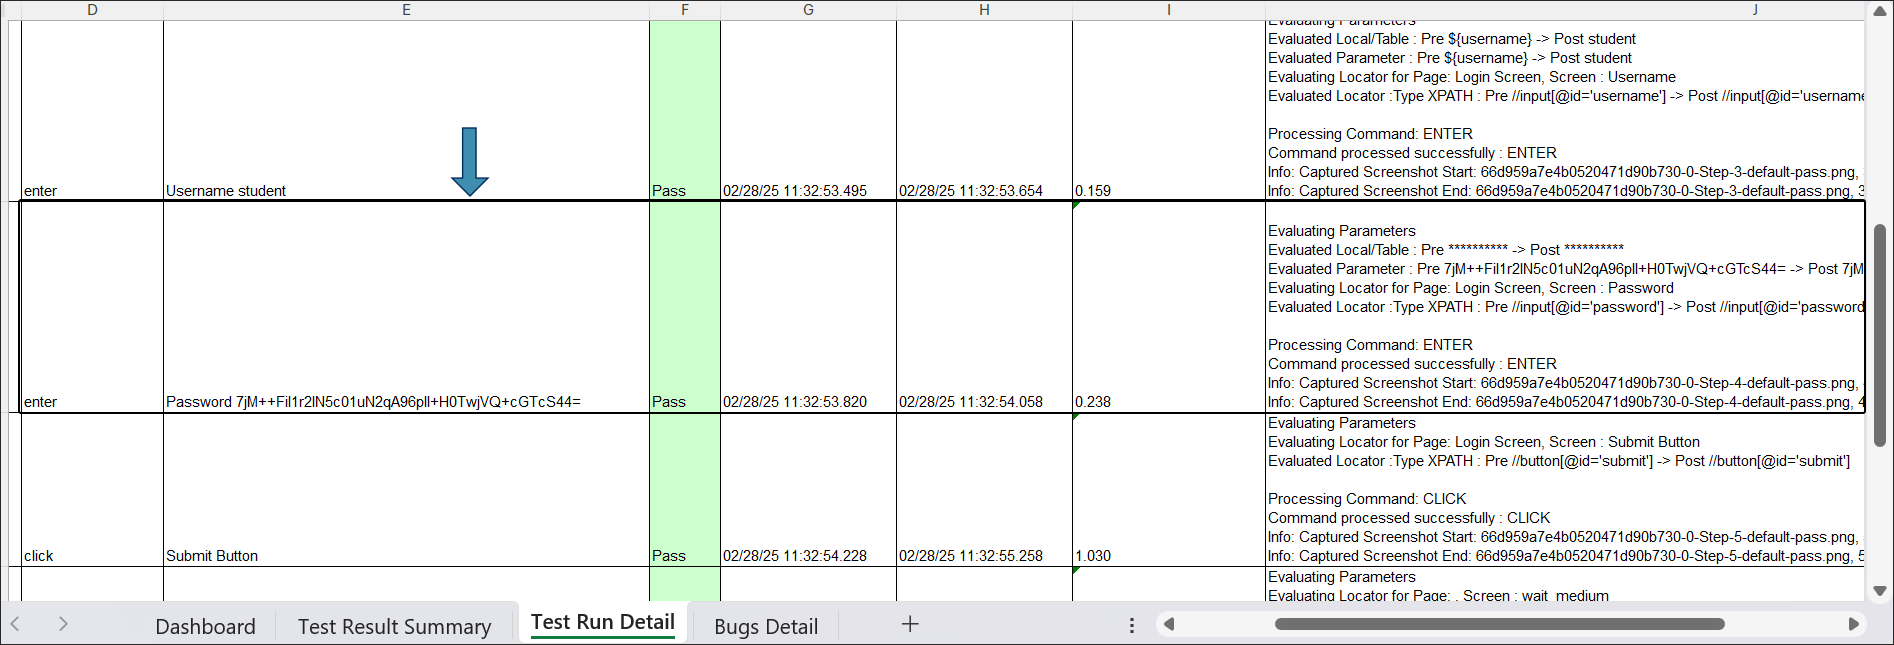
To exclude step-level details from the Excel Report, follow these steps:
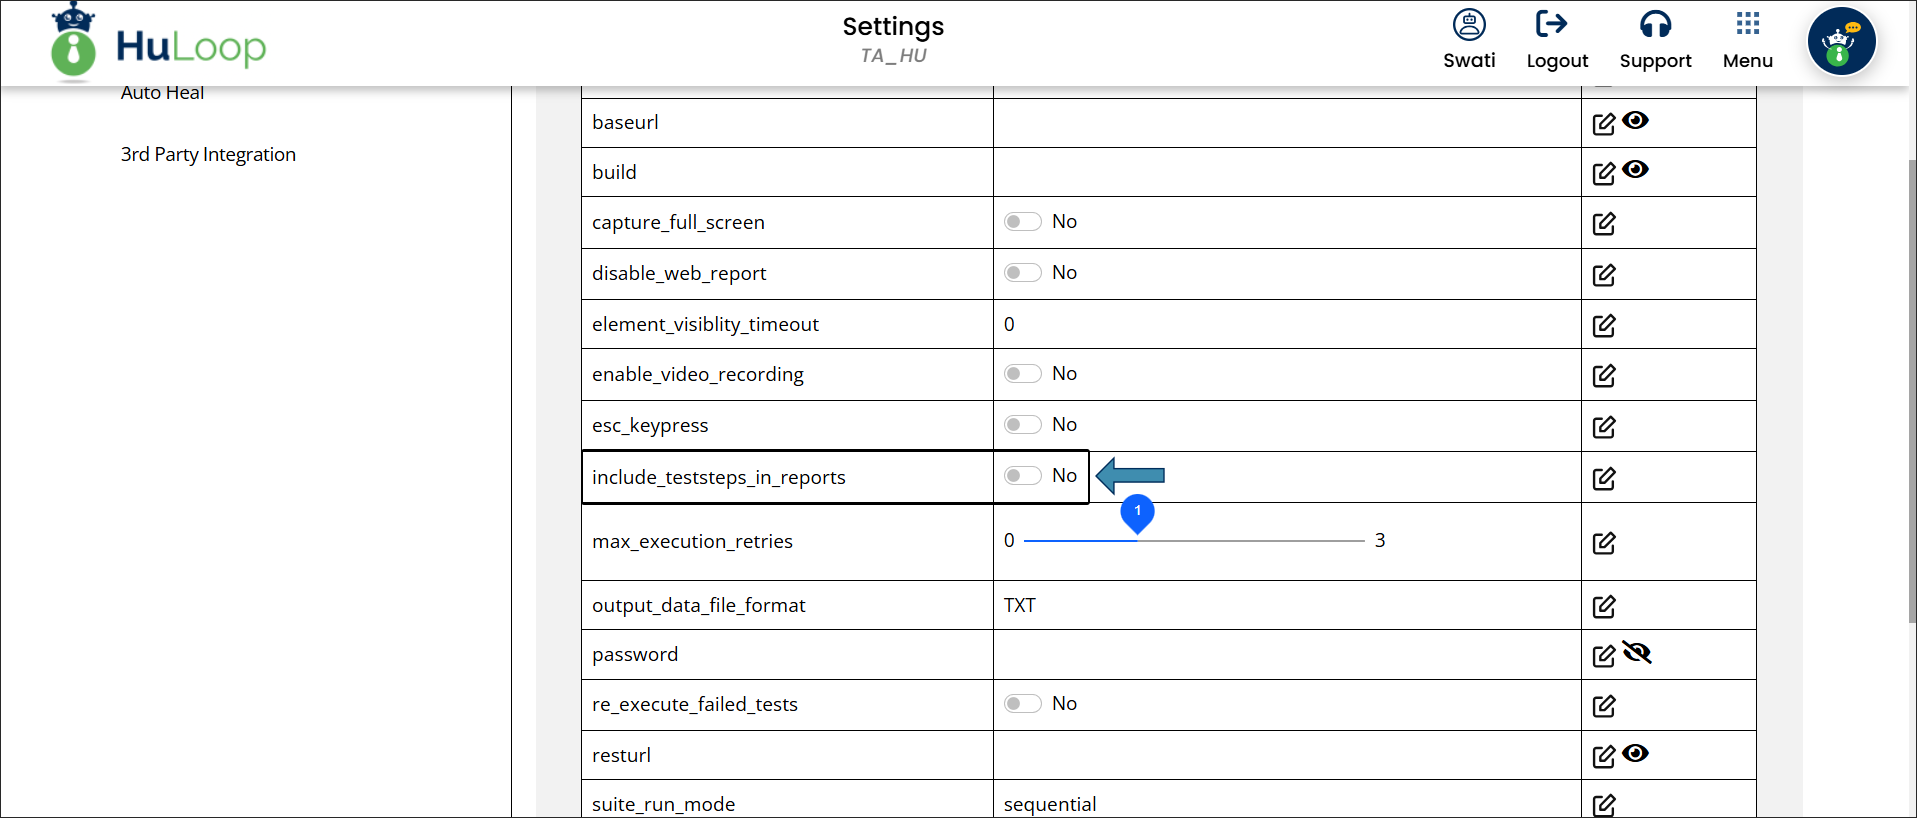
- Open Settings > Application Settings.
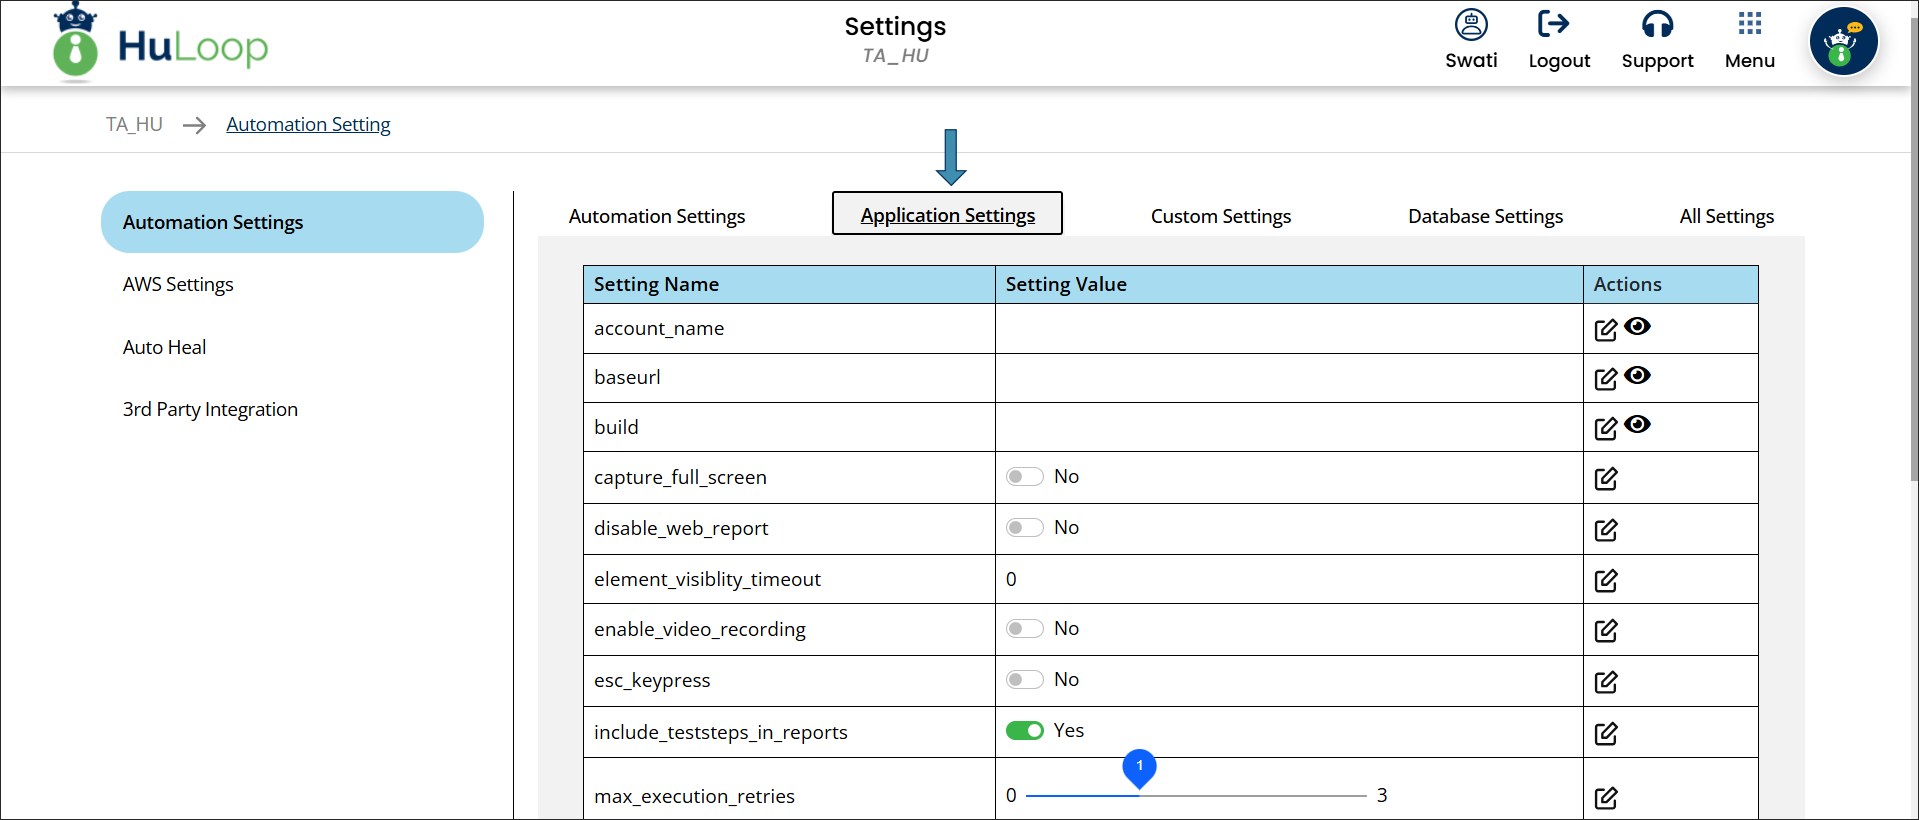
- Find the setting include_teststeps_in_reports.
- Use the toggle button to switch its value to NO.
Outcome on execution: The Excel Report will exclude step-level execution details, keeping the report concise. Refer to the following screenshot:
Note: This is an automation-level setting, meaning it will apply to all test cases and reports within the automation. Once enabled, step-level details will be hidden across all executions for the selected automation.
HuLoop automatically manages browser driver compatibility during automation runs to ensure executions continue smoothly, even when Chrome or Edge browsers are updated.
If a compatible Chrome or Edge driver is temporarily unavailable after a browser update, HuLoop automatically uses a previously working driver. This fallback mechanism helps prevent execution failures and removes the need for manual driver management.
What Happens During Automation Execution?
When you run an automation:
- HuLoop first attempts to use the latest compatible browser driver.
- If the latest driver is not available, HuLoop automatically falls back to the most recent working driver.s
- Automation execution continues without interruption, even during browser upgrades.
Why Is This Helpful?
This behavior helps you:
- Avoid execution failures caused by browser updates
- Eliminate manual steps such as creating driver folders or storing older drivers
- Maintain consistent and reliable automation runs
- Reduce operational overhead during frequent Chrome or Edge updates