Wait Operations
The HuLoop Wait Operations ensure that automation steps execute at the right time by pausing until specified conditions are met. These commands help manage timing issues by allowing waits for a fixed duration or until an element appears or disappears. Users can define timeouts at the automation or step level for greater control and efficiency.
The following sections describe the available Wait Operations in HuLoop and how to configure them for optimal performance:
- Wait For Specified Time Command: WAIT
- Wait Until Element Is Hidden: WAITFORHIDE
- Wait Until Element Is Displayed: WAITFORSHOW
Wait For Specified Time Command: WAIT
The Wait For Specified Time command is used to pause the execution of a process for a specified time. This command allows you to delay actions to ensure that elements or events have had enough time to load or process before the next step is executed.
The wait time can be provided as either:
- Standard Keywords: Predefined wait times that are configurable in the project settings:
- wait_veryshort: Very short wait time (default: 1500 ms)
- wait_short: Short wait time (default: 3000 ms)
- wait_medium: Medium wait time (default: 6000 ms)
- wait_long: Long wait time (default: 10000 ms)
- wait_verylong: Very long wait time (default: 15000 ms)
- Milliseconds: A specific wait time in milliseconds (e.g., 5000 for 5 seconds).
Note: All times are in milliseconds, where 1 second = 1000 milliseconds.
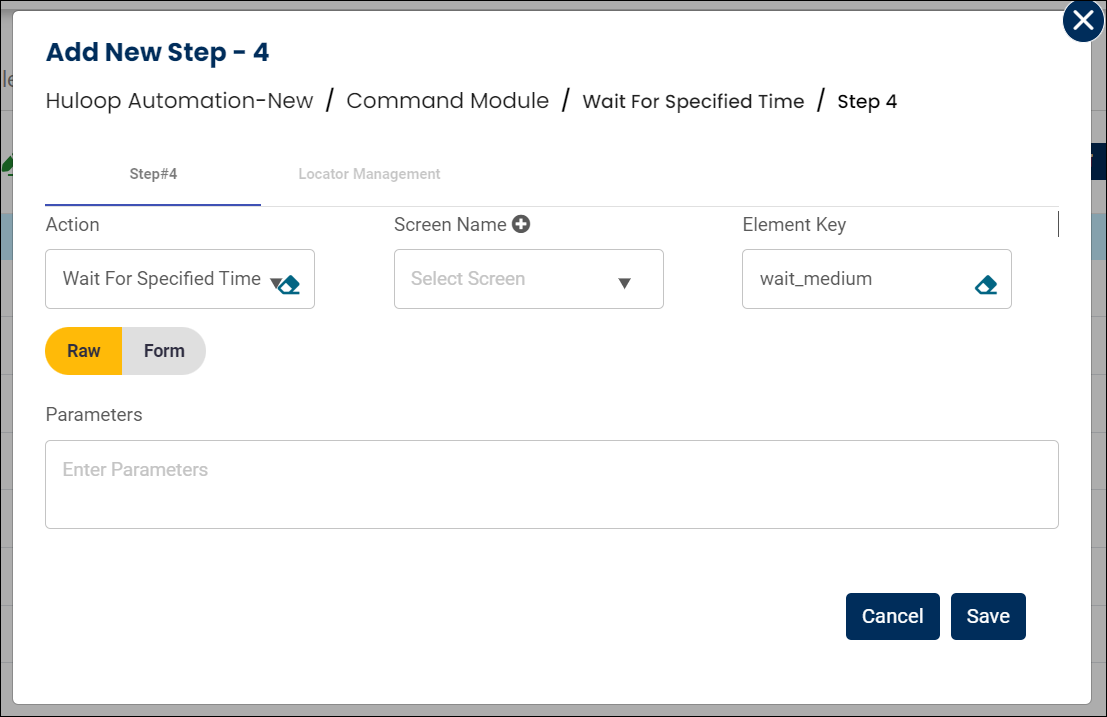
Steps to configure:
- Select Wait For Specified Time from the Action drop-down menu.
- Leave Screen Name blank.
- In the Element Key field, provide either a standard keyword (wait_veryshort, wait_short, etc.) or a specific wait time in milliseconds (e.g., 5000 for 5 seconds).
- Leave Parameters box blank.
- Click Save.
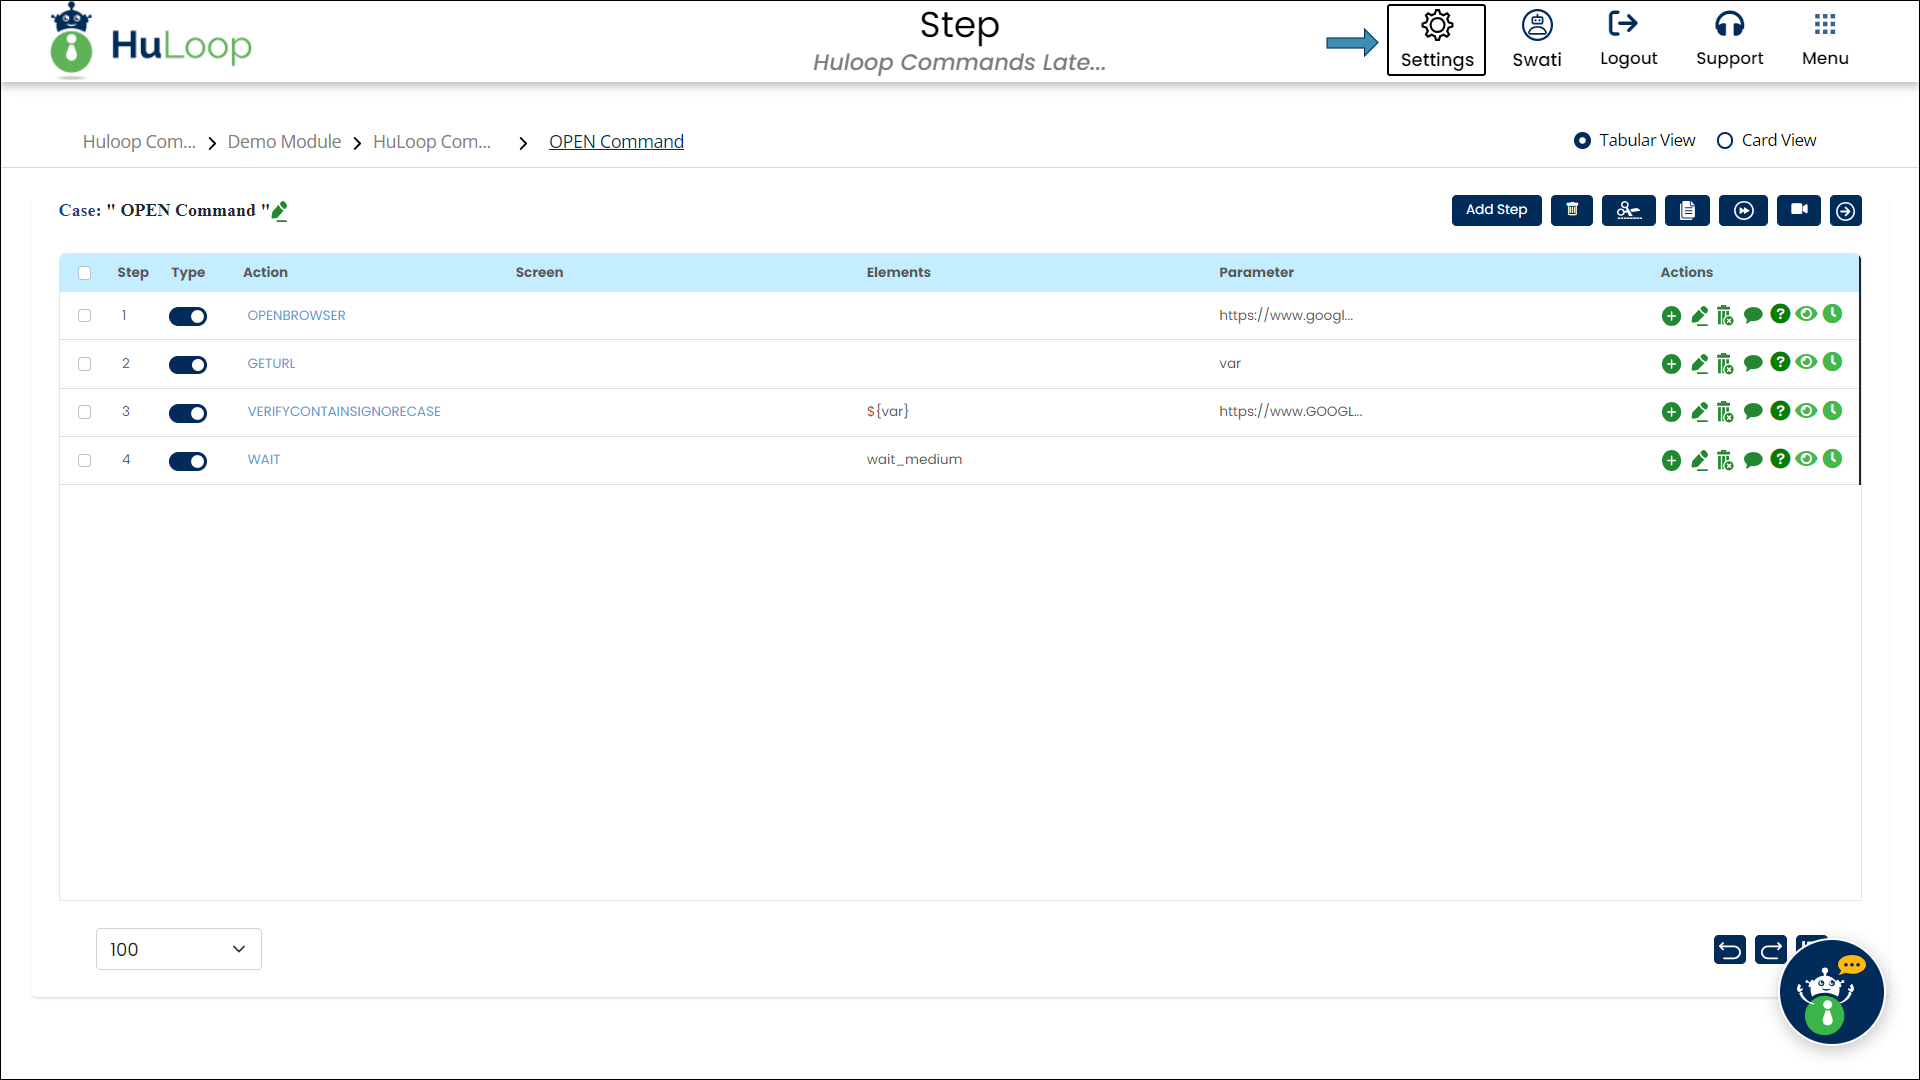
Note: While the steps for adding an action command are identical in both views, the display of the steps changes:
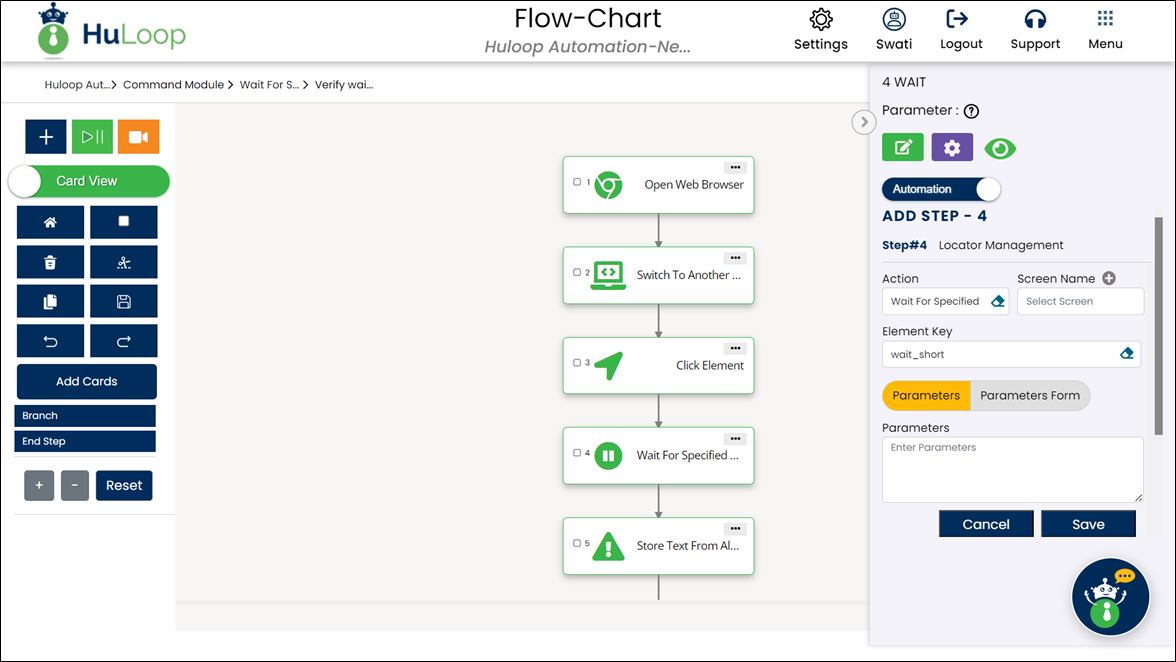
Expected Output on execution: The system pauses execution for 6 seconds.
Note: The predefined wait times can be modified. To do so, follow these steps:
Modifying Predefined Wait Times
- Click
 as shown:
- You will land on the Settings page. Click Custom Settings.
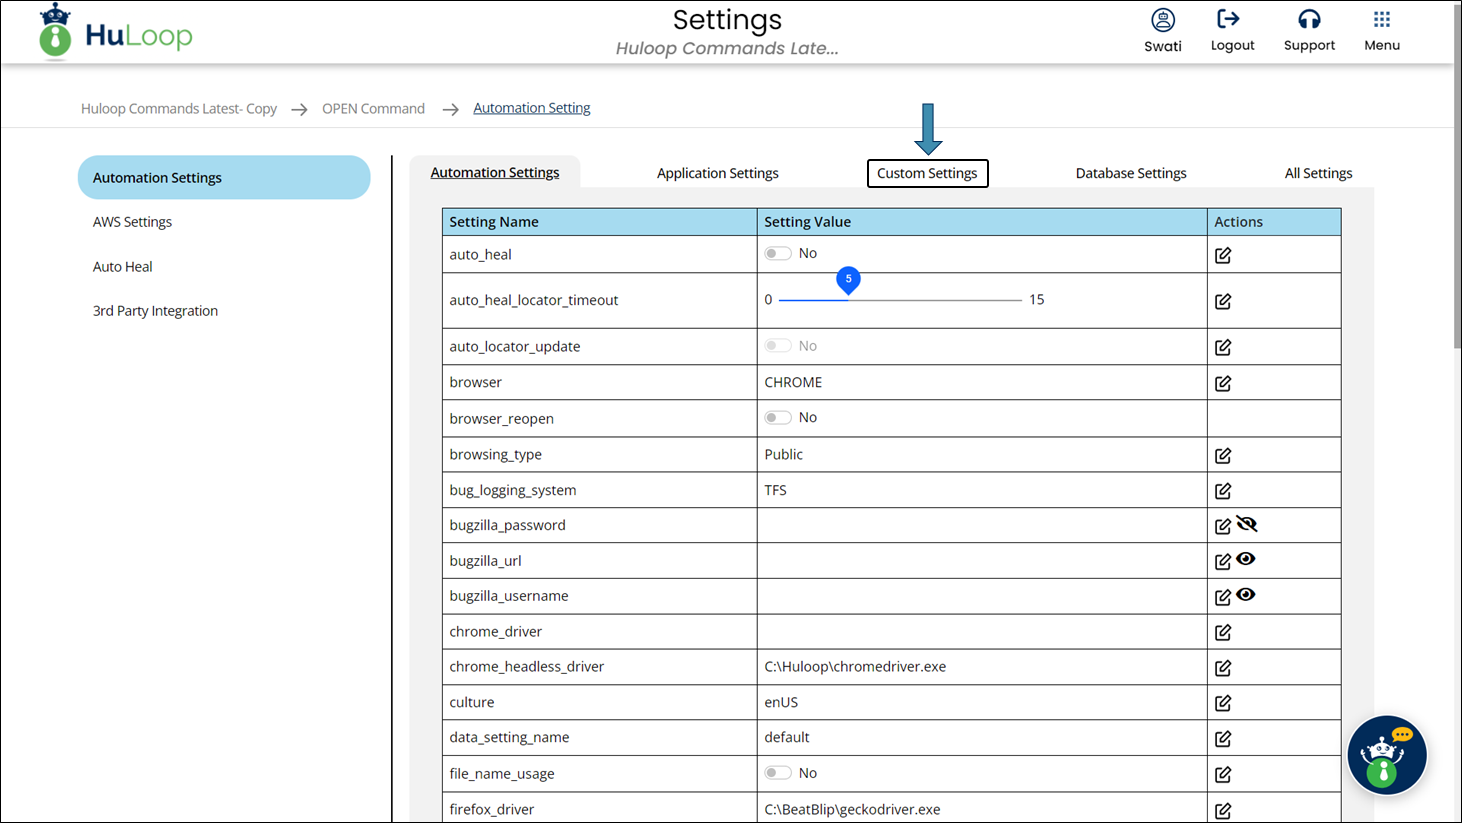
- In the Custom Settings section, locate the parameter you want to modify under Setting Name.
- Find the wait time you wish to change (e.g., wait_long).
- Click the edit
 icon next to the parameter to make the value editable.
![]()
- You will get a pop-up to define the new value for the selected parameter.

- Under Setting Value, input the new time in milliseconds for the selected keyword.
For example, change wait_long from 10000 ms to 12000 ms if you want to increase the wait time.
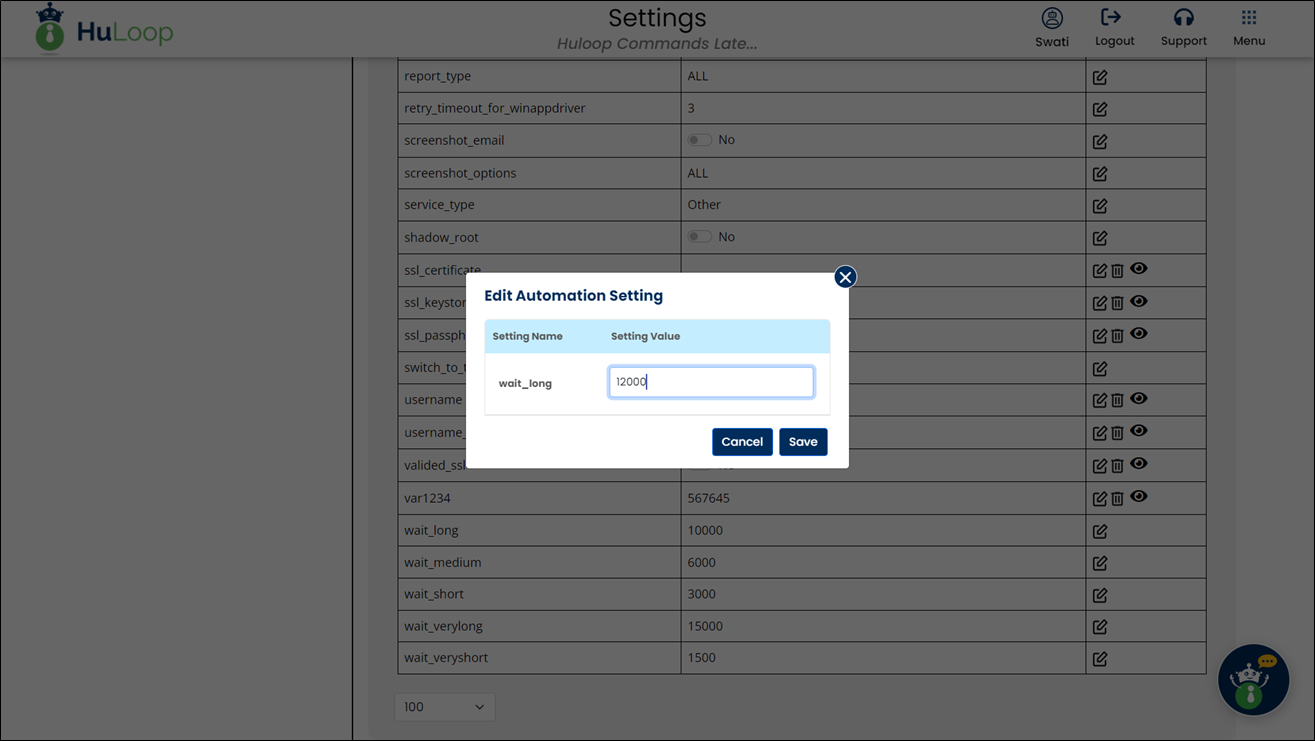
- After making the changes, click Save to apply the new value.
These custom settings ensure that the wait times match the requirements of your test environment. It’s advisable to standardize wait times across projects for consistency.
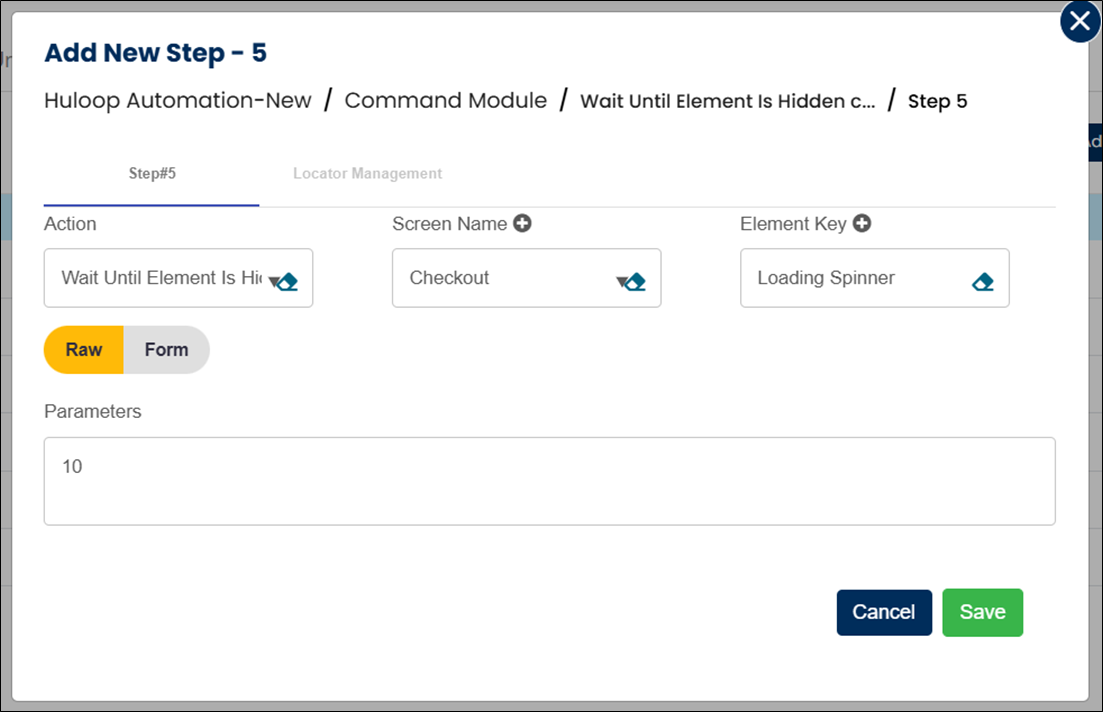
Wait Until Element Is Hidden: WAITFORHIDE
The Wait Until Element Is Hidden command pauses the automation until a specified element, like a loading spinner or busy icon, becomes invisible on the page. This command is helpful in scenarios where you need to wait until an element disappears before moving forward, ensuring smoother execution without relying on fixed wait times. The default timeout is 65 seconds.
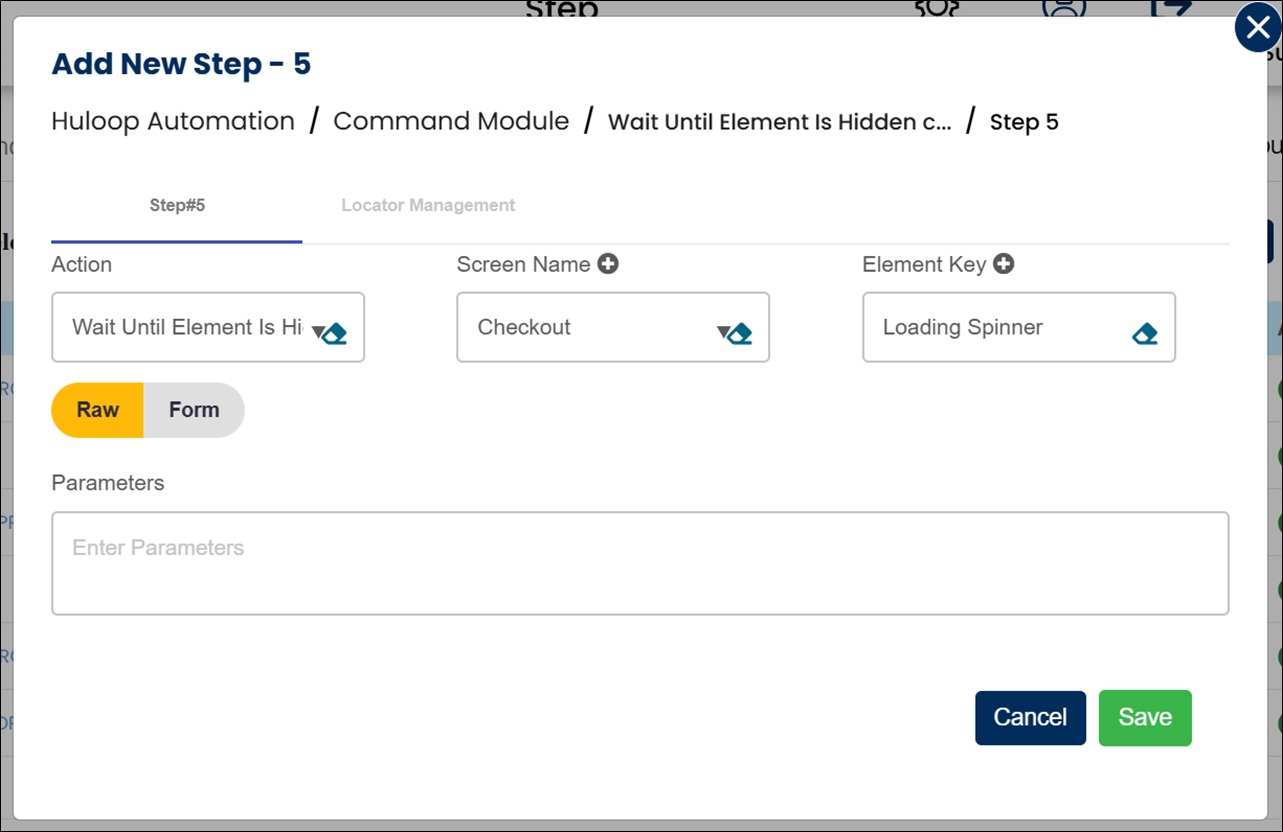
Example: Let’s say you’re testing a checkout page, which displays a loading spinner while an order is processed. You want the test to continue only once this spinner disappears.
Steps to configure:
- Select Wait Until Element Is Hidden from the Action drop-down.
- In the Screen Name field, specify the screen where the element appears (e.g., “Checkout”).
- In the Element Key field, choose the element to wait for (e.g., “Loading Spinner”).
- Leave the Parameters section blank, unless you want to set a step-specific timeout.
- Click Save.
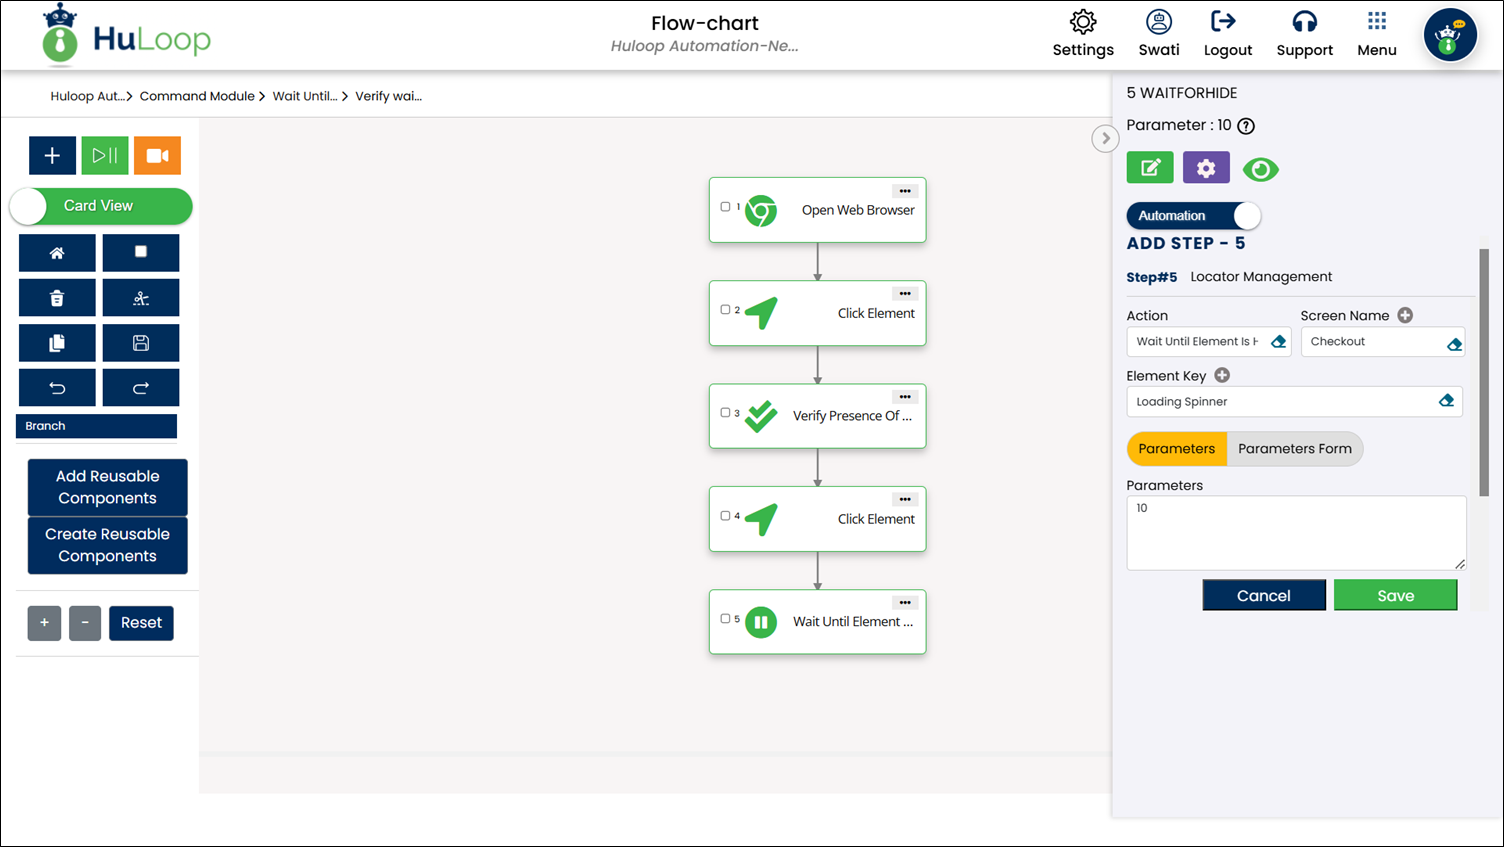
Note: The setup steps are the same across views, though the display may differ:

Timeout Settings:
- Automation-Level Timeout: Although the default wait time is set to 65 seconds, this can be modified to apply to the entire automation project. Follow these steps to adjust this generic timeout:
- Click as shown:
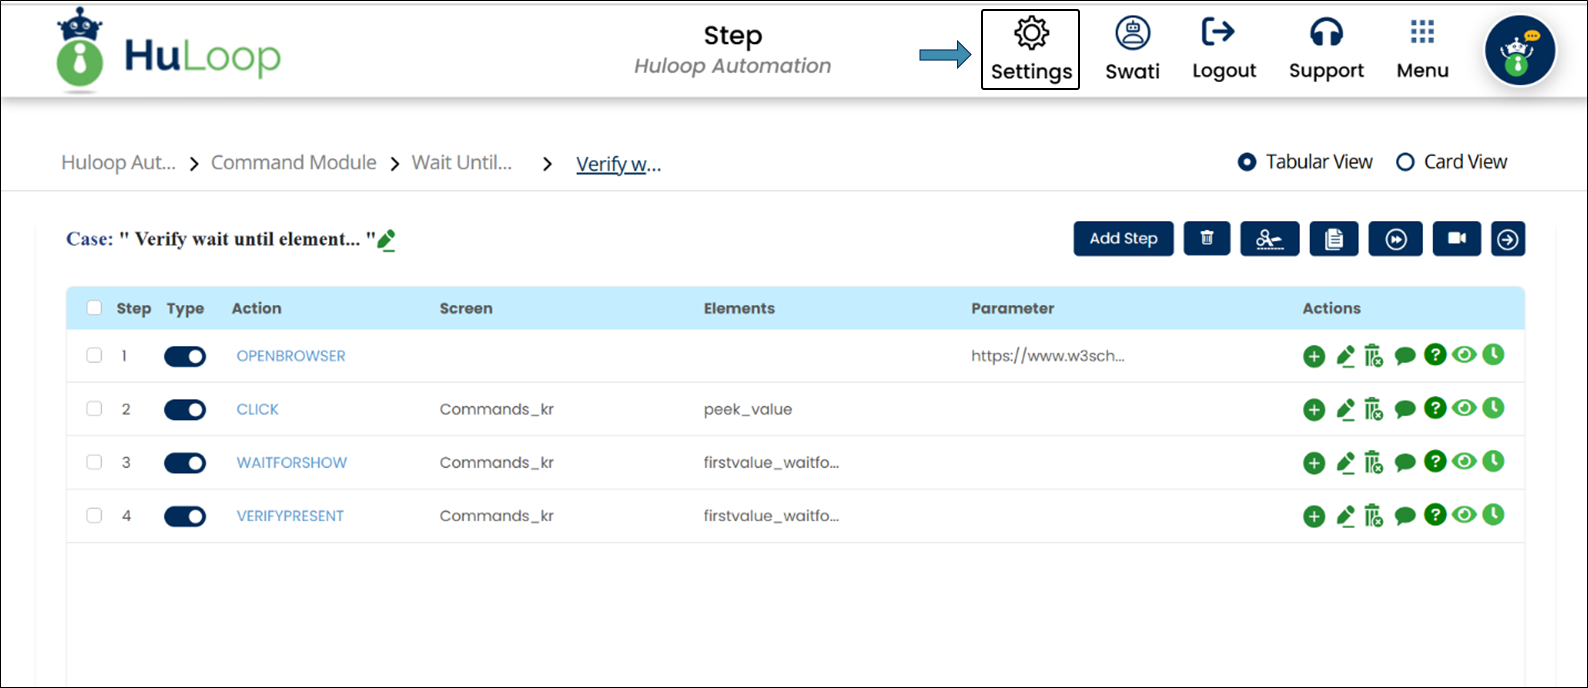
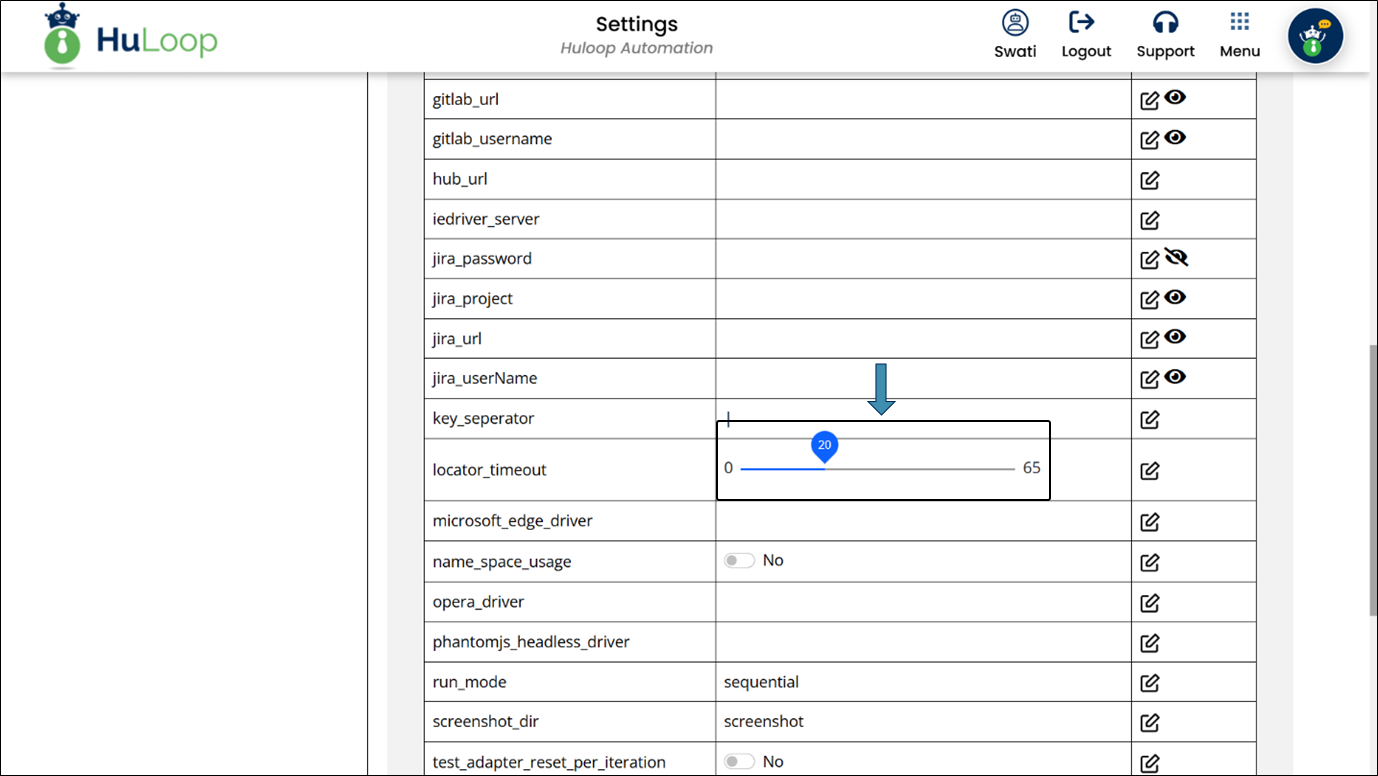
- You will land on the Automation Settings page. Scroll to find the locator_timeout setting.
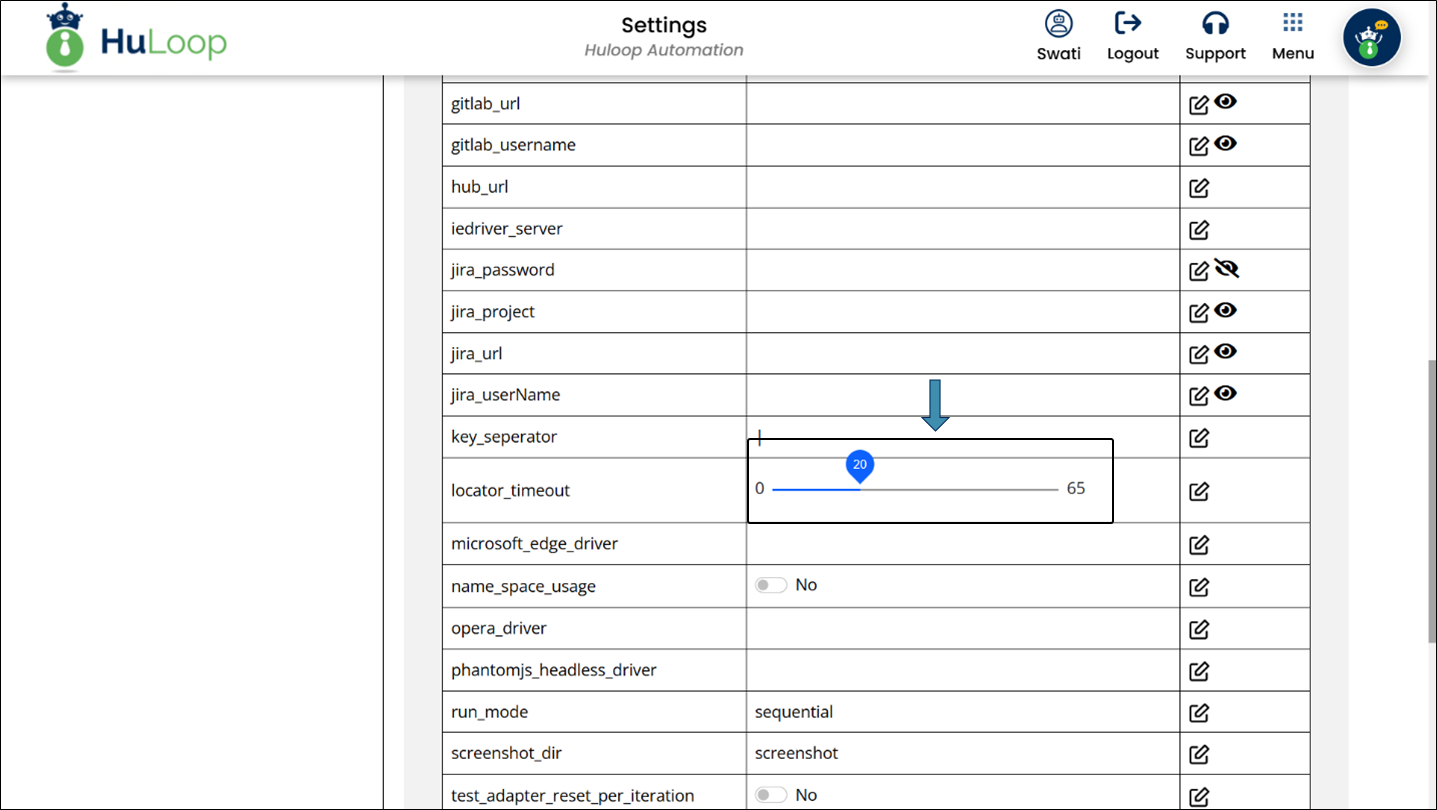
- Use the slide bar to adjust the wait time from 0 to a maximum of 65 seconds. (Here we have set the adjustable timeout to 20 seconds.)
- Step-Level Timeout:
- If you want to set a timeout specific to this step only, provide the value (in seconds) in the Parameters field for the command. For example, enter 10 for 10 seconds.
- This timeout will override the automation-level timeout for this particular step.
Note: The setup steps are the same across views, though the display may differ.
Note: Ensure that the Screen Name and Element Key are already defined before using this command.
Expected Outcome on execution: The Wait Until Element Is Hidden command will pause the test until the loading spinner disappears, allowing the process to continue smoothly without timing conflicts.
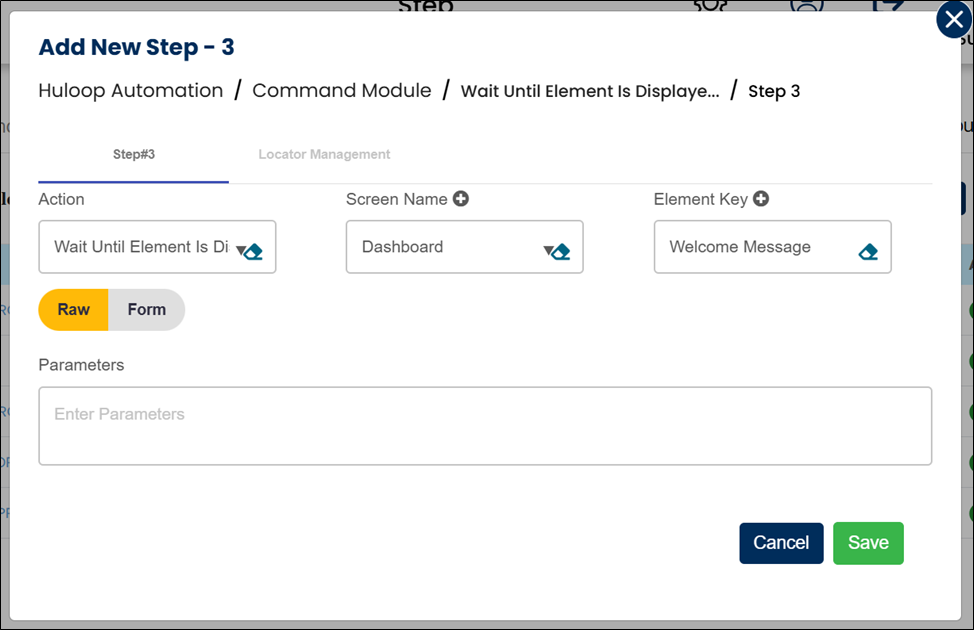
Wait Until Element Is Displayed: WAITFORSHOW
The Wait Until Element Is Displayed command pauses the automation until a specified element becomes visible on the page. With a default timeout of 65 seconds, this command is particularly useful when you need to wait for elements like confirmation messages or content sections to appear before continuing.
Example: Suppose you’re testing a login process, where a welcome message should appear after successful login. You want the test to proceed only after this message is visible.
Steps to configure:
- Select Wait Until Element Is Displayed from the Action drop-down.
- In the Screen Name field, enter the screen where the element should appear (e.g., “Dashboard”).
- In the Element Key field, select the element to wait for (e.g., “Welcome Message”).
- Leave the Parameters section blank, unless you want to set a step-specific timeout.
- Click Save.
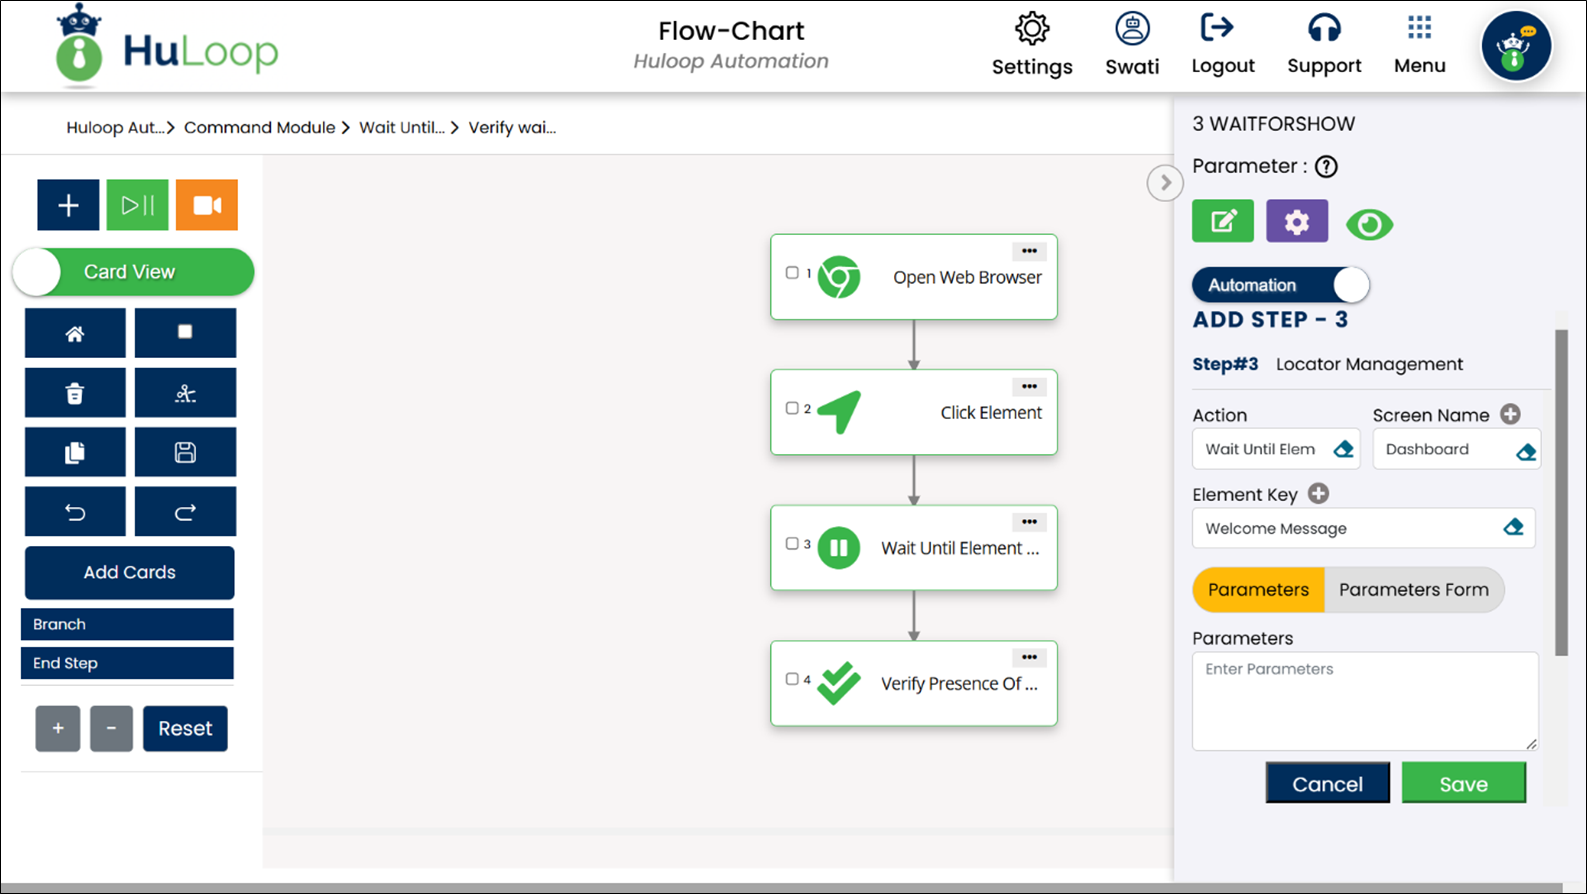
Note: The steps for adding this command are the same across views, though the layout may vary:
Timeout Settings:
- Automation-Level Timeout: Although the default wait time is set to 65 seconds, this can be modified to apply to the entire automation project. Follow these steps to adjust this generic timeout:
- Click as shown:

- You will land on the Automation Settings page. Scroll to find the locator_timeout setting.
- Use the slide bar to adjust the wait time from 0 to a maximum of 65 seconds. (Here we have set the adjustable timeout to 20 seconds.)
- Step-Level Timeout:
- If you want to set a timeout specific to this step only, provide the value (in seconds) in the Parameters field for the command. For example, enter 10 for 10 seconds.
- This timeout will override the automation-level timeout for this particular step.


Note: Ensure the Screen Name and Element Key are defined before using this command.
Expected Outcome on execution: The Wait Until Element Is Displayed command will pause until the specified element, like a welcome message, appears on the screen, allowing the automation to continue without errors from premature execution.
Last updated: Sep 09, 2025