IF ELSE Functionality
The IF ELSE functionality is used to handle situations where actions depend on certain conditions being met. This allows for dynamic decision-making in your automation steps, so actions only run if specified conditions are met. In HuLoop, this is achieved through four actions:
- IF Action: Checks an initial condition and performs actions if it’s true.
- ELSEIF Action: Adds additional conditions to check if the original IF condition is not met.
- ELSE Action: Executes actions when none of the IF or ELSEIF conditions are met.
- ENDIF Action: Closes the IF ELSE block to indicate end of IF block.
If Statement: IF
The If Statement action checks if a condition is true and performs the designated actions if it is. This action starts the IF ELSE block and must be closed with ENDIF.
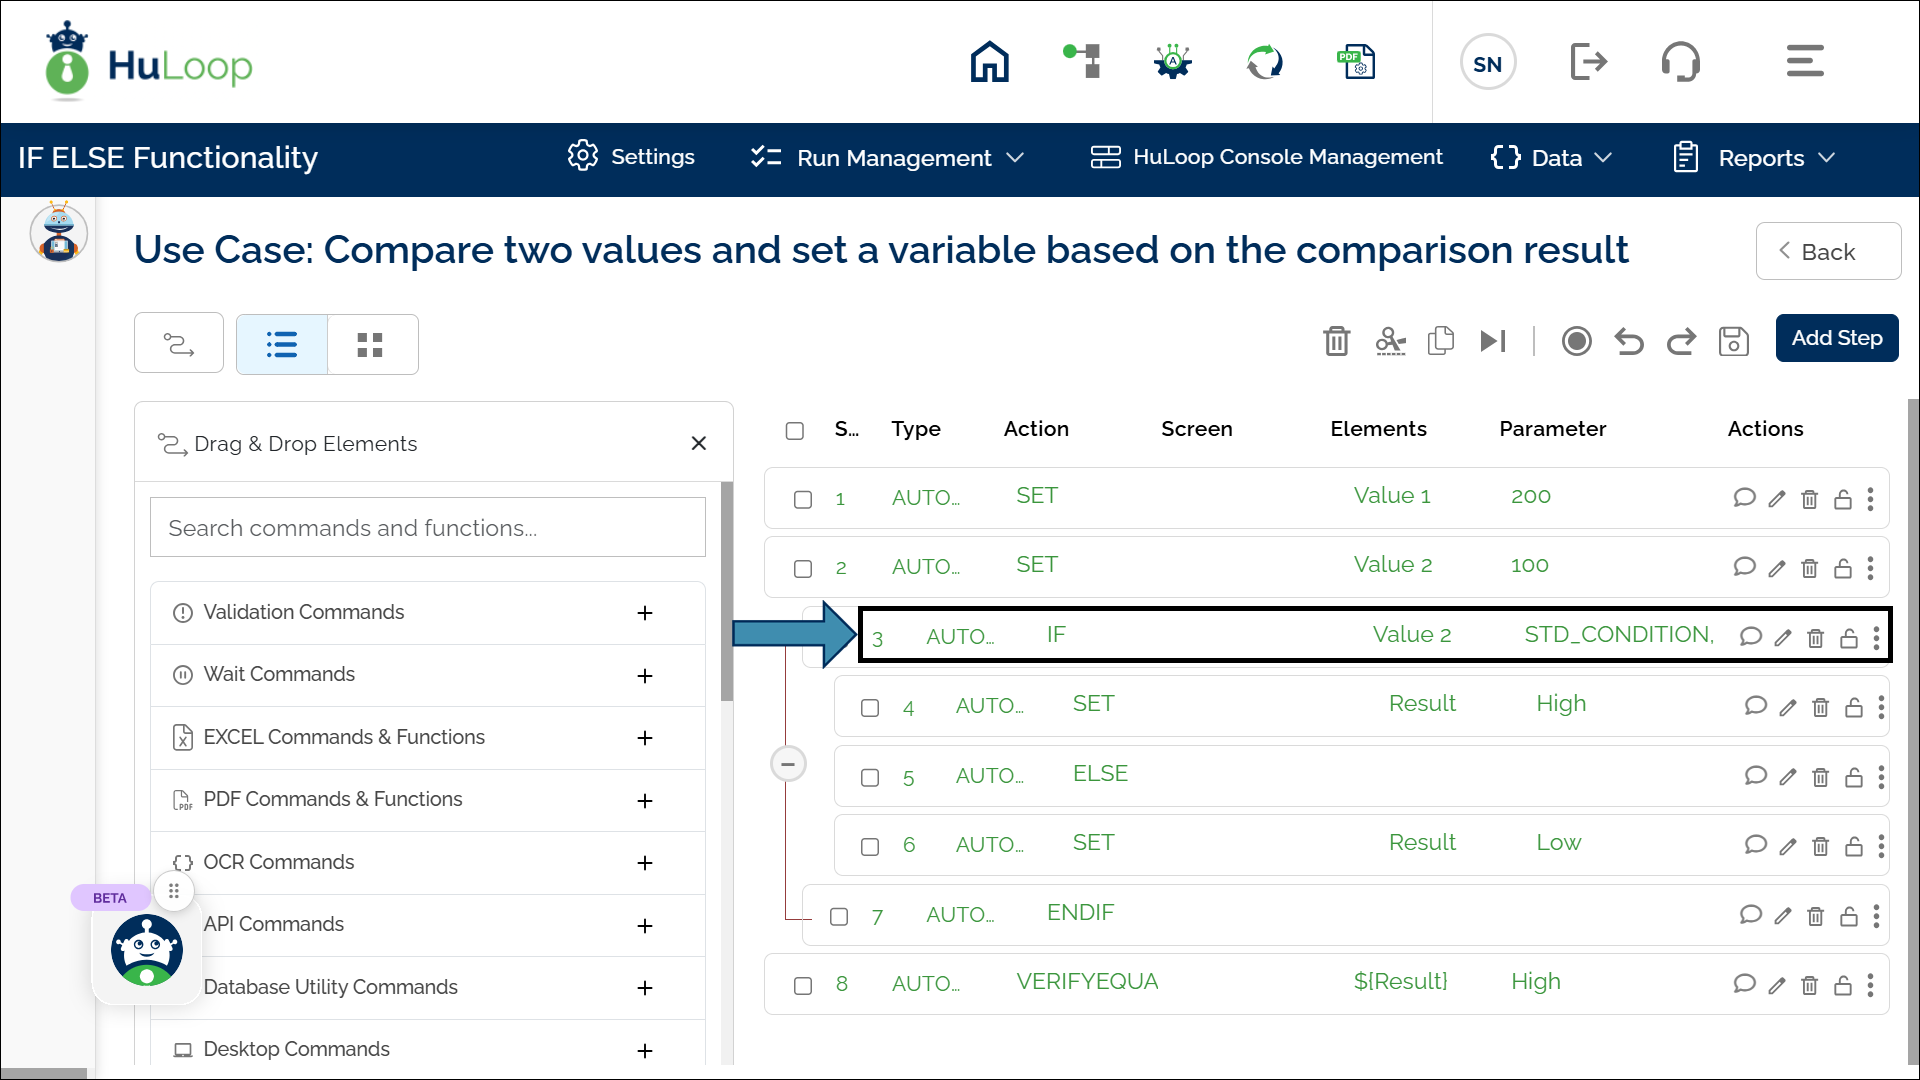
Example: Let’s say you want to compare two values and setting a variable based on the comparison result.
Suppose you have two predefined variables:
- Value 1 = 200
- Value 2 = 100
The automation should perform the following checks:
- If Value 1 is greater than Value 2 → Set another variable, Result = High
- Else → Set Result = Low (this part is explained in later section)
Steps to configure:
- Add a new step.
- Select IF from the Action drop-down.
- Leave the Screen Name blank.
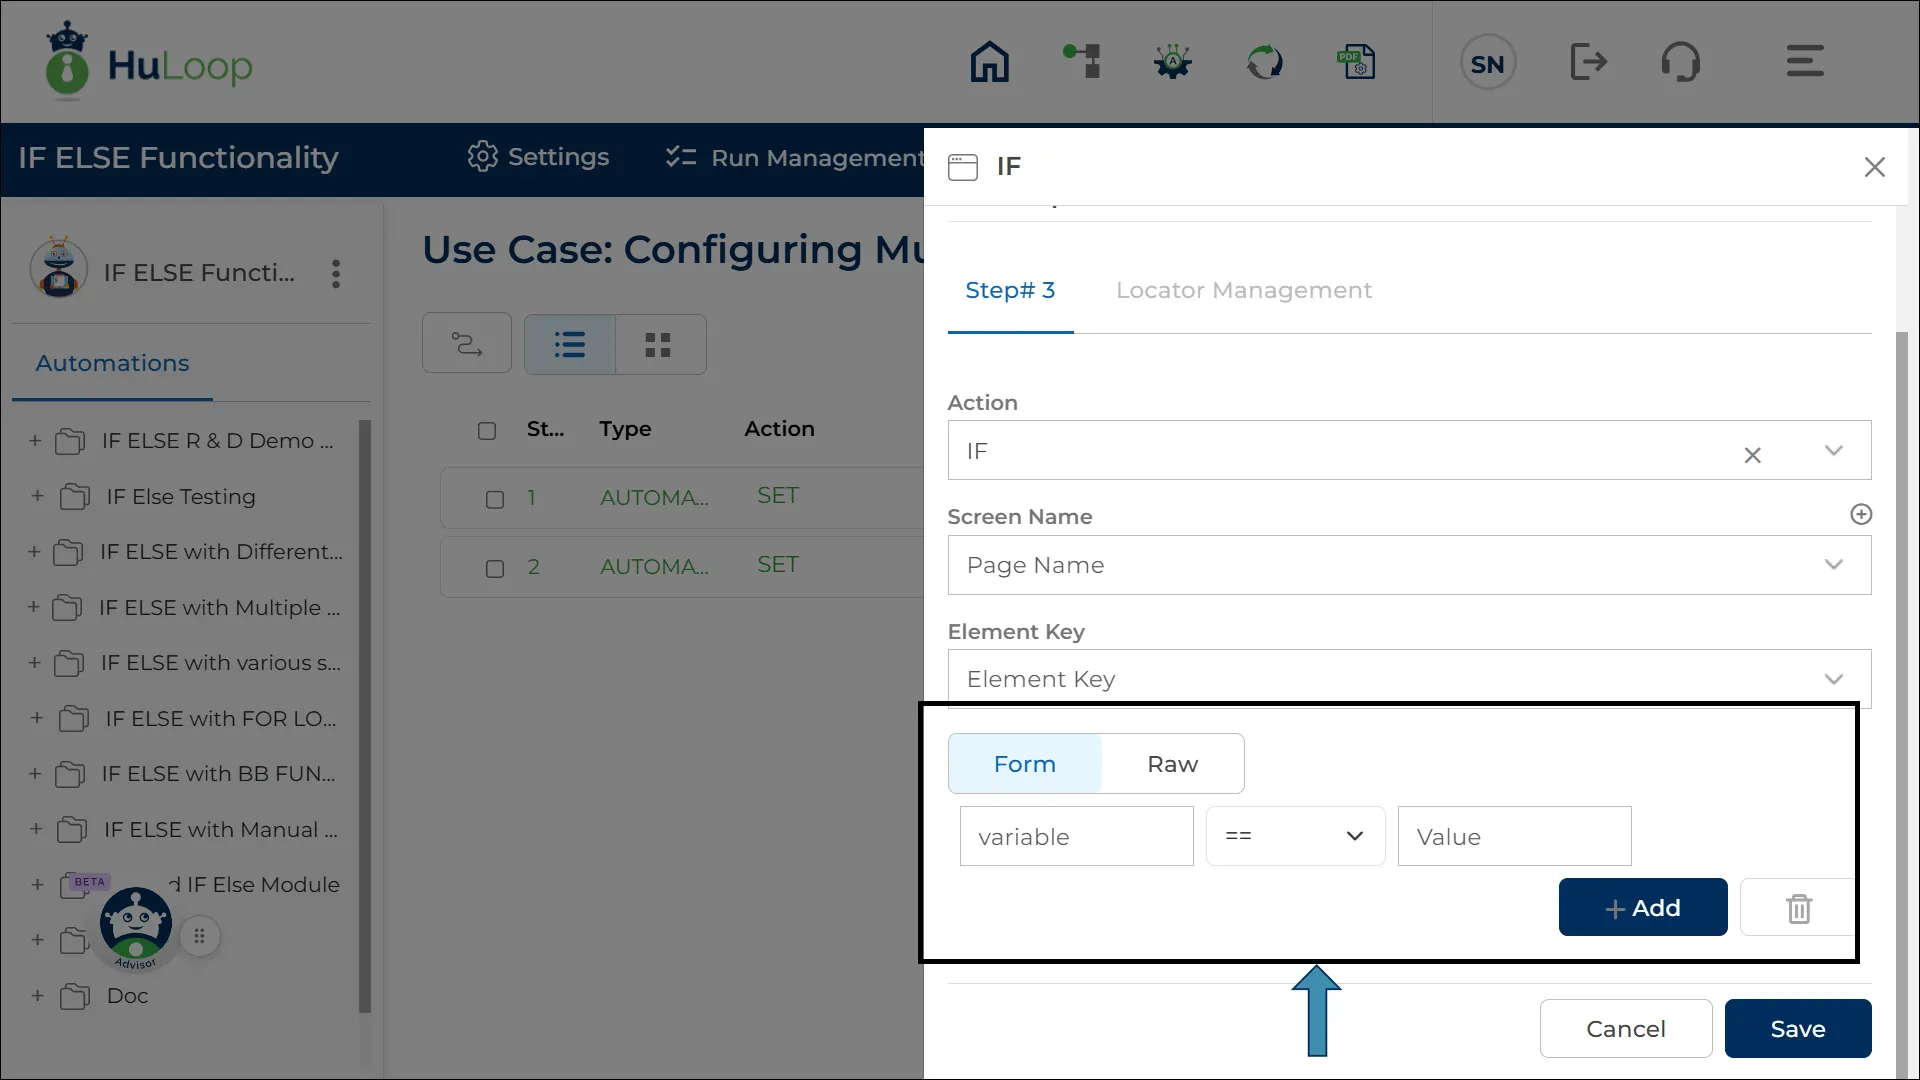
- In Element Key, enter the value to be compared, e.g., Value 2.
- In Parameter, enter: STD_GREATERTHAN,${Value 1} (Value 1 is the reference value for comparison).
- Click Save.

Outcome on Execution:
- Since Value 1 (200) > Value 2 (100), the IF condition is met, and the automation sets Result = High.
- If the condition is not met, the automation moves to the next part of the IF ELSE block, which will be covered in the Else statement section.
Refer to the screenshot below to see how an IF statement is visually represented in the workflow:
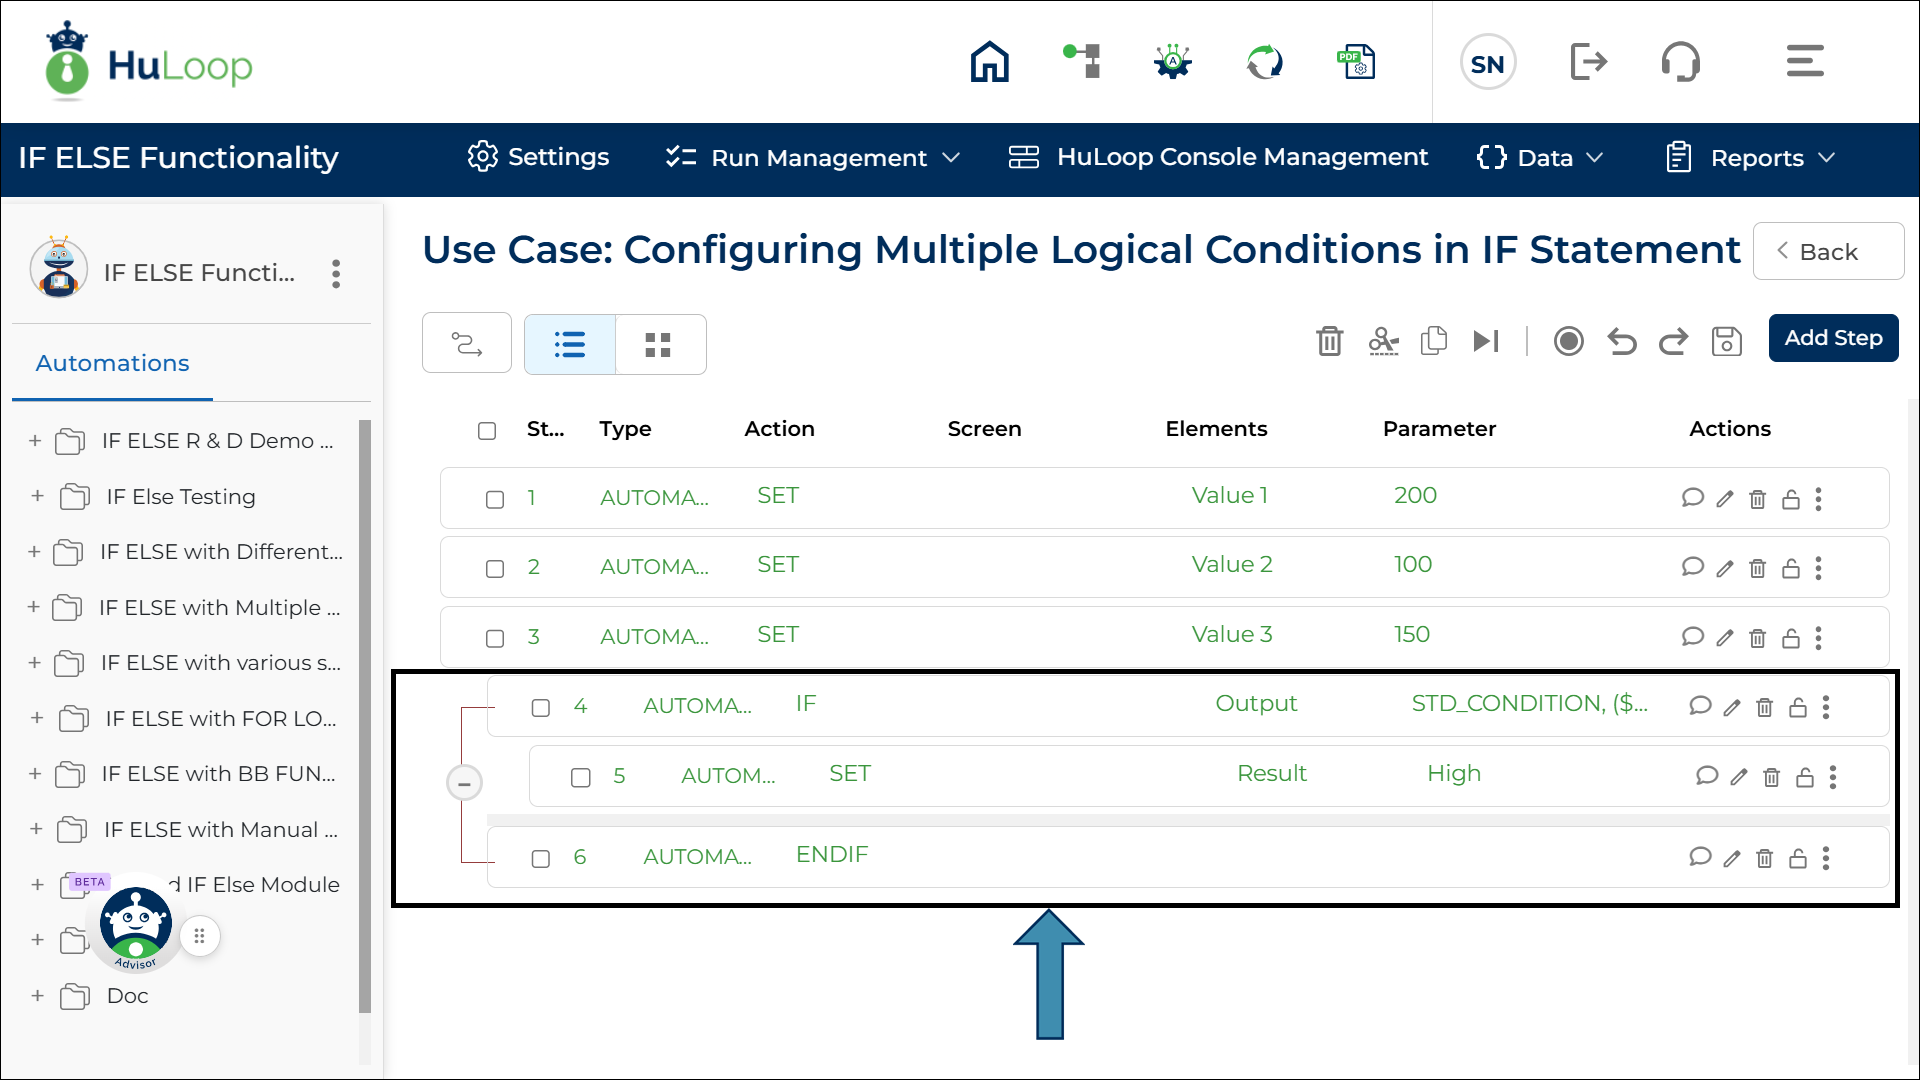
Configuring Multiple Logical Conditions in IF and ELSEIF Statements
HuLoop allows you to define multiple logical conditions in a single IF or ELSEIF step. This helps you evaluate several criteria together and determine the outcome based on combined logic. You can use operators such as >, <, >=, <=, ==, and != to compare values. These conditions can then be linked using AND or OR based on your workflow requirement.
This feature helps reduce the number of conditional steps and keeps your automation flow clean and easy to maintain.
How It Works?
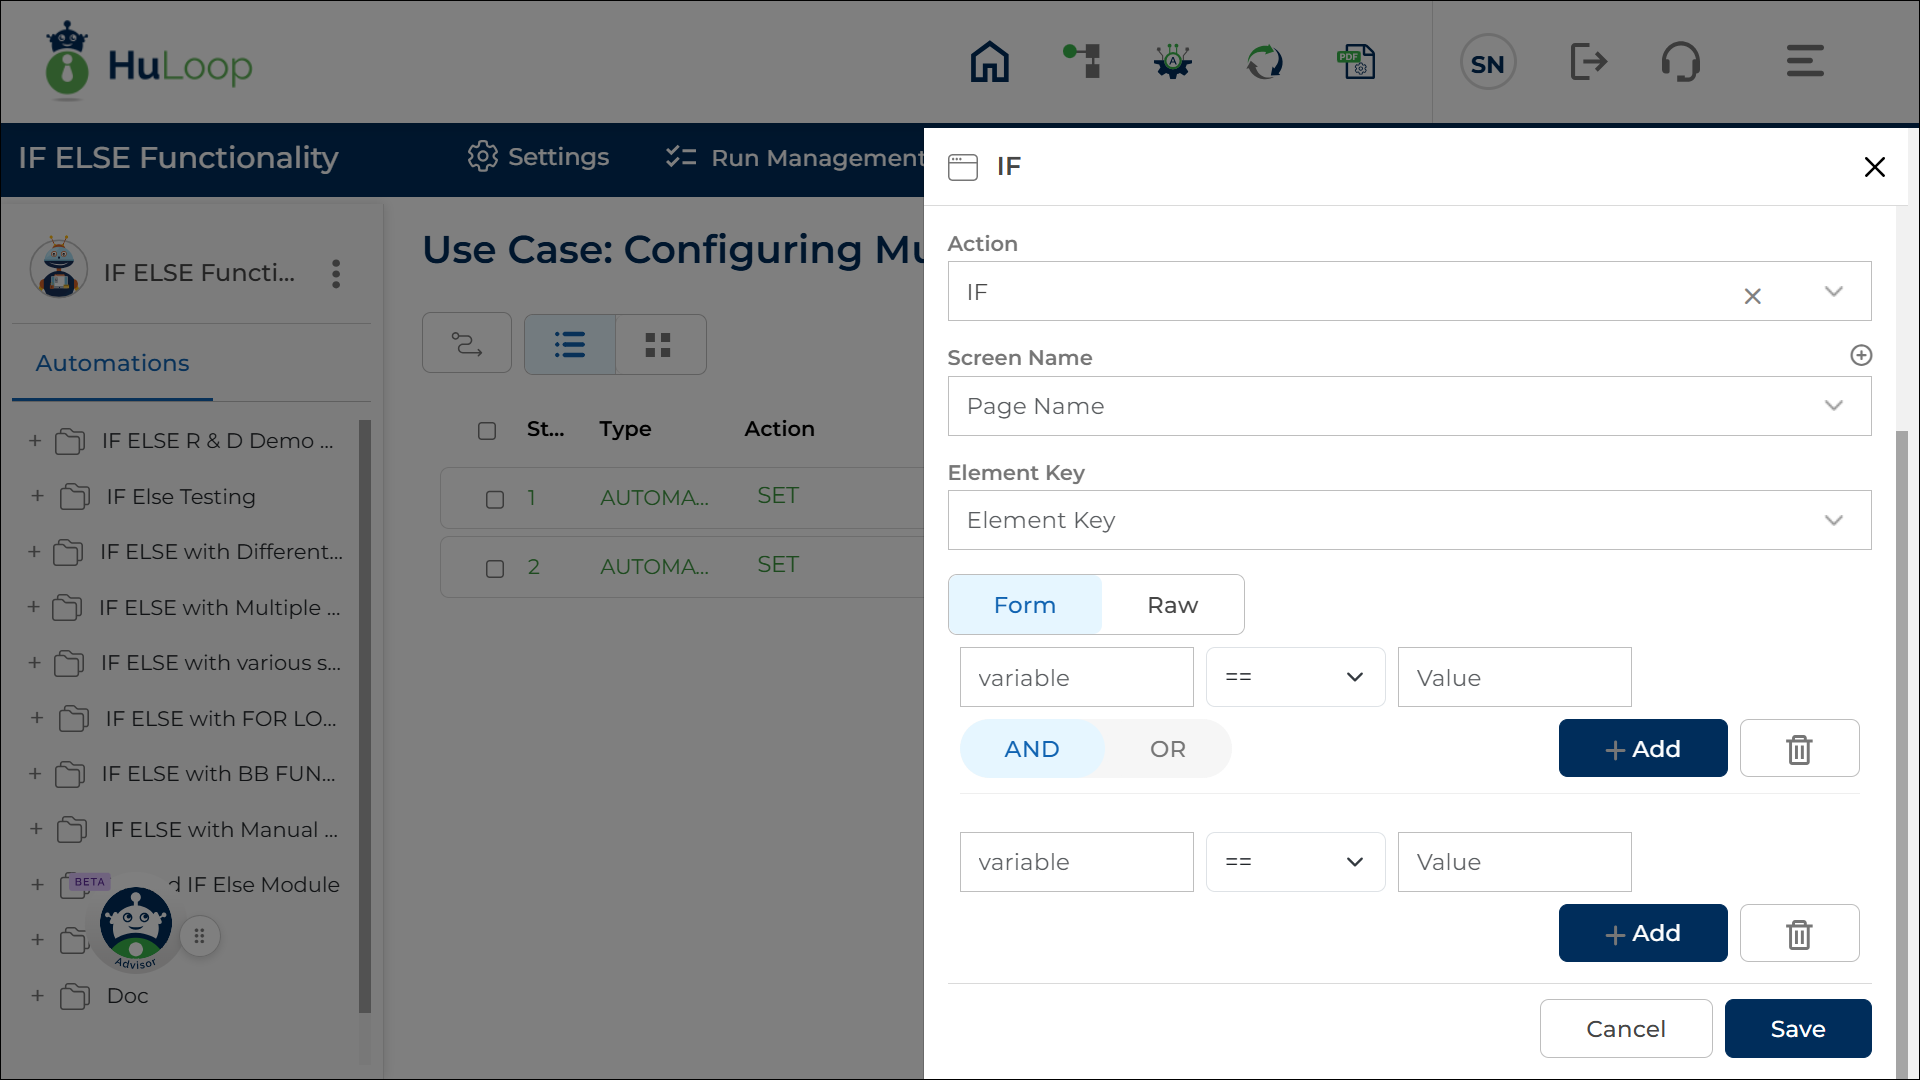
When you open the Form panel in an IF or ELSEIF step, you can define:
- Variable: The value to compare.
- Operator: The comparison operator such as = (EQUALS), > (GREATER THAN), etc.
- Value: The reference value for comparison
Note: You can provide any of the following in the Variable and Value fields:
- Local variable
- Suite-level variable
- Global variable
- Or directly enter a hardcoded value
Variables must be defined before they can be used in conditional logic. Click here to know more about variables and their types
You can define one or several of these condition sets. You may continue adding or removing conditions by using the ![]() or
or ![]() buttons within the Form panel.
buttons within the Form panel.
When more than one condition exists, a toggle ![]() appears that allows you to choose either:
appears that allows you to choose either:
AND: All conditions must be true
OR: At least one condition must be true
Steps to Configure Multiple Conditions:
- Add a new step.
- Select IF (or ELSEIF) from the Action drop-down.
- Leave the Screen Name field blank.
- In the Element Key field, define a variable name that will store the result (True/False)
- Click Form to open the configuration panel.
- For each condition, provide:
- Variable
- Operator
- Value
- Use +Add button to configure more conditions.
- Select AND or OR to specify how the conditions should be evaluated.
- Click Save.
Example: Checking Multiple Conditions Together.
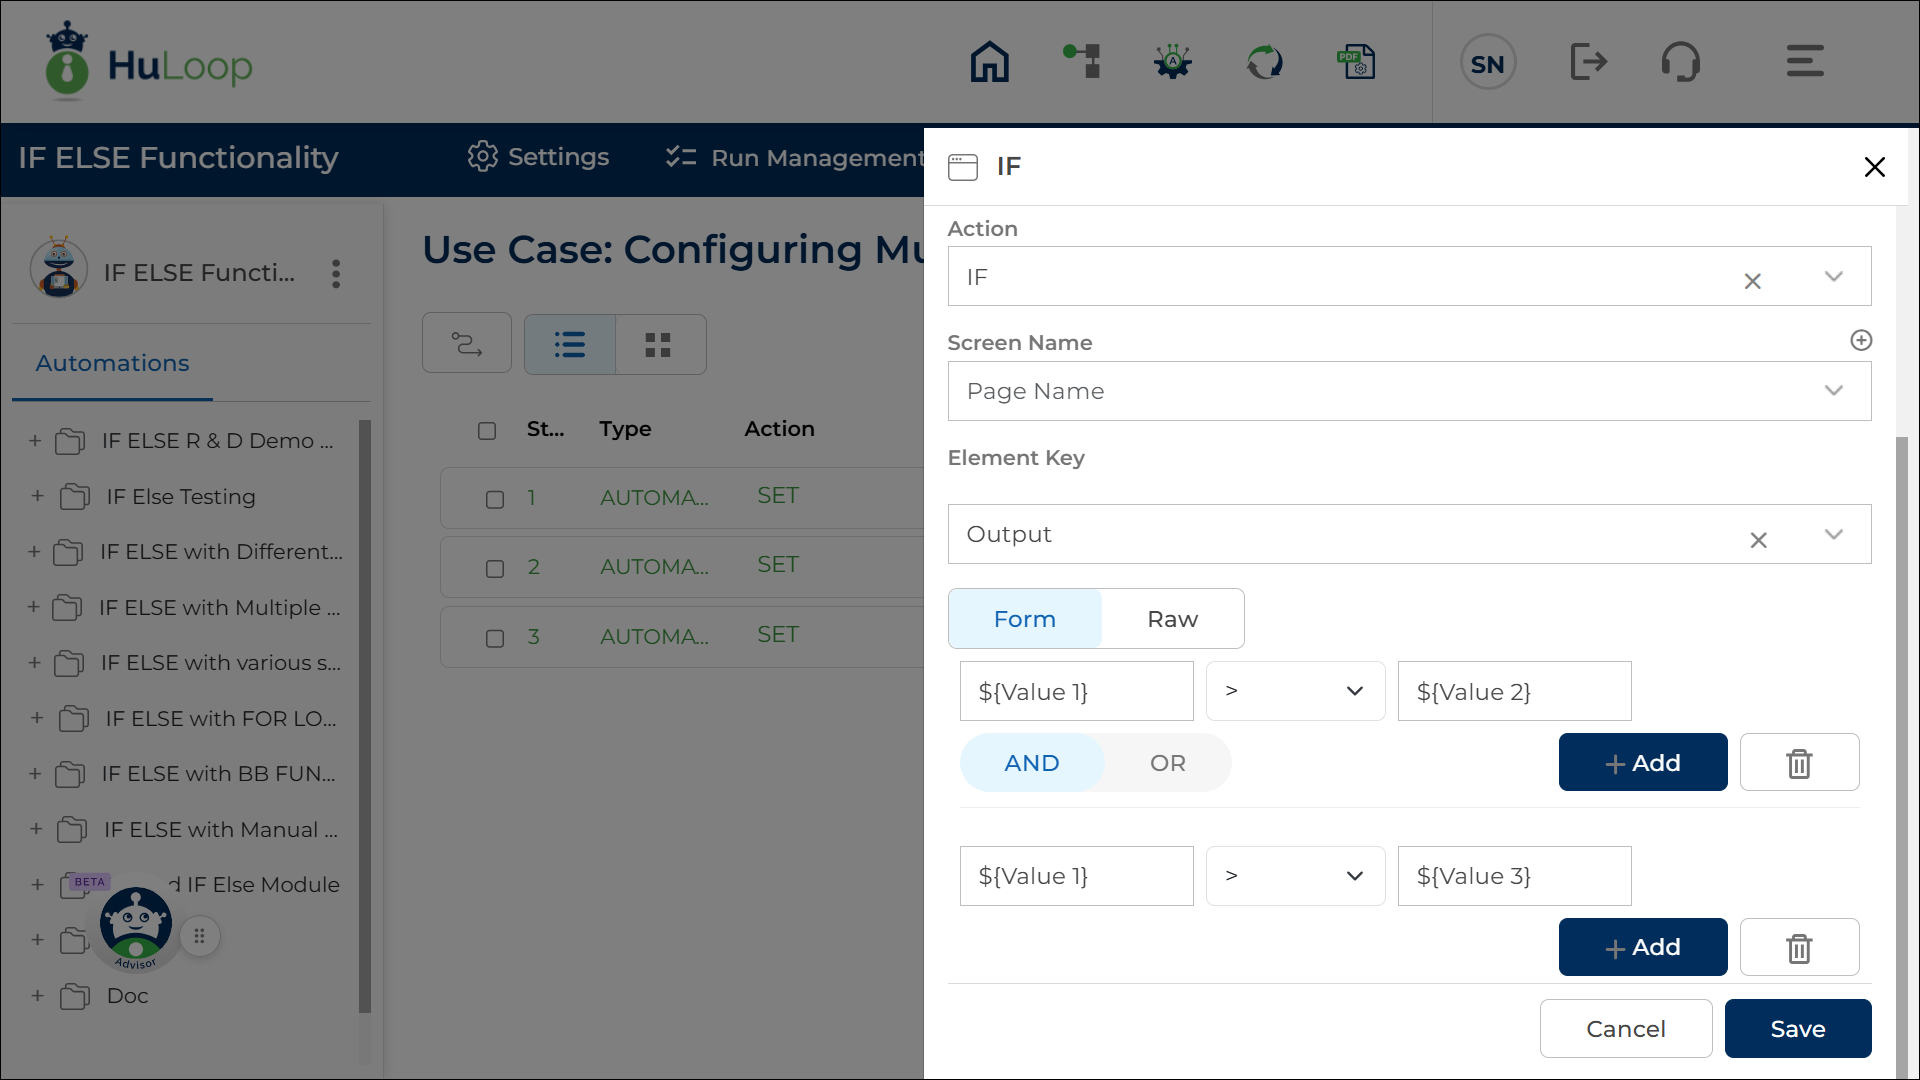
Scenario: Building on the earlier example where you compare Value 1, Value 2, and Value 3, you can configure multiple logical conditions within the same IF or ELSEIF step.
Suppose you want to evaluate the following:
- Value 1 must be greater than Value 2
AND - Value 1 must also be greater than Value 3
If both conditions are true, you want to set the variable Result = High.
This removes the need to create separate IF or ELSEIF steps for each comparison.
Steps to Configure:
- Add a new step.
- Select IF from the Action drop-down.
- Leave the Screen Name field blank.
- In the Element Key, enter the variable that stores the output of the execution (True/ False)
- Click Form and enter the following:
- Condition 1
- Variable: ${Value 1}
- Operand: > (Greater Than)
- Value: ${Value 2}
- Condition 1
- AND / OR Selection: Set the toggle to AND so both comparisons must be true.
- Condition 2
- Variable: ${Value 1}
- Operand: > (Greater Than)
- Value: ${Value 3}
- Condition 2
- Click Save.
Outcome on Execution:
- If Value 1 > Value 2 and Value 1 > Value 3, the IF condition is true and the variable in the Element Key holds True.
- The automation proceeds with the steps inside the IF block (for example, setting Result = High).
- If either condition is false, the automation skips the IF block and moves to the next ELSEIF or ELSE block (as already described in the main document).
- Refer to the screenshot below to see how this condition is represented in the workflow:
You can configure combined conditions in the ELSEIF statement in the same way. This allows you to evaluate multiple criteria across multiple branches of your IF–ELSEIF–ELSE logic.
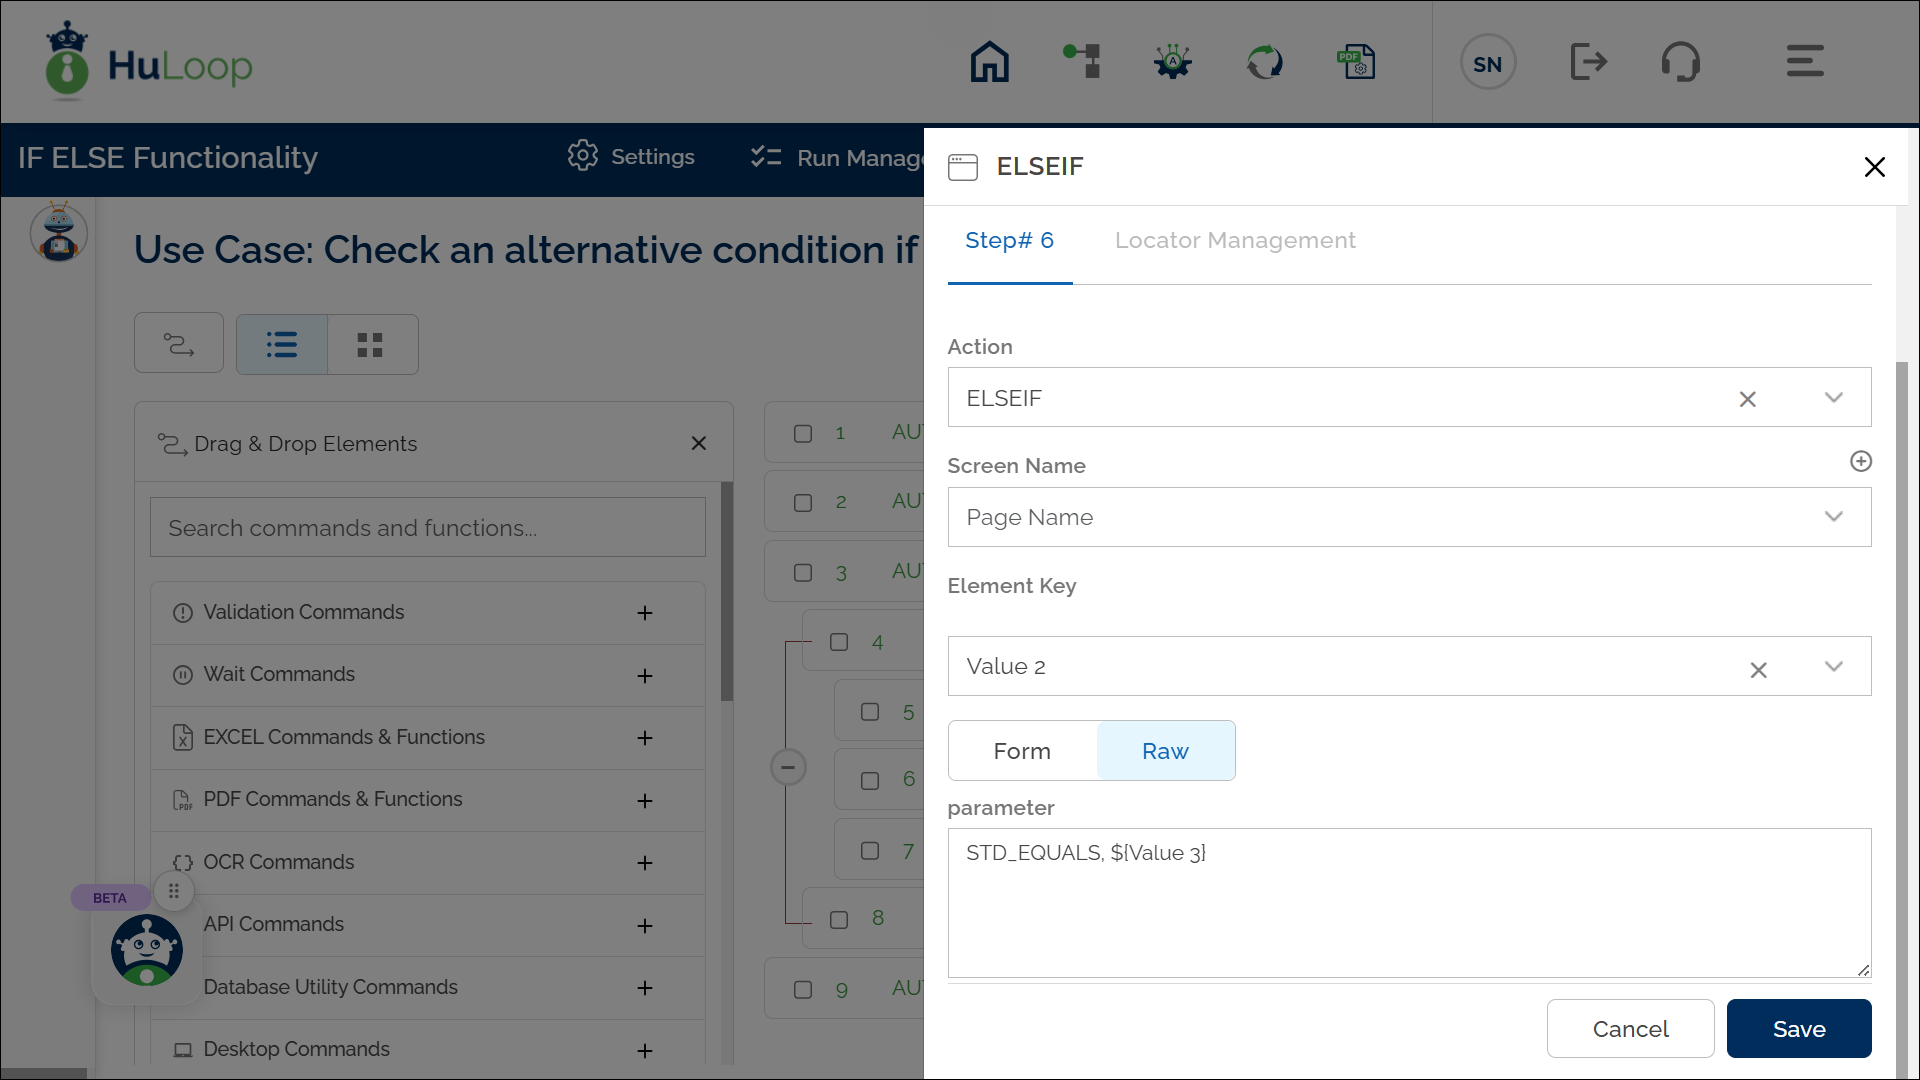
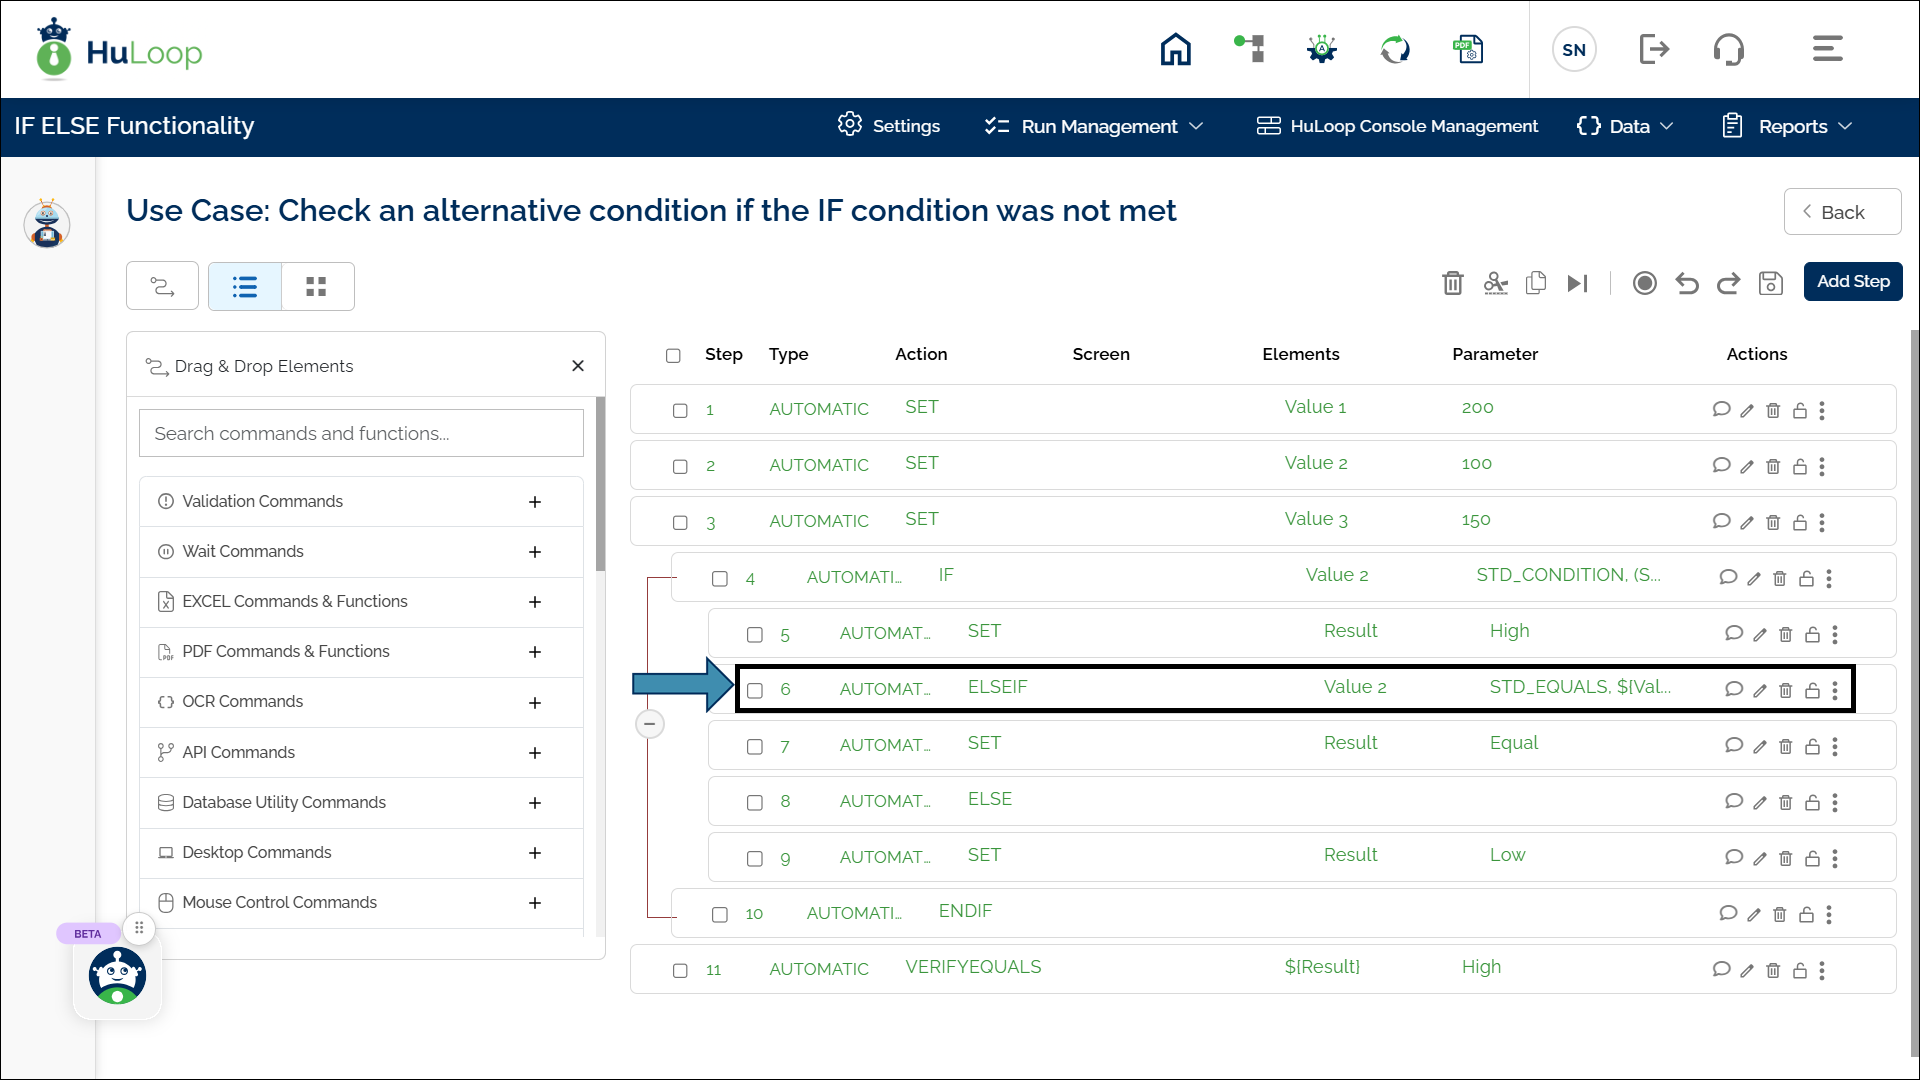
Else If Statement: ELSEIF
The Else If Statement action checks an additional condition if the IF condition wasn’t met. It allows you to handle multiple conditions sequentially before executing the final ELSE block.
Example: Checking an Alternative Condition
Building upon the previous example, suppose we now introduce an additional condition:
- Value 1 = 200
- Value 2 = 100
- Value 3 = 150 (New variable for additional comparison)
The automation should perform the following checks:
- IF Value 2 is greater than Value 1 → Set Result = High (already explained).
- ELSEIF Value 2 is equal to Value 3 → Set Result = Equal (new condition).
- ELSE → Set Result = Low (to be covered in the next section).
Steps to configure:
After setting up the IF condition, add ELSEIF:
- After configuring the IF statement, add a new step.
- Select ELSEIF from the Action drop-down.
- Leave the Screen Name blank.
- In Element Key, enter the variable to be compared, e.g., Value 2.
- In Parameter, enter STD_EQUALS, ${Value 3} (Value 3 is the reference value for comparison).
- Click Save.
Outcome on Execution:
- If the IF condition is met, ELSEIF is skipped, and the automation proceeds with the IF action.
- If the IF condition is not met, the automation evaluates the ELSEIF condition:
- If Value 2 (100) = Value 3 (150) → This is false, so ELSEIF is also skipped.
- If the ELSEIF condition is met, the automation sets Result = Equal.
- If neither IF nor ELSEIF conditions are met, the automation moves to the ELSE block (covered in the next section).
Refer to the screenshot below to see how an ELSEIF statement is visually represented in the workflow:
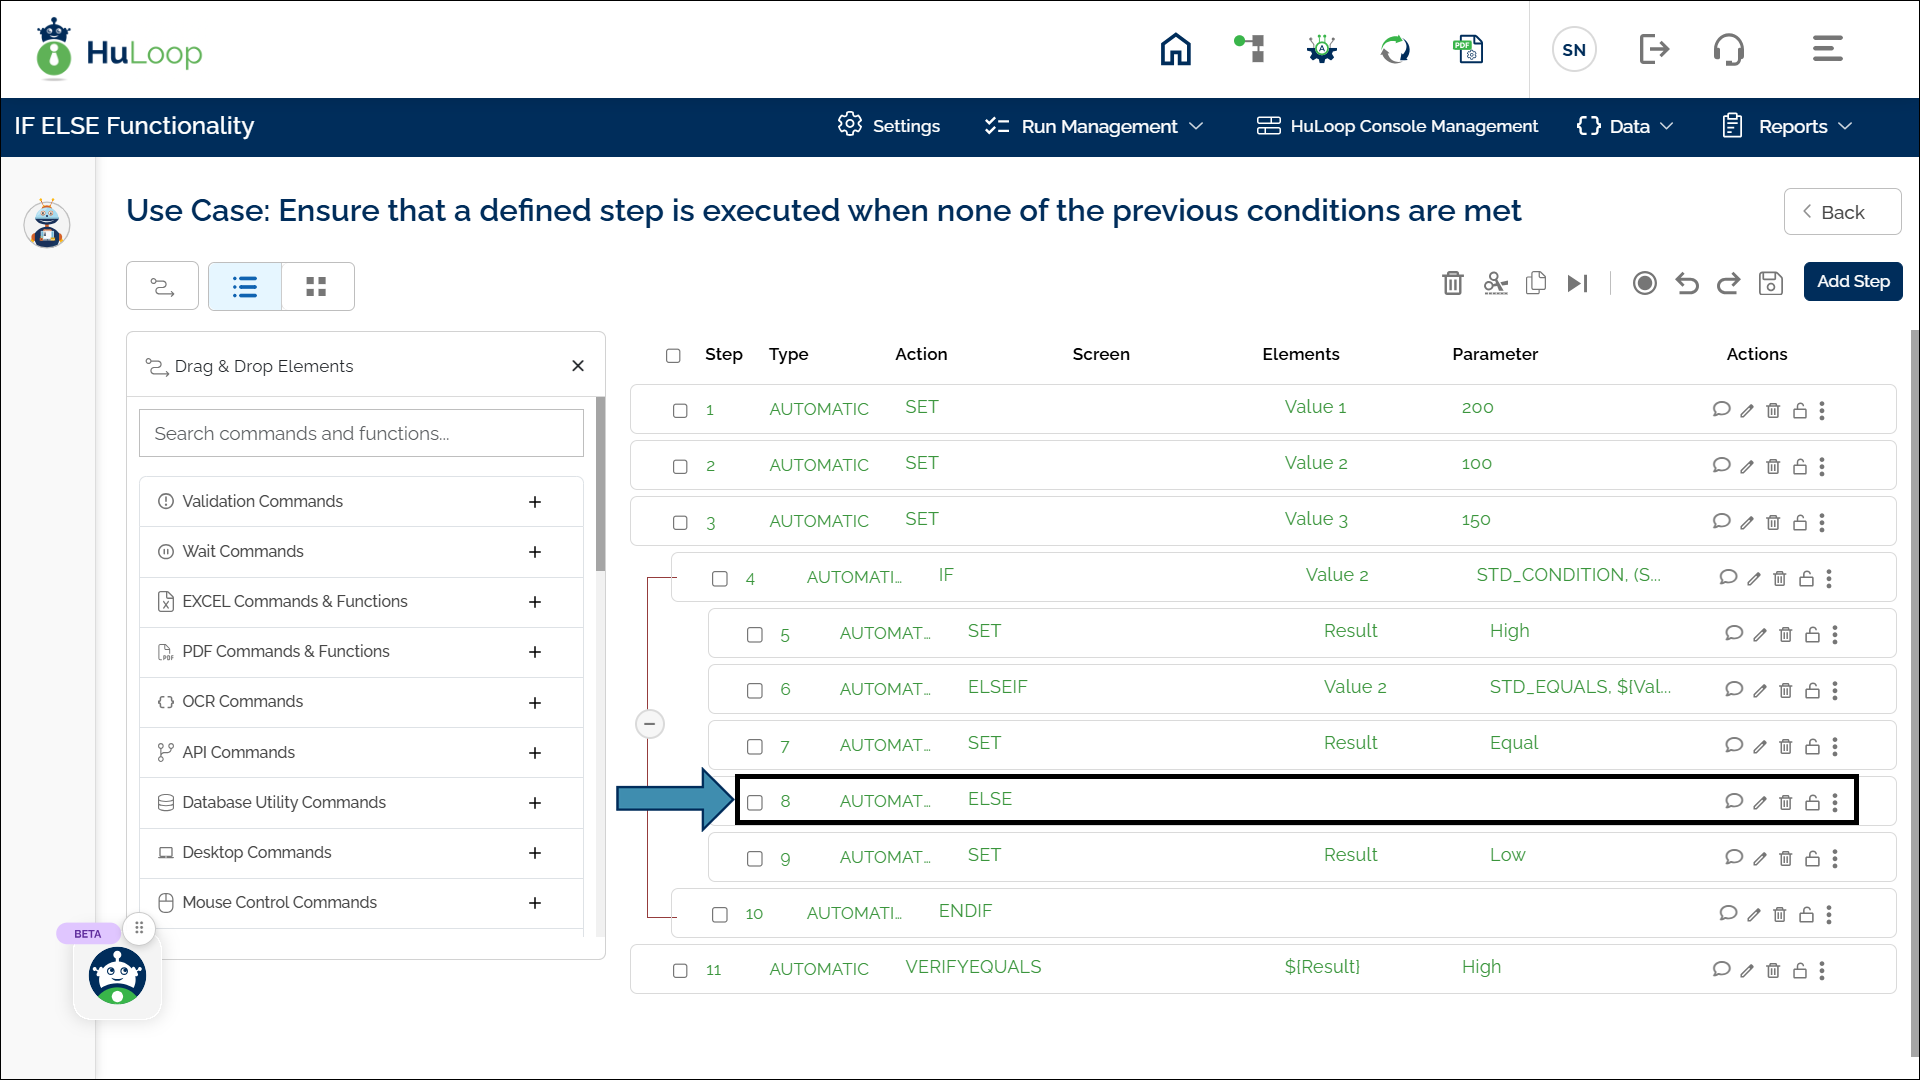
Else Statement: ELSE
The Else Statement action ensures that a defined step is executed when none of the previous conditions are met. It serves as the default fallback condition, ensuring that the workflow always has a defined next step.
It requires an ENDIF to close the block.
Example: Handling the Default Case
Continuing from the previous example, we now add an ELSE condition:
- Value 1 = 200
- Value 2 = 100
- Value 3 = 150
The automation should perform the following checks:
- IF Value 2 is greater than Value 1 → Set Result = High (already explained).
- ELSEIF Value 2 is equal to Value 3 → Set Result = Equal (already explained).
- ELSE → If neither condition is met, Set Result = Low.
Steps to configure:
After setting up the IF and ELSEIF conditions, add ELSE:
- Add a new step.
- Select ELSE from the Action drop-down.
- Leave all other fields blank.
- Click Save.

Outcome on Execution:
- If either the IF or ELSEIF condition is met, the ELSE block is skipped.
- If both IF and ELSEIF conditions fail, the automation executes the ELSE block and sets Result = Low.
When checking multiple conditions, use multiple ELSEIF statements before the final ELSE to capture various scenarios.
Refer to the screenshot below to see how the ELSE statement is visually represented in the workflow:
In the upcoming section, we will configure the ENDIF statement to properly close the IF ELSE block.
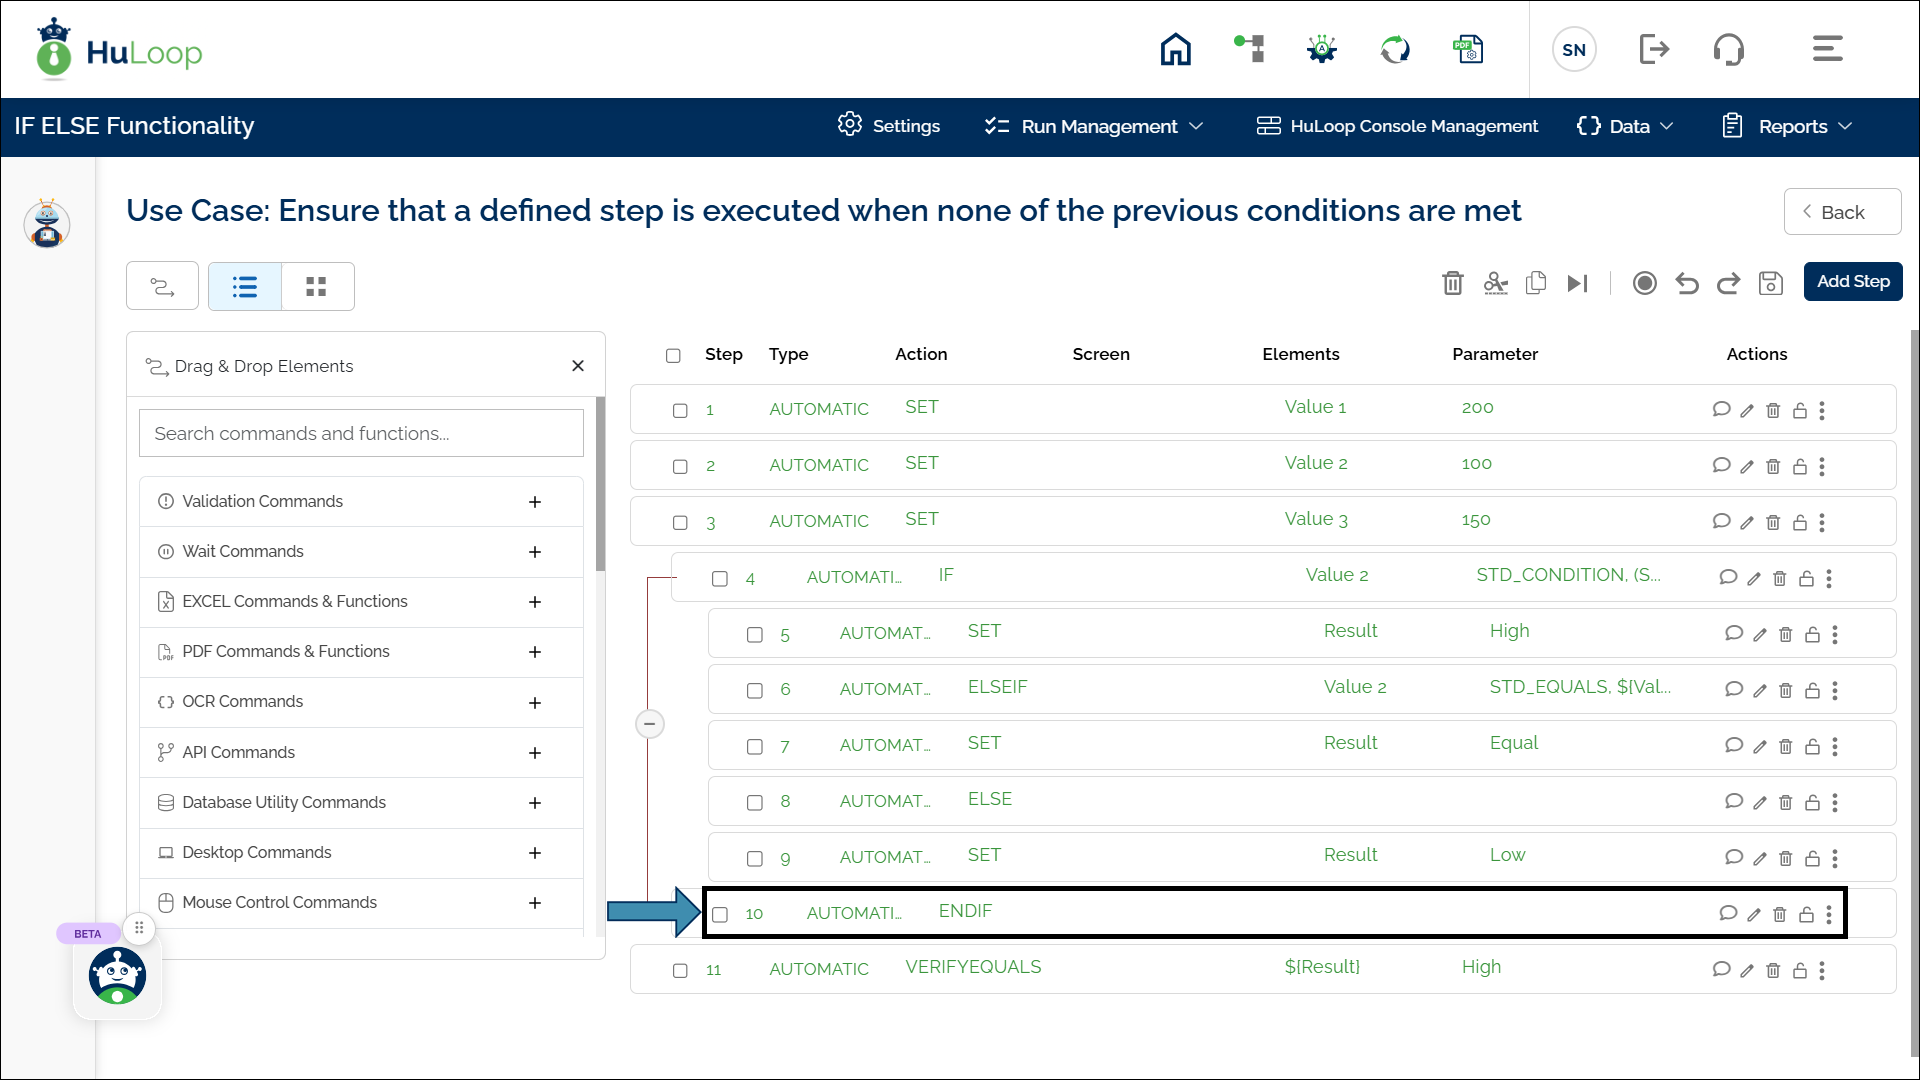
Endif Statement: ENDIF
The Endif Statement action marks the end of the IF ELSE block, indicating that all conditions have been checked.
This statement is automatically added to the automation workflow to close the IF ELSE block.
Outcome on Execution:
- Once any condition (IF, ELSEIF, or ELSE) is executed, the workflow reaches ENDIF, signaling the end of the conditional block.
- The automation then proceeds to the next step outside the IF ELSE structure, if any.
Refer to the screenshot below to see how ENDIF is represented in the workflow:
With this, the entire IF ELSE structure is complete, allowing the automation to handle multiple conditions effectively.
Full Example Recap:
- IF: Check if Value 2 < Value 1; if true, set Result = High.
- ELSEIF: If Value 2 does not meet Value 1, check if Value 2 = Value 3 and, if true, set Result = Equal.
- ELSE: If neither condition is met, set Result = Low.
- ENDIF: Closes the conditional block.
You can collapse or expand the IF ELSE block using the ![]() or
or ![]() sign in the workflow. This helps simplify the view when working with larger automation scripts.
sign in the workflow. This helps simplify the view when working with larger automation scripts.
The default view is expanded.