Extracting Data from PDF Files
HuLoop offers a powerful Extraction function as part of its Intelligent Document Processing capabilities. This function allows you to extract Personally Identifiable Information (PII) and other specified data from scanned, handwritten, or image-based PDF files.
With minimal setup, you can configure a PDF source, define the target destination for the extracted content, and specify the data identifiers you want to extract. The extracted data can then be stored in a text file in your local machine and also in a variable that can be reused across other automation steps, making document handling seamless and secure.
Note: Ensure that the source PDF file is closed before running the automation. If the file is open during execution, the process may fail.
Steps to Configure
- Add a new step in the automation workflow.
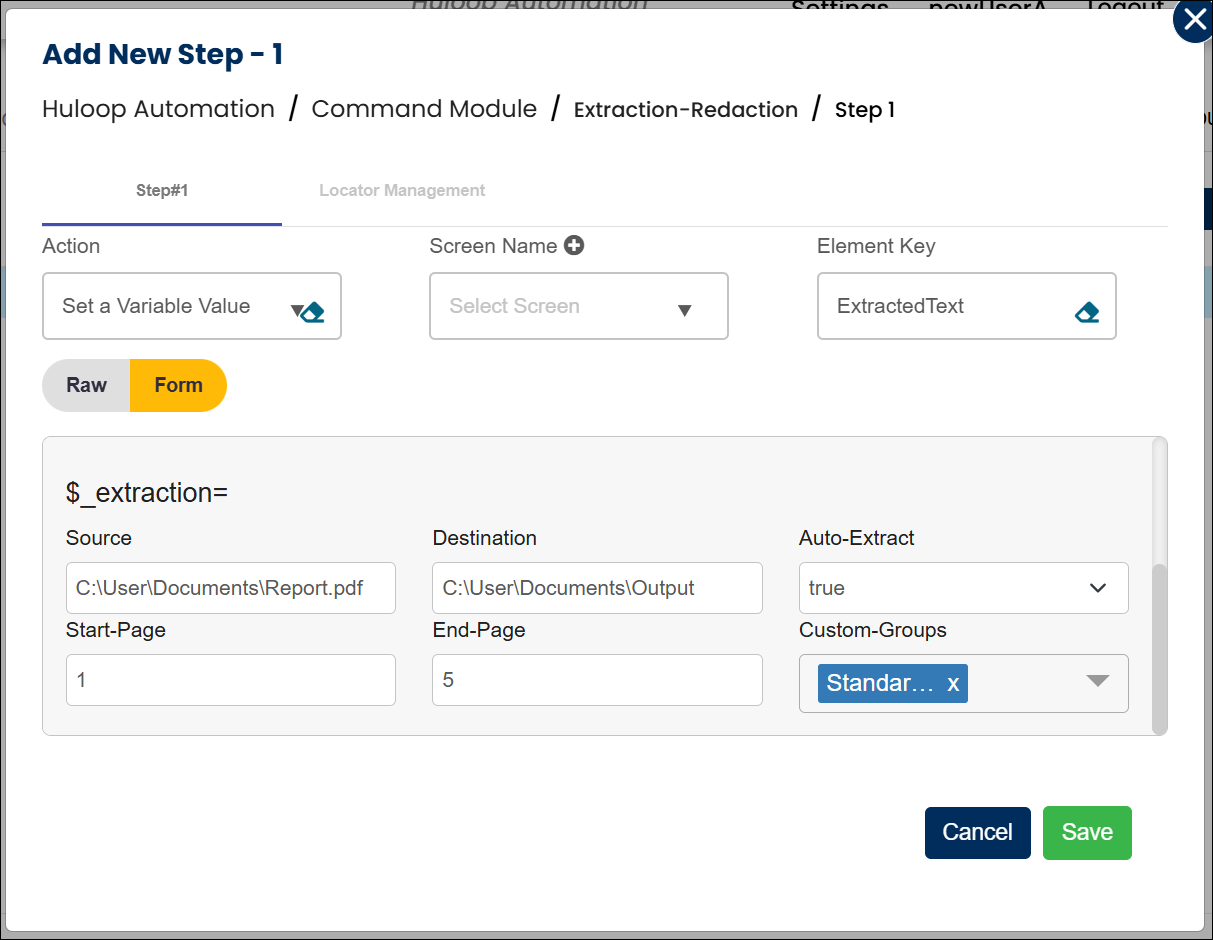
- Select Set a Variable Value from the Action dropdown.
- Enter a variable name in Element Key (e.g., ExtractedText). This will store the extracted content.
- Click Form, select Functions, and choose Extraction.
- Provide the following parameters:
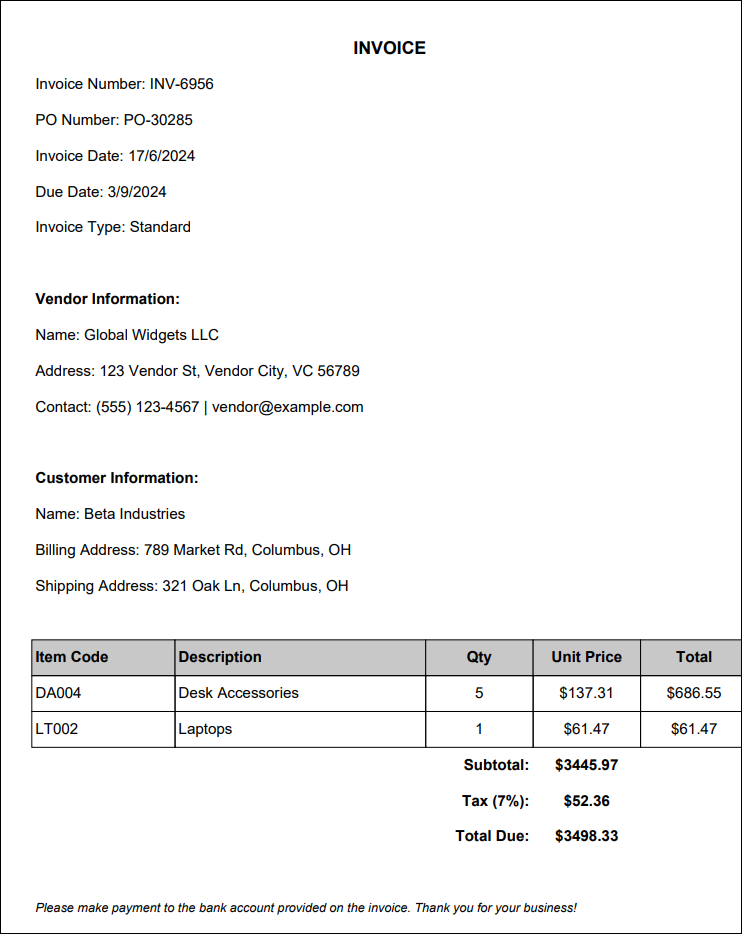
- Source: Full path to the input PDF file (e.g., C:UserDocumentsInvoice.pdf).
- Destination: Path where the Extraction Redaction folder will be created (e.g., C:UserDocuments).
- Auto-Extract: Select true to extract all content automatically, or false to extract only selected fields.
- Start-Page: (Optional) Page number to begin extraction (e.g., 1).
- End-Page: (Optional) Page number to stop extraction (e.g., 5).
- Custom-Groups: The Custom Group name (e.g., Standard PII) that includes the entities to be extracted.
Note: Make sure the required identifiers are selected in the chosen PII group. If no identifiers are selected, the function may return empty results.
You can select multiple PII groups-both standard and custom—during function setup to extract or redact a wider set of information in one step.
- Click Save.
Note: While the steps for adding an action are identical in both views, the display of the steps changes:
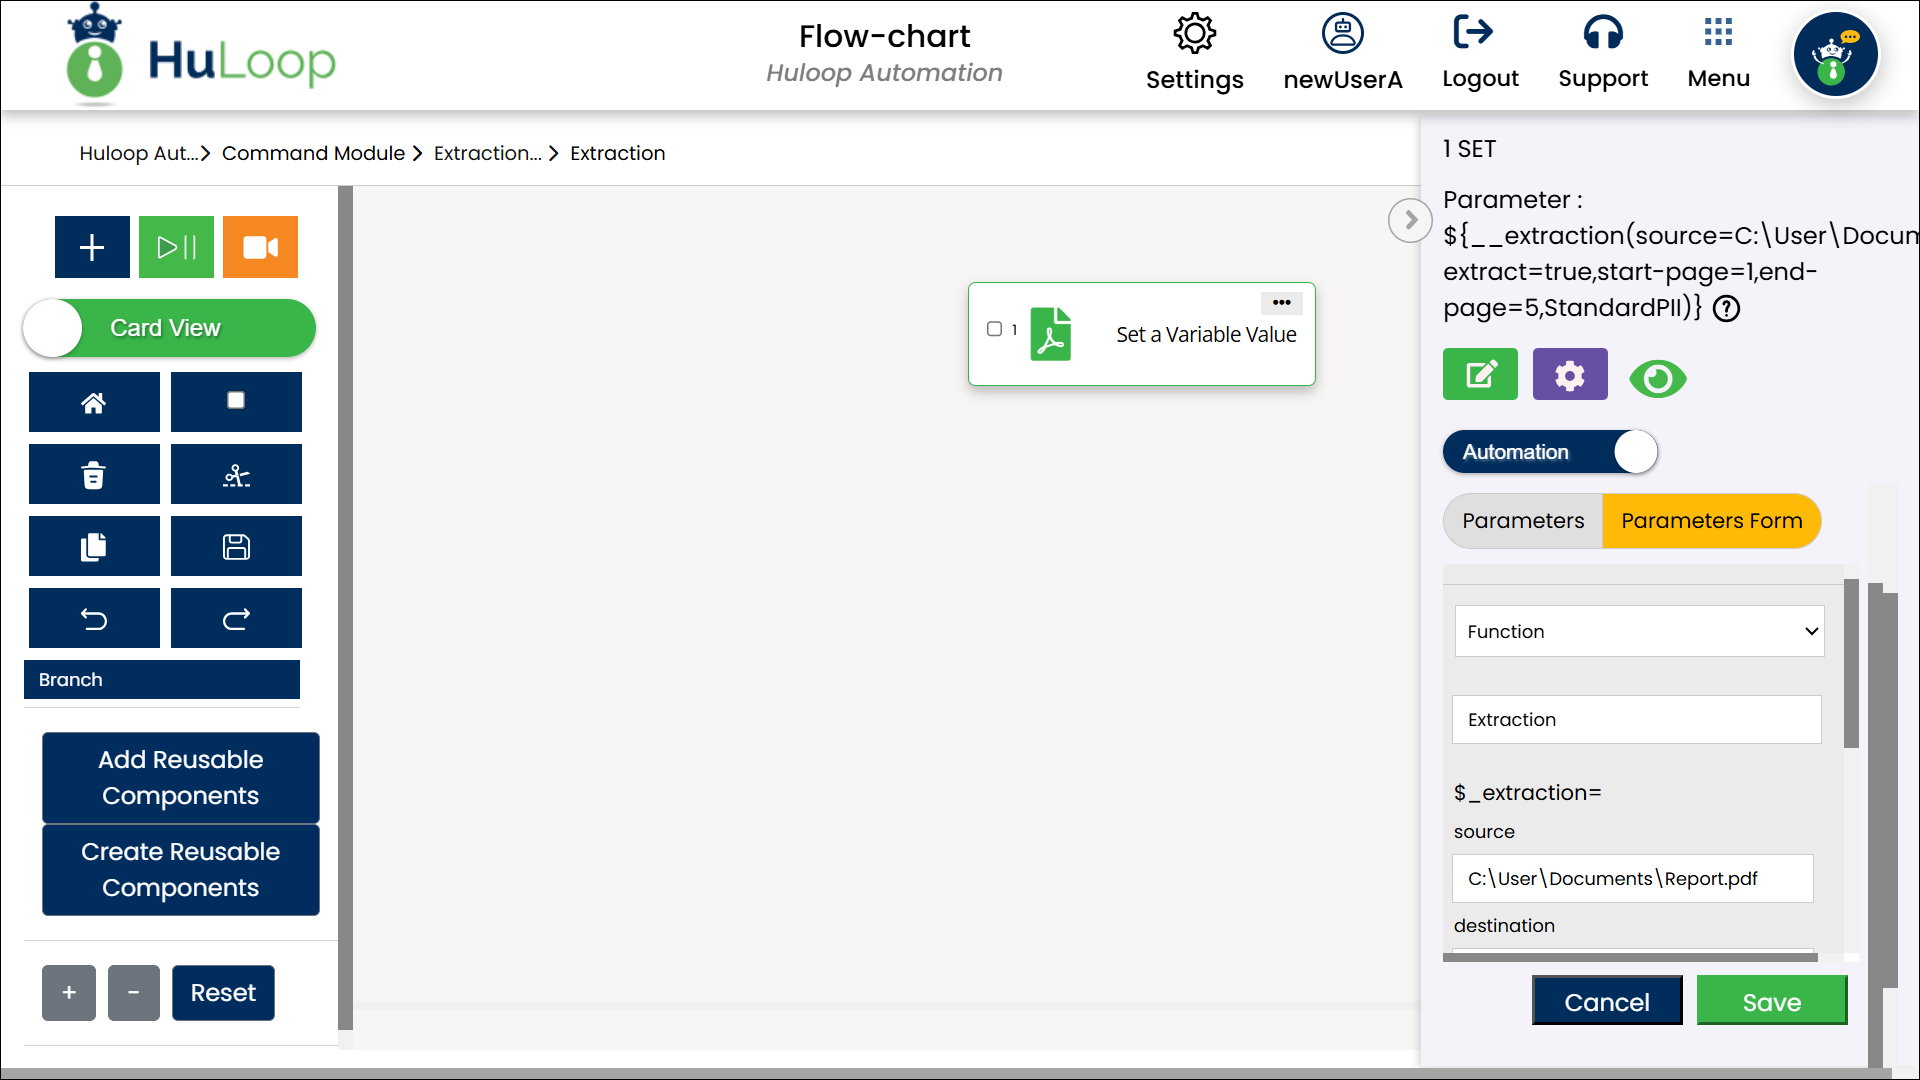
Expected Outcome on Execution: After execution, the variable defined in the Element Key field will store the extracted text containing relevant PII, which can be used in later steps for processing or validation using the syntax ${Variable Name} i.e., ${ExtractedText}.
As output, HuLoop_Extraction folder will be created at the location specified in the Destination field containing the following sub-folders:
- ExtractedFiles: Contains the Extracted text Files. Open this folder to see the extracted text file.
- ToBeProcessed: Contains the files that are yet to be processed. For example, if you have uploaded 3 files, and one had been processed, the rest 2 files will be present in this folder. After the successful extraction of all files, this folder will become empty.
- UploadedFiles: Shows the uploaded files.

Example: Extracting Salary Information Using a Custom PII Group
Scenario: You want to extract the Salary of employees from the Employee_Record.pdf file. Since Salary is not part of HuLoop’s Standard PII group, you’ll need to create a Custom PII Group with “Salary” defined as an entity for extraction. See here to know how to create a new custom PII group.
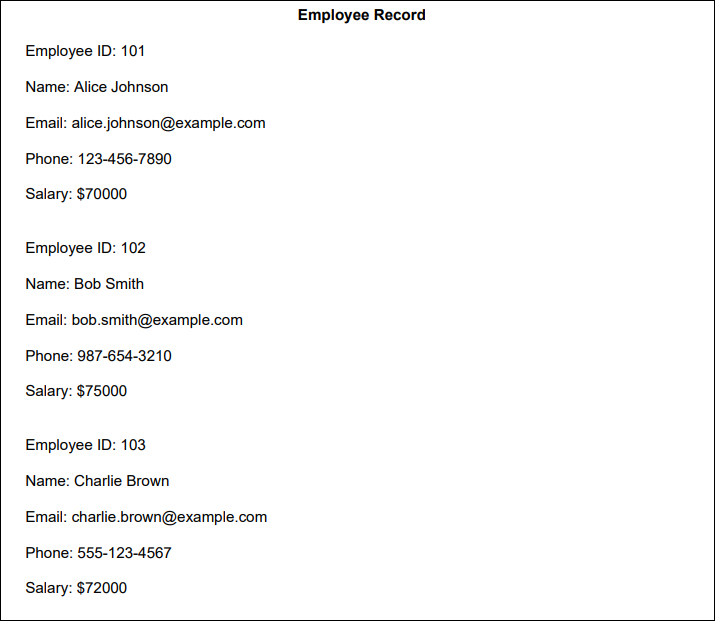
Steps to Configure:
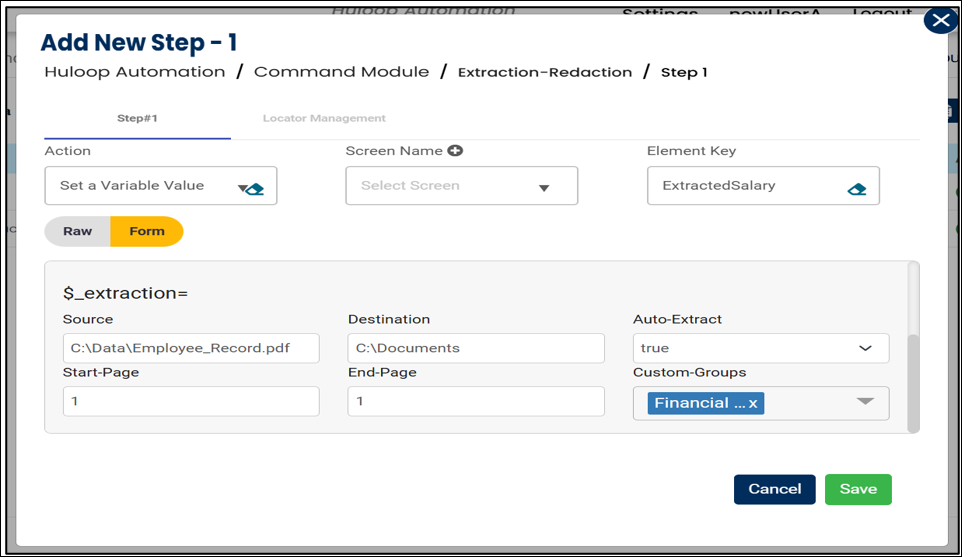
- Add a new step in your automation.
- Select Set a Variable Value from the Action dropdown.
- In the Element Key field, enter a variable name that will store the extracted value. For example, enter ExtractedSalary.
- Click Form, go to Functions, and choose Extraction.
- Set these values in the parameters:
- Source= C:DataEmployee_Record.pdf
- Destination=C:Documents
- Auto-Extract=true
- Start-Page=1
- End-Page=1
- Custom-Groups= Financial Identifiers (This is the name of the custom group you created with “Salary” as an identifier)
If required, you can select multiple PII groups-both standard and custom – during function setup to extract or redact a wider set of information in one step.
- Click Save.
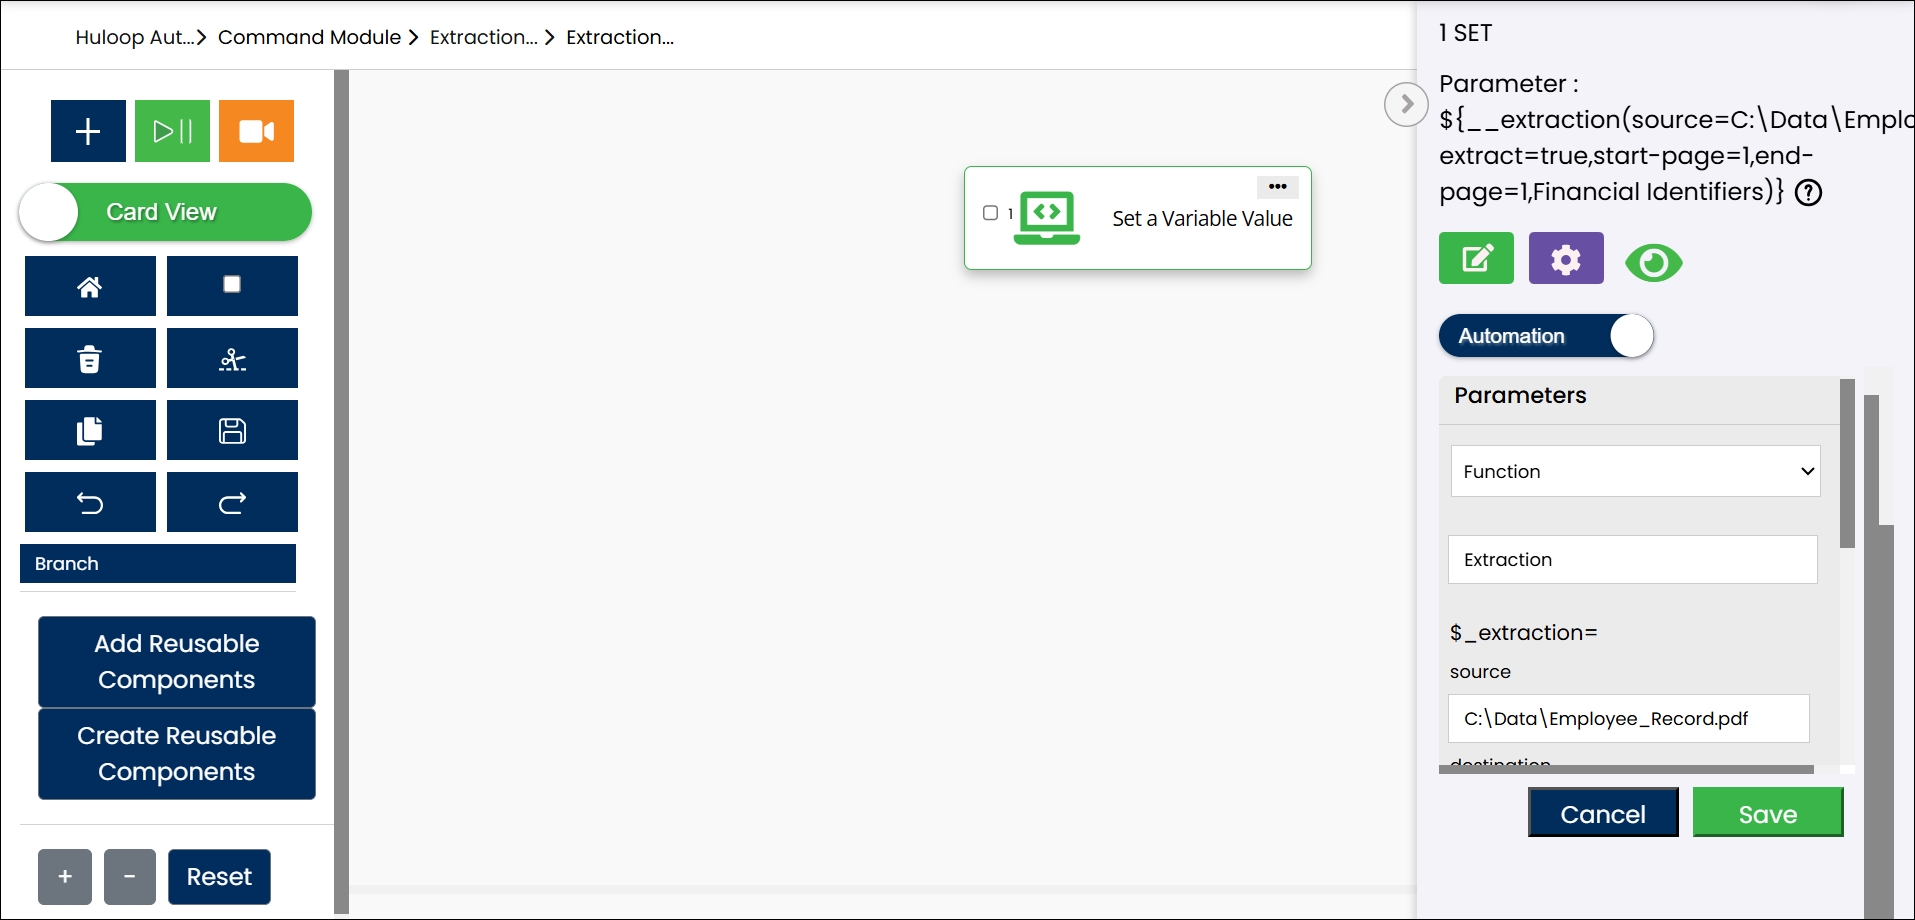
Expected Output on Execution:
- The system will extract data from the specified PDF file using the selected custom PII group.
- The Salary values will be extracted and stored in the variable ExtractedSalary.
- You can now use the variable syntax ${VariableName} (e.g., ${ExtractedSalary}) in subsequent automation steps for validations, display, or logging.
- Extracted files are also saved automatically in the HuLoop_Extraction folder at the location you specified in the Destination field. You can refer to the ExtractedFiles subfolder to access the extracted files.

Counting Extracted Components
After extracting multiple values for an entity like Salary, you may want to count how many times that entity appeared in the document.
HuLoop allows you to do this using the .count() function, which can be used across any supported Actions.
Usage example: Suppose you also need to count how many Salary entries were extracted using the same variable from the previous step. This value can then be used for further processing or validation in your automation.
In this example, we are using the Set a Variable Value action to capture and store the count in a new variable.
Steps to Configure:
- Add a new step in your automation
- Select Set a Variable Value from the Action drop-down menu.
- In the Element Key field, enter a variable name to store the count. For example: SalaryCount
- In the Parameters section, enter:
${ExtractedSalary.Salary.count()}
Where:
- ExtractedSalary – The name of the variable where the extracted data is stored
- Salary- The entity being counted
- count()- A function that returns how many times the entity appeared in the extracted data
- Click Save.
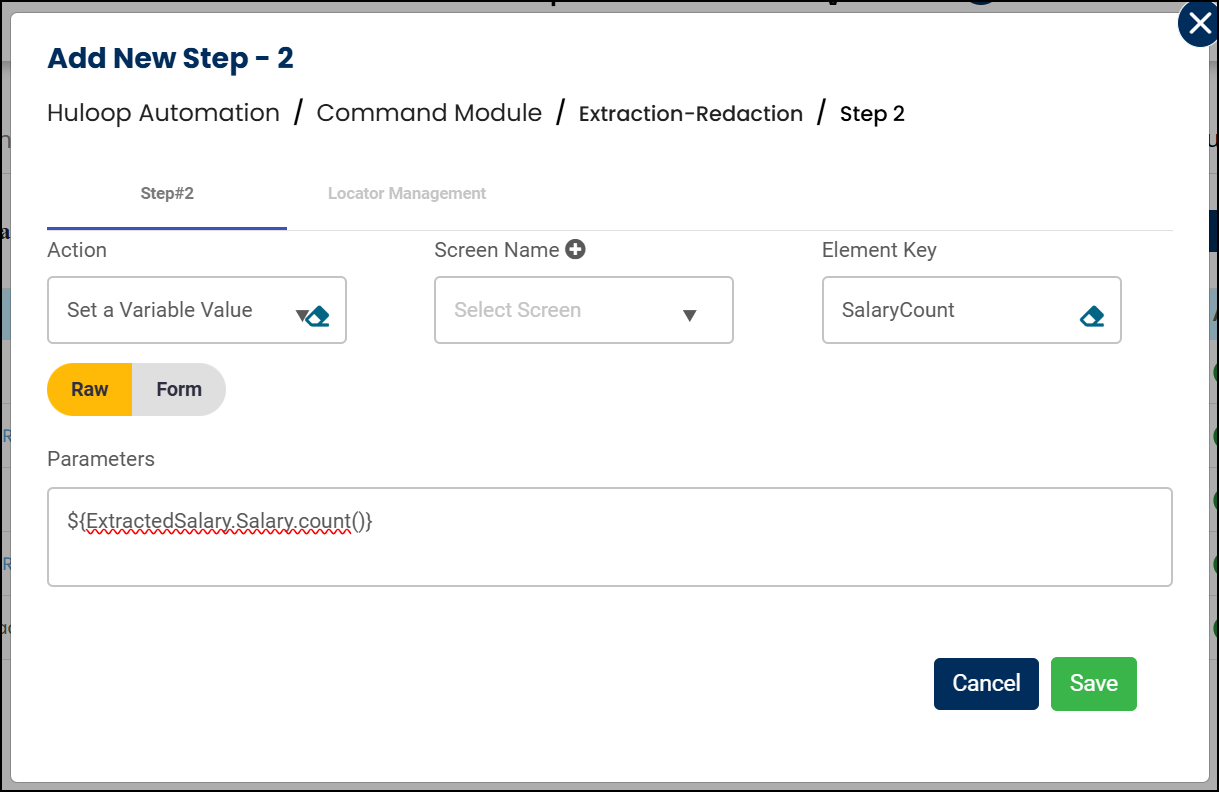
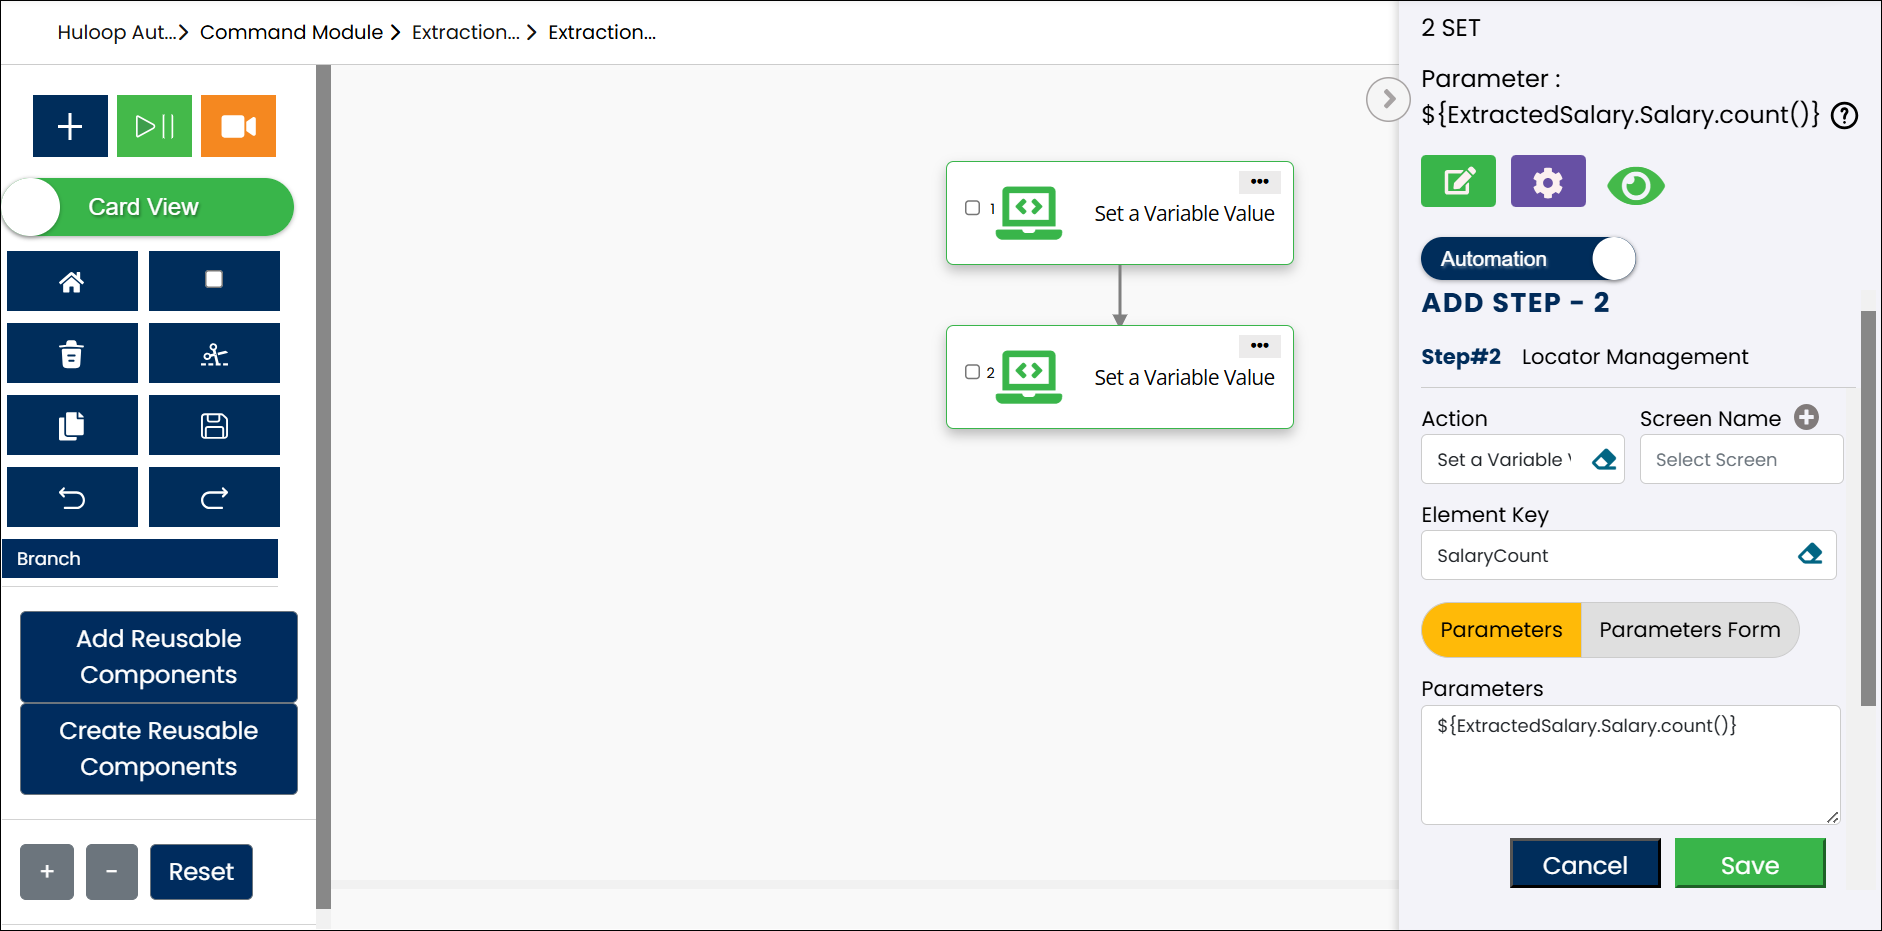
Expected Output on Execution: This will store the total number of extracted Salary values in the variable SalaryCount, which can be reused in later steps of your workflow using the syntax ${Variable Name} (e.g., ${SalaryCount}).
Getting a Specific Value by Index
After extracting multiple values for a particular entity (like Salary) you may want to use just one specific value from the list- such as the first, second, or third entry.
HuLoop lets you access a specific item by its index using the following format:
$(<VariableName>.<EntityName>.<Index>)
Where:
- <VariableName> – Name of the variable that stores the extracted data
- <EntityName> – The identifier or entity you want to access (e.g., Salary)
- <Index> – The position of the item you want to retrieve (starting from 0)
Note: Indexing starts from 0, so .0 gives the first value, .1 gives the second, and so on.
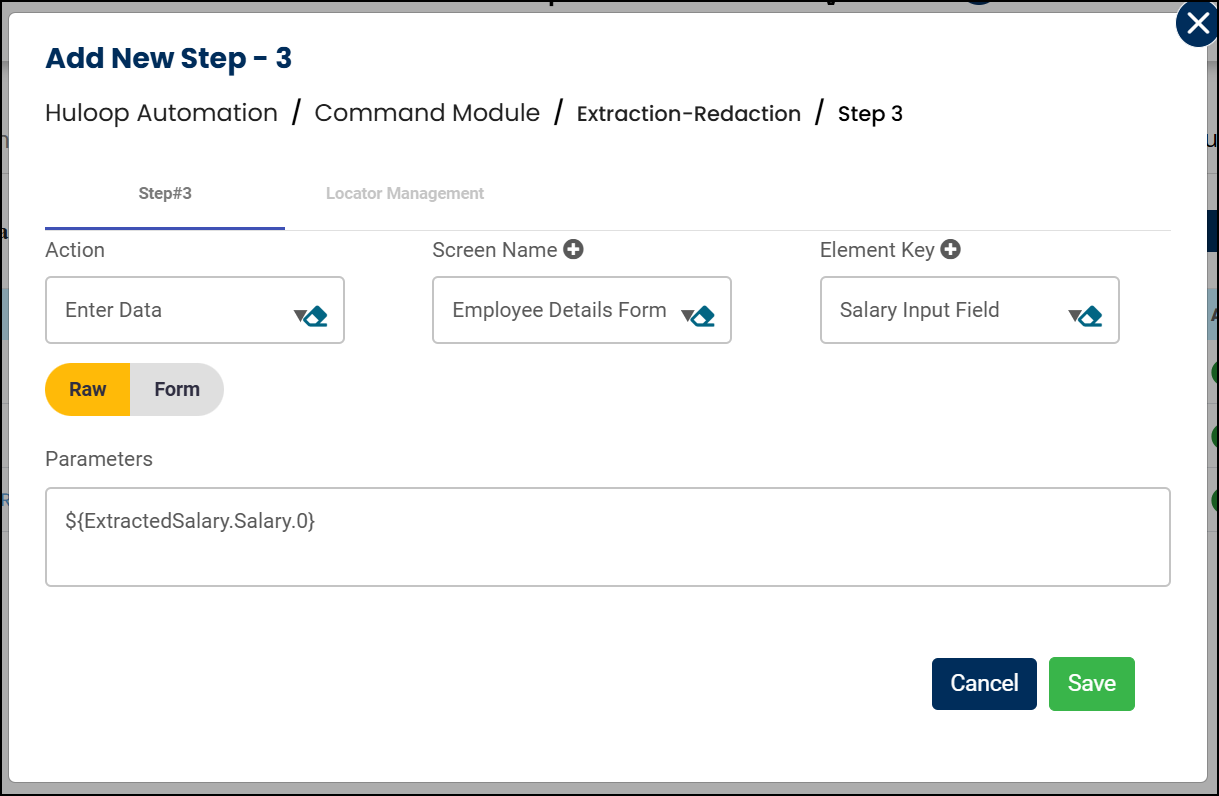
Usage Example: Suppose you want to use a specific extracted value in any supported action. In this example, we are using the Enter action to input the first Salary value extracted from a document:
Steps to Configure:
- Add a new step to your Case.
- Select Enter Data (or any other action) from the Action drop-down menu.
- In the Screen Name field, enter the name of the screen where the action is taking place (e.g., Employee Details Form)
- In the Element Key field, enter the target field’s locator where the value should be entered (e.g., Salary Input Field)
- In the Parameters section, provide the following value:
${ExtractedSalary.Salary.0}
Where:
- ExtractedSalary – The name of the variable where the extraction result is stored.
- Salary – The name of the entity you defined in your Standard or Custom PII Group.
- 0 – The index of the value you want to access. Indexing starts from 0.
Make sure the entity name and variable name (like Salary and ExtractedSalary respectively) exactly match the custom entity defined in your Custom PII Group.
- Click Save.
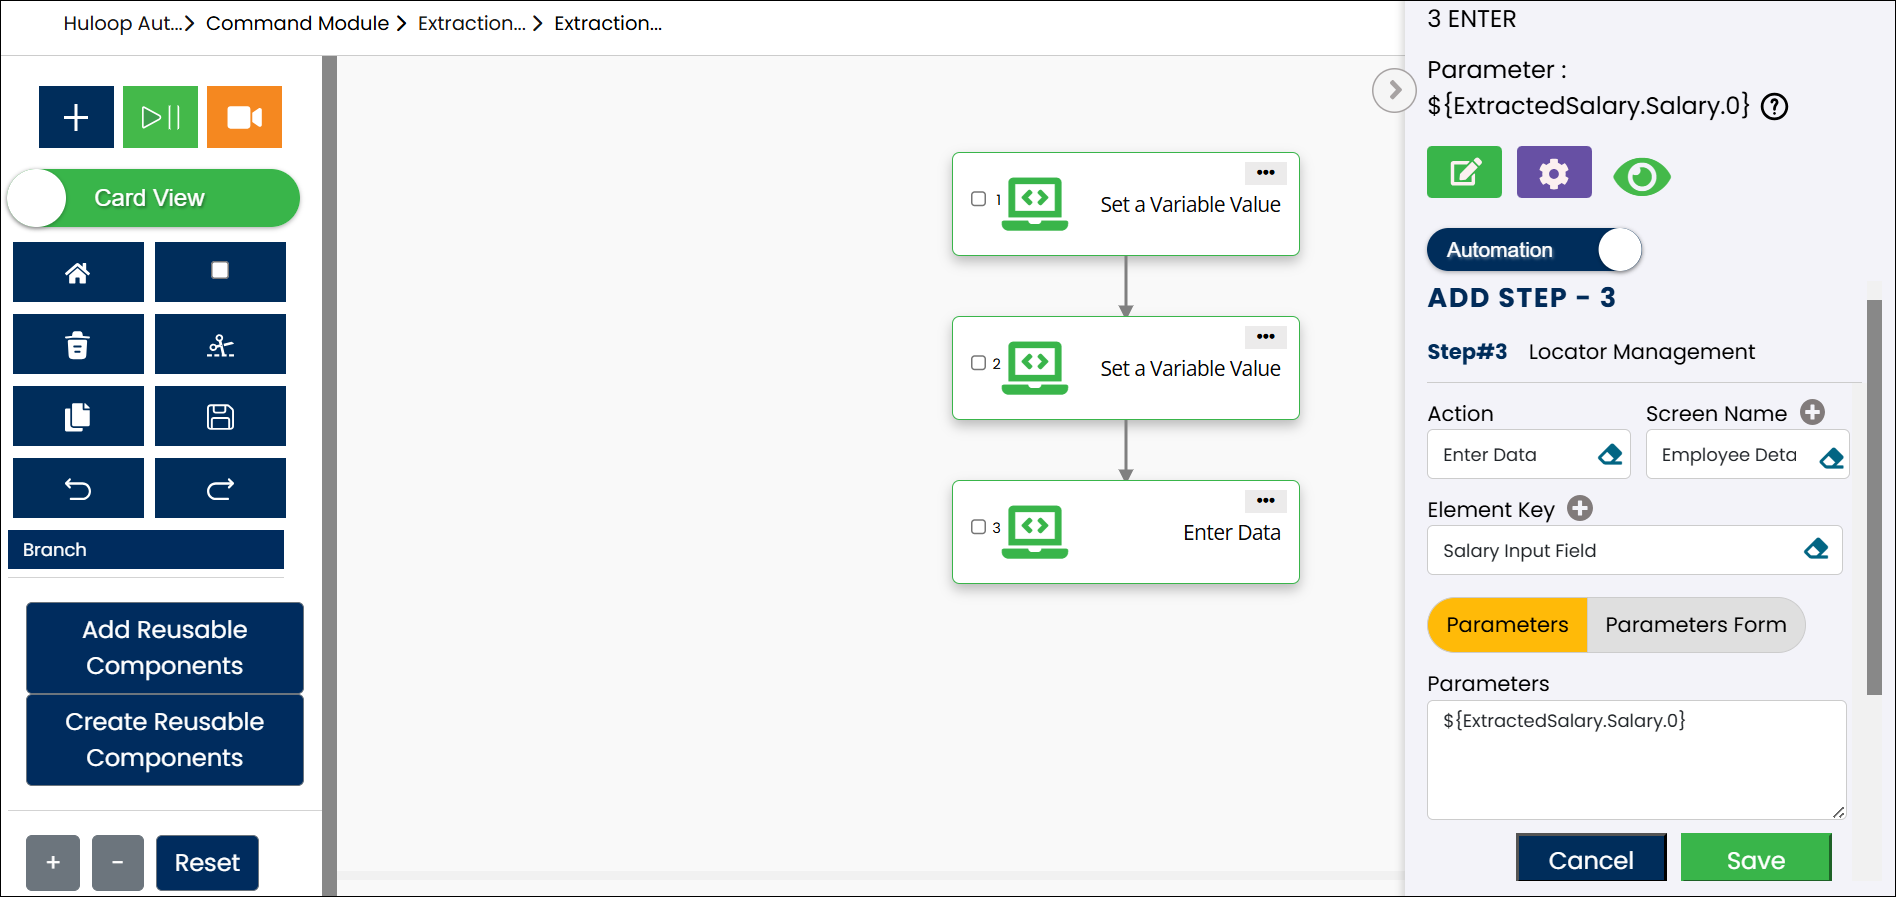
The screenshot below shows how the configured steps appear together in the automation, including extraction, counting, and accessing a specific value by index:
Optional: View the Count Using a HITL Step
If you want to preview the result at runtime or see it in Agent or reports, you can optionally use a HITL (Human-In-The-Loop/Manual) step:
- Mark the step as HITL/Manual
- Switch to Tabular view
- In the Comment field, enter:
Steps to Configure:
- Add a new step in your automation after the extraction step.
- Use the Type toggle to mark the step as Manual.

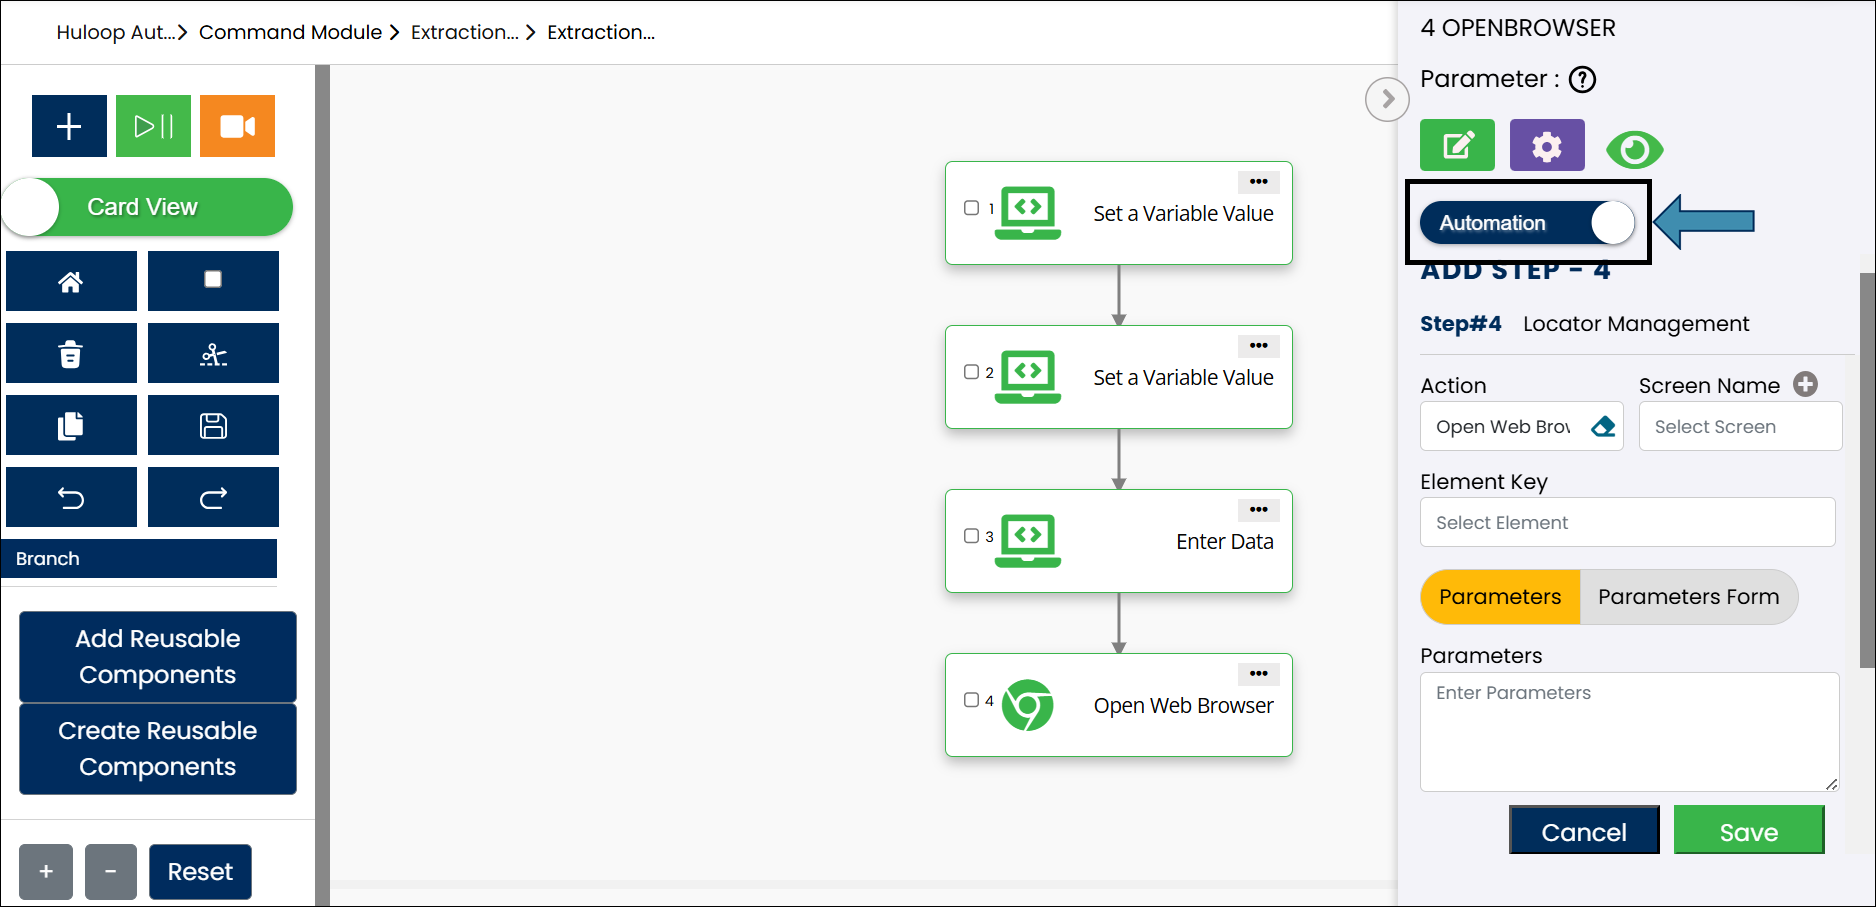
- Switch to Tabular view if not already in. Click the Comment
 icon.
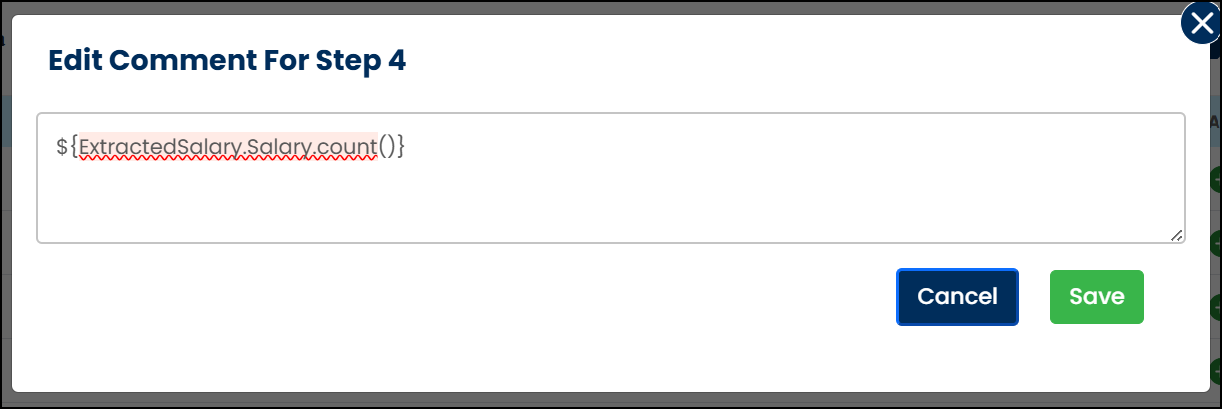
icon. - In the edit comment box, enter the following syntax:
${<VariableName>.<EntityName>.count()}
Where,
- <VariableName> – This is the name of the variable where the extraction result is stored. In the example, it is ExtractedSalary.
- <EntityName> – This is the name of the entity you defined in your Custom PII Group, such as Salary.
- count() – This function counts how many times the specified entity appears in the extracted data.
Example: ${ExtractedSalary.Salary.count()}
Make sure the entity name and variable name (like Salary and ExtractedSalary respectively) exactly match the custom entity defined in your Custom PII Group.

