Workflow Use Case Example: Leave Request Approval
This example demonstrates how to create a simple workflow to handle employee leave requests. The workflow uses conditional logic to route requests based on the number of leave days submitted by the employee.
Scenario:
When an employee submits a leave request:
- If the number of leave days is 5 or more, the request is routed to the Manager for review and approval.
- If the number of leave days is less than 5, the request is routed to the HR Representative.
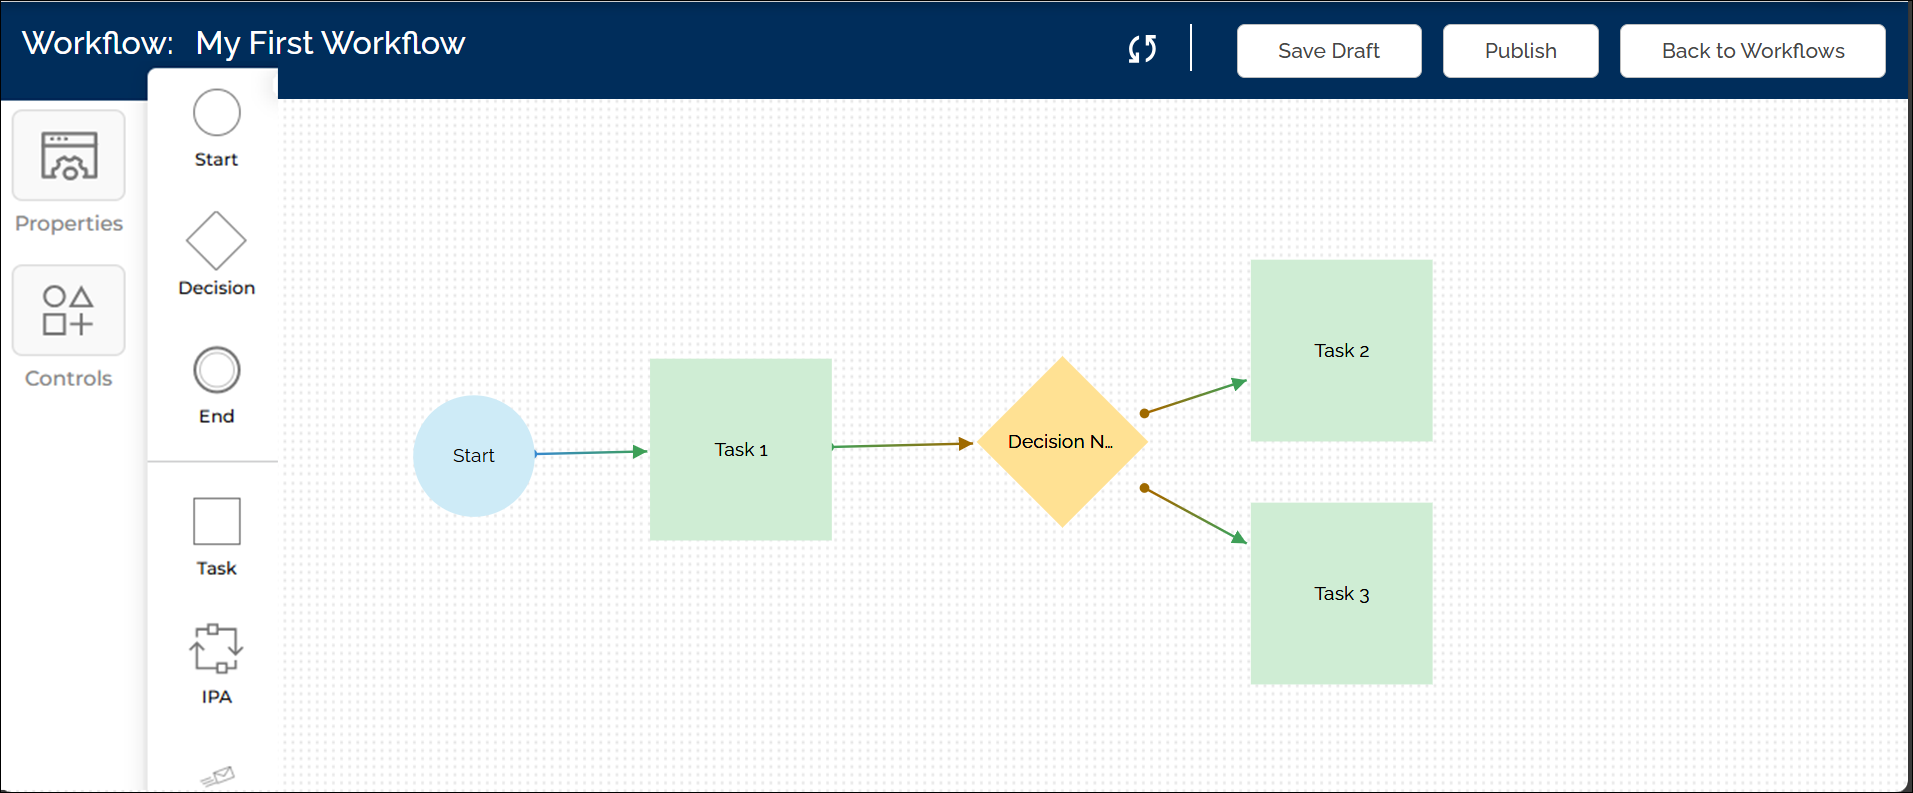
Overview of the Workflow
- Start Node with Start Form: The workflow begins when a user initiates the process by submitting a Start Form with basic details like request ID and name.
- Task 1: The employee (assignee) submits a leave request form with details such as leave dates, reason, and number of leave days.
- Decision Node: The workflow checks the number of requested leave days and routes the request accordingly.
- Task 2: A task is assigned to the HR Representative to approve/reject requests of less than 5 days.
- Task 3: A task is assigned to the Manager to approve/reject requests of 5 or more days.
- End Node – The workflow ends after the final decision is recorded.
Steps to Create the Workflow:
- Create a New Workflow
- Go to the Workflows page and click New Template.
- Enter the workflow name (e.g., Leave Request Approval) and an optional description.
- Set the Trigger Type to Manual.
- Click Continue to proceed.
- Configure the Start Node and Start Form
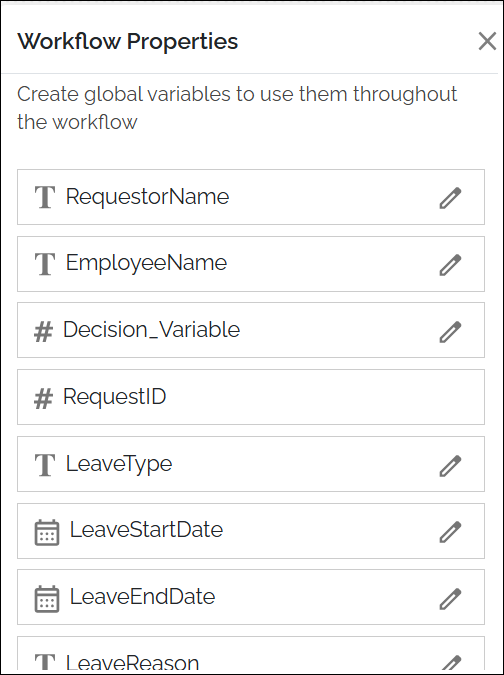
- In the Start Node, define a Unique Identifier Variable, for example: RequestID.
- Click Design a Form to configure the Start Form.
- Add the following fields:
| Field Label | Field Type | Variable Name |
| Requestor Name | Text Input | RequestorName |
- Click Save, then Back to Task, and finally Continue to return to the canvas.
- Add Task 1: Submit Leave Request
- Drag a Task to the canvas.
- Task configuration:
- Name: Submit Leave Request
- Assignee: Select the employee or a relevant group.
- Click Design a Form.
- In the Form Builder:
Add the necessary input fields and define corresponding workflow variables. For example:
| Form Field | Field Type | Variable Name | Variable Type |
| Employee Name | Text | EmployeeName | Text |
| Leave Type | Select | LeaveType | Text |
| Leave Start Date | Date Picker | LeaveStartDate | Date |
| Leave End Date | Date Picker | LeaveEndDate | Date |
| Reason for Leave | Paragraph | LeaveReason | Text |
| Total Leave Days | Number Input | TotalLeaveDays | Number |
| Supporting Documents | File Uploader | SupportingDocs | Text |
- After configuring the fields and mapping them to variables, click Save, then Back to Task.
- Add a Decision Node
- Drag a Decision node onto the canvas and connect it to the leave request task (Task 1).
- Double-click the Decision node to configure:
- Name: Leave Approval Decision
- Description (optional): Routes request based on number of leave days.
- Decision Variable: Select TotalLeaveDays from the dropdown.
- Click Continue.
- Add Task 2: HR Approval
- Drag a third Task element to the canvas.
- Configure:
- Name: HR Approval
- Assignee: HR Representative or HR Group
- Click Design a Form and add:
| Field Label | Field Type | Variable Name |
| Approval Status | Checkbox | HRApprovalStatus |
| HR Comments | Text Input | HRComments |
- Save the form and return to the canvas.
- Connect this task to the Decision node.
- Double-click the Decision node to set the Routing Condition:
- Condition: TotalLeaveDays less than 5
- Click Continue.
- Add Task 3: Manager Approval
- Drag another Task element to the canvas.
- Configure:
- Name: Manager Approval
- Assignee: Manager or Manager Group
- Click Design a Form and add:
| Field Label | Field Type | Variable Name |
| Approval Status | Checkbox | ManagerApprovalStatus |
| Manager Comments | Text Input | ManagerComments |
- Save the form and return to the canvas.
- Connect this task to the Decision node.
- Double-click the Decision node to set the Routing Condition:
- Condition: TotalLeaveDays greater than or equal to 5
- Click Continue.
- Add the End Node
- Drag an End Node onto the canvas.
- Connect both Task 2 (HR Approval) and Task 3 (Manager Approval) to this node.
Final Workflow:
The final workflow starts with a Start Form, collects leave request data, and routes approval to either HR or Manager based on the number of leave days. Once the assigned task is completed, the workflow ends.
All variables defined during task configuration are available under the Variables tab in the Workflow Properties pane.